🏠 1. Your First Kitchen
With FoodyBank you can manage multiple kitchens simultaneously: your home, office, vacation house, etc. Each kitchen can be shared with other people!
In FoodyBank, a "kitchen" is a flexible container to organize your products as you prefer. It doesn't have to be an actual kitchen! You can create containers for different locations (Home, Office), specific spaces (Fridge, Pantry, Freezer) or product categories (Cleaning supplies, Medicines).
🆕 1.1 Create a new kitchen
Start by creating your first container. Give it a name that helps you identify what it contains: "Home Fridge", "Pantry", "Bathroom Supplies", "Office", etc.
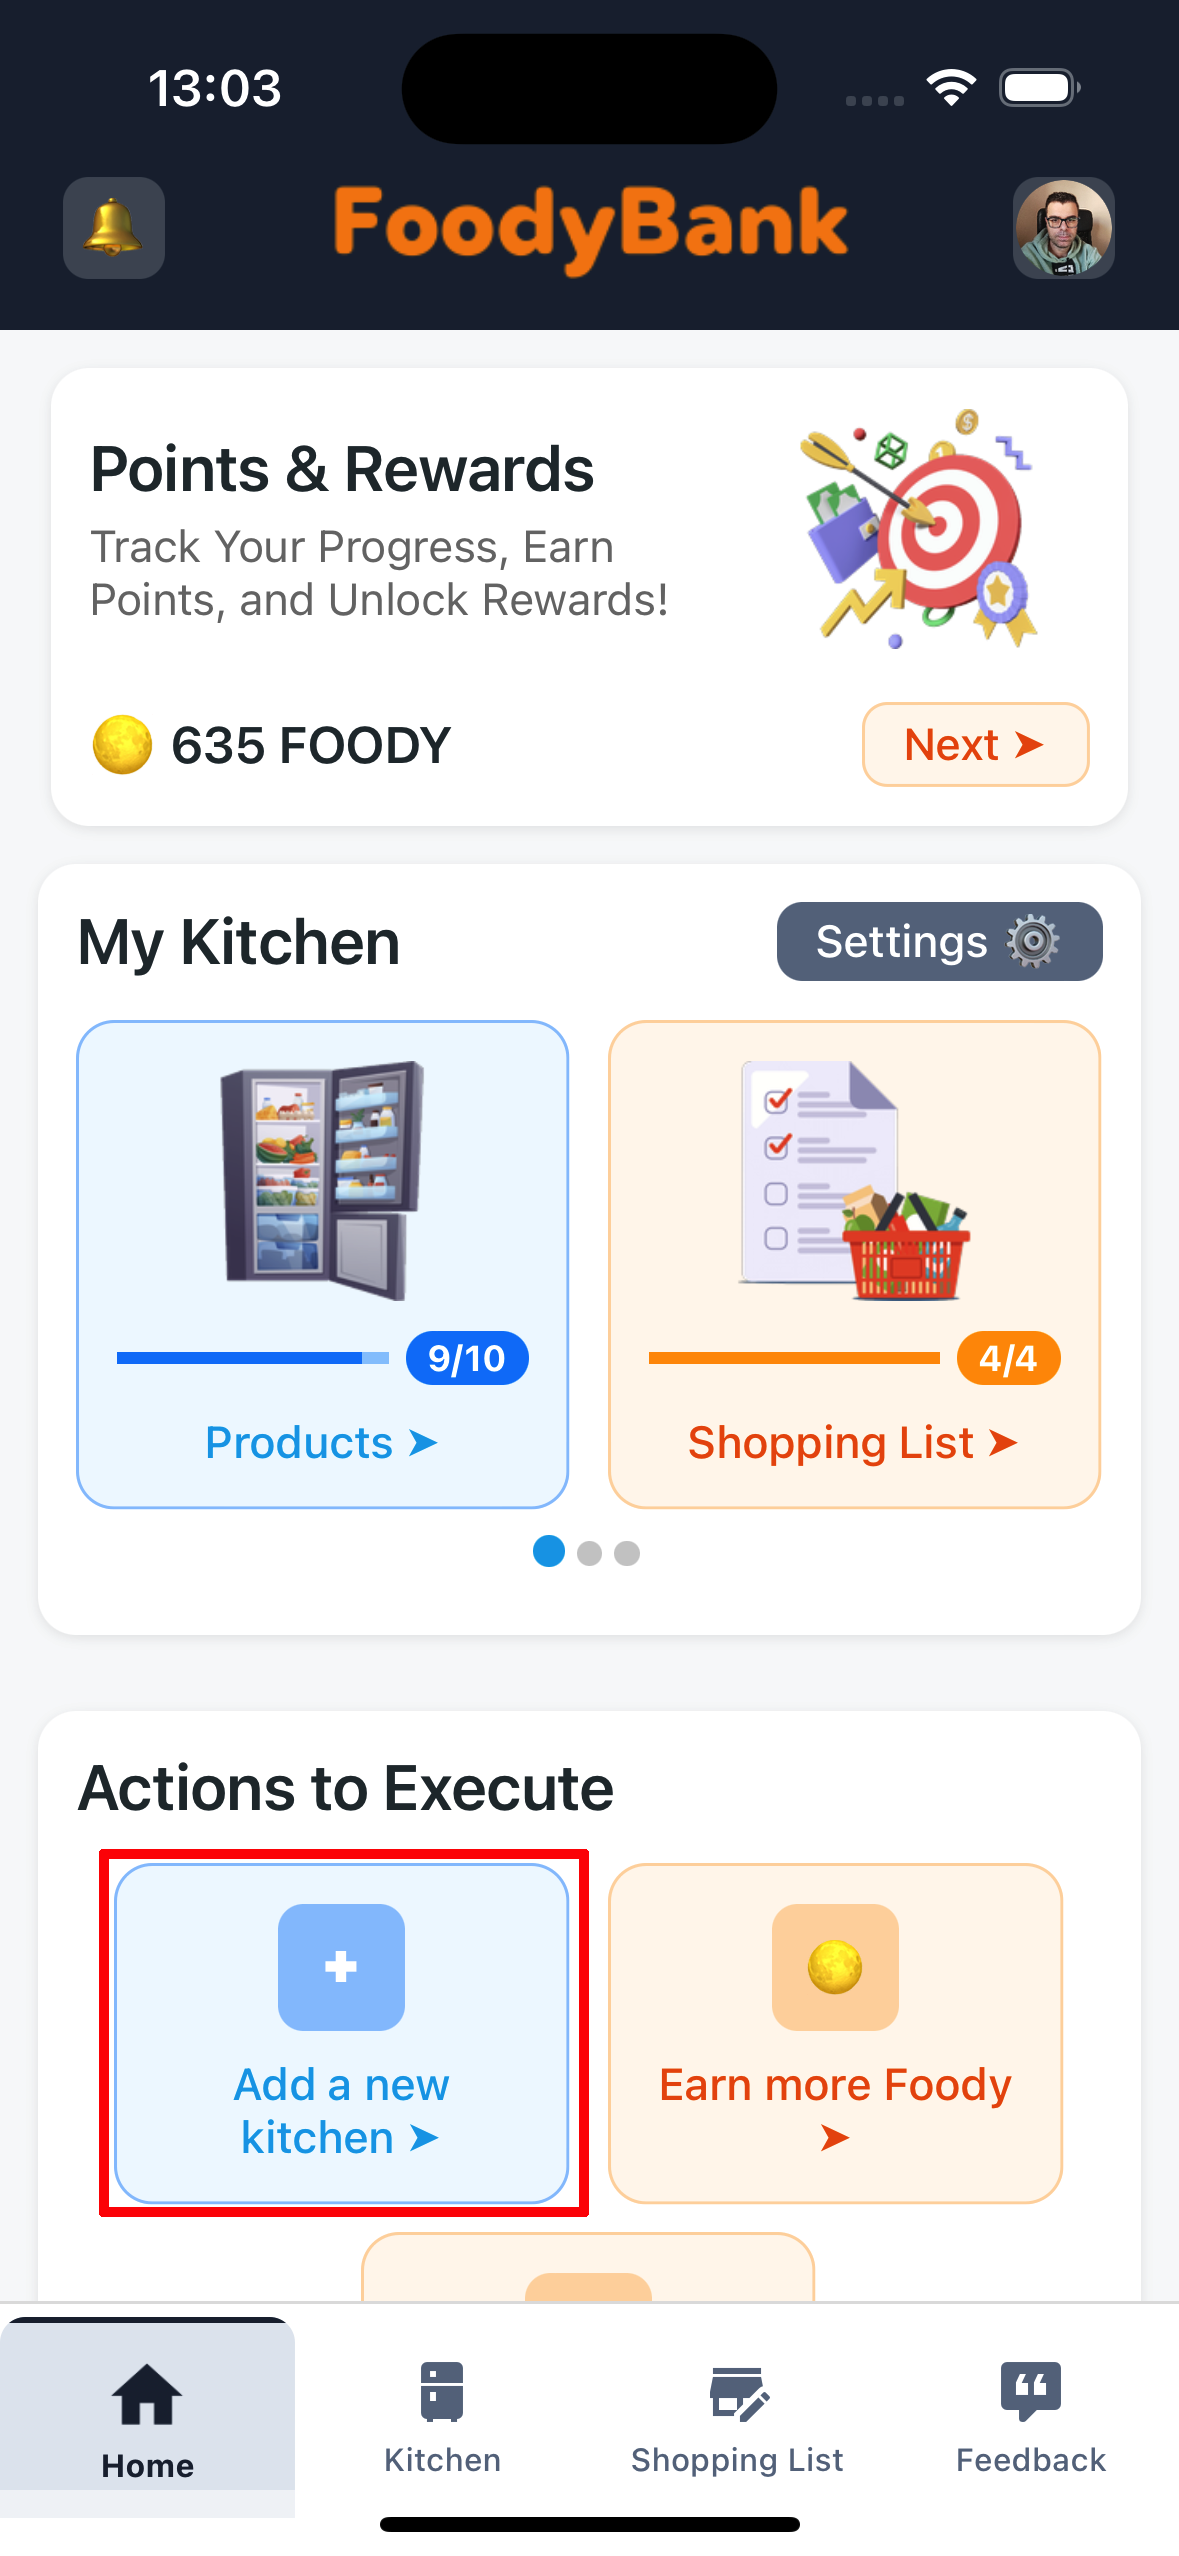
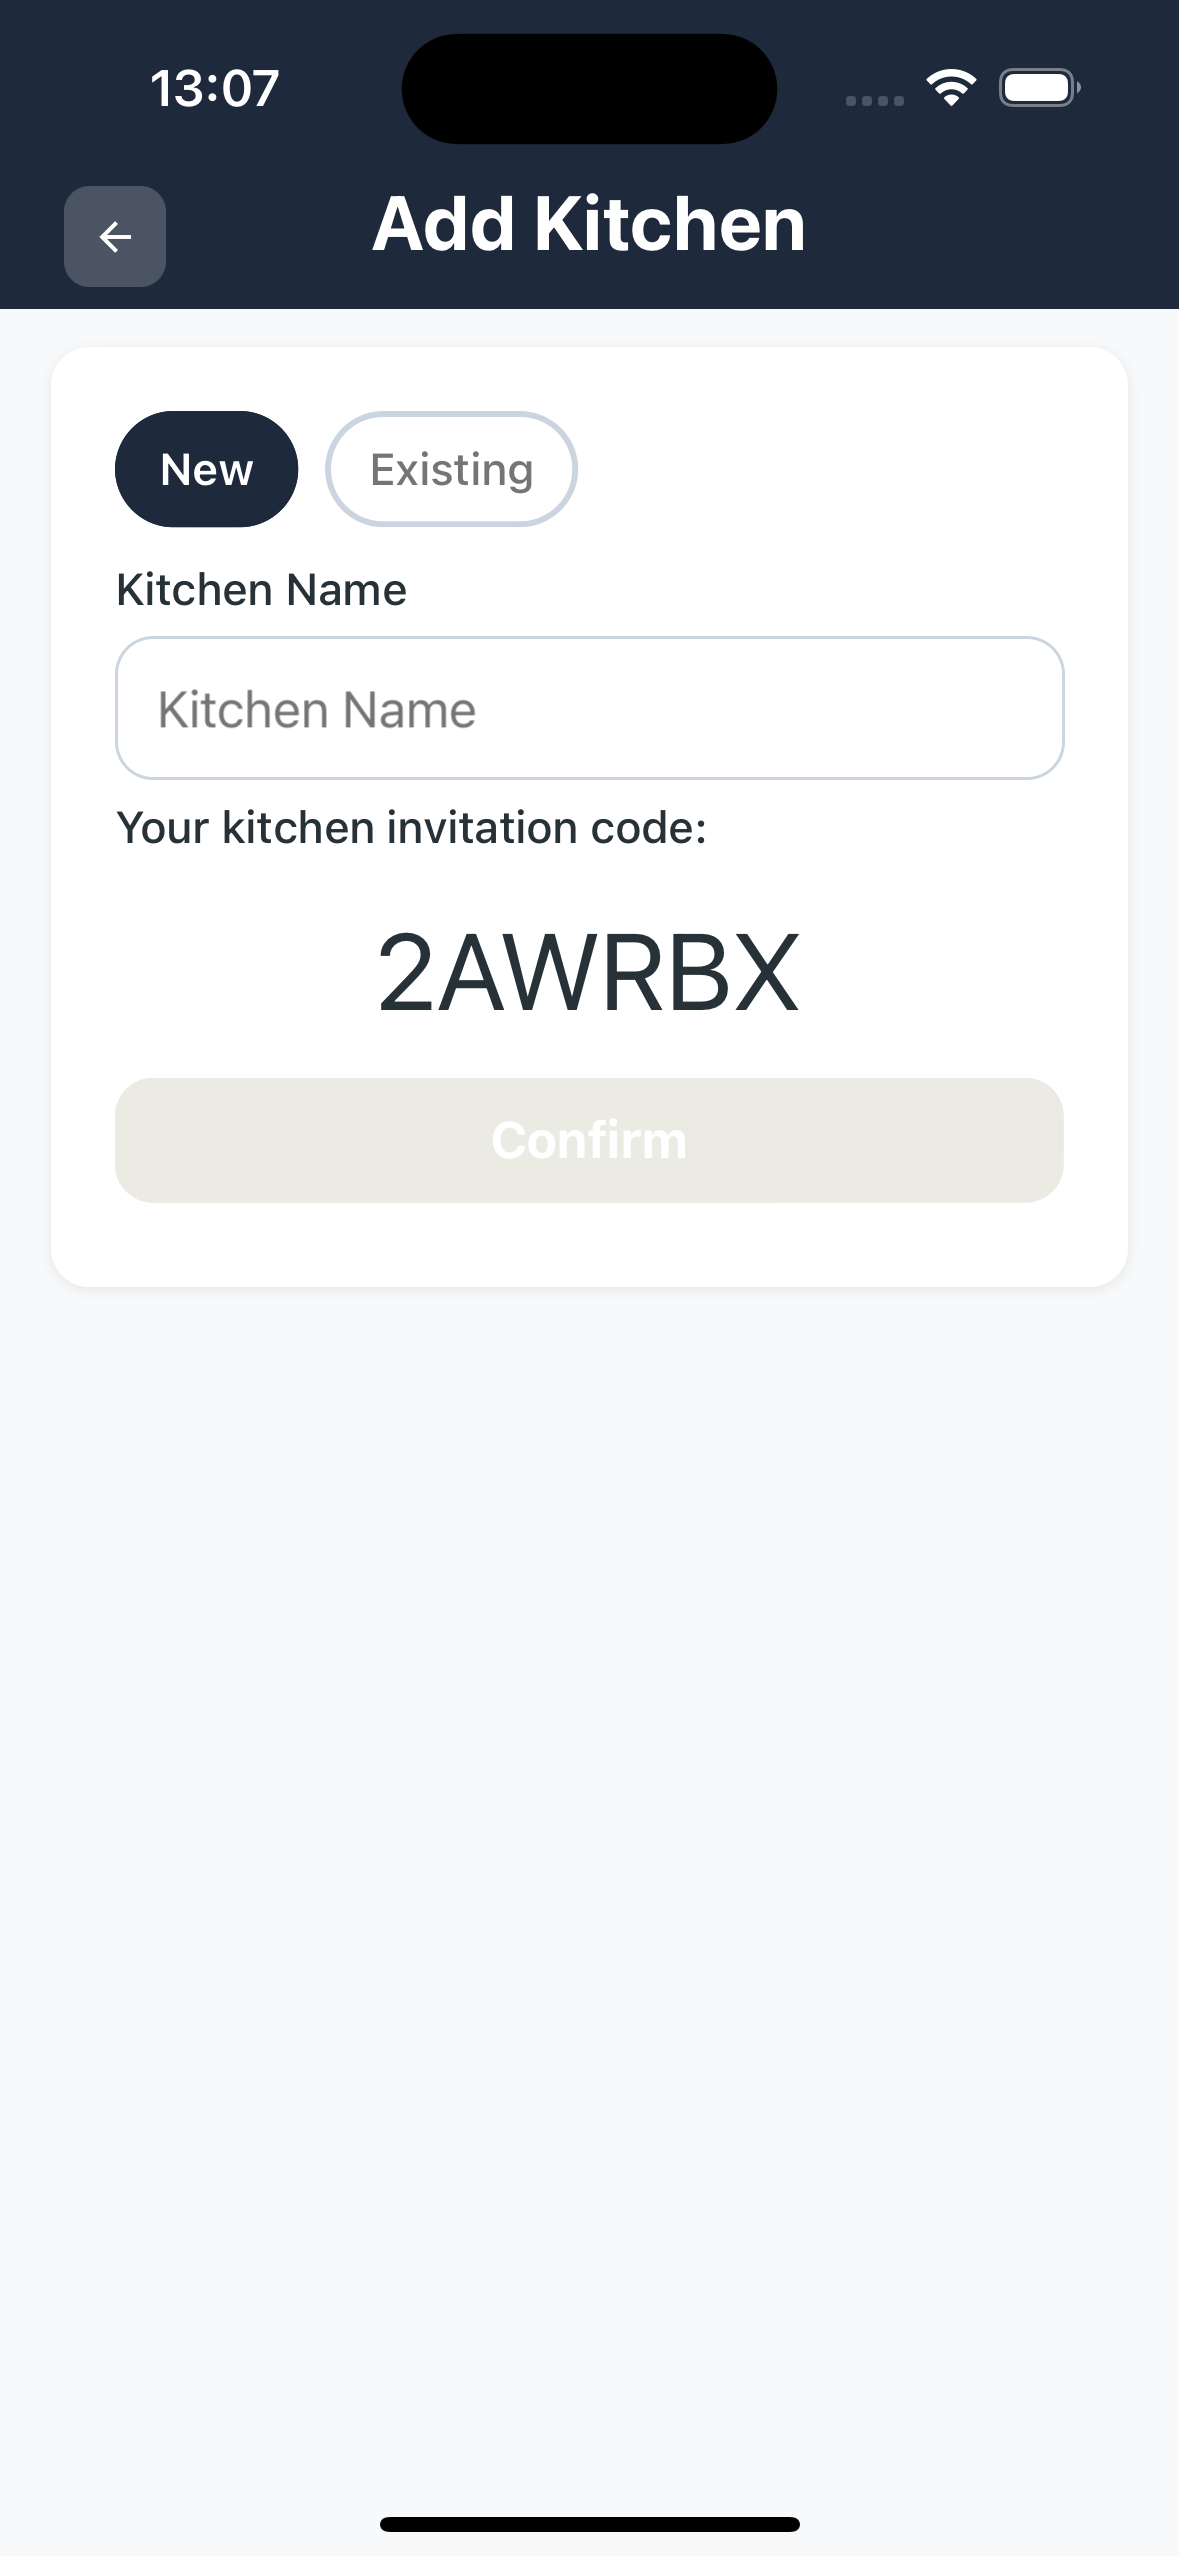
Steps:
- From Home, click on "Add a new kitchen"
- In the screen that opens, select the "New" button at the top
- Enter the container name in the "Kitchen Name" field
- You'll see an automatically generated invitation code (you can share it later)
- Press "Confirm"
- Your container is ready!
🔗 1.2 Share your kitchen (only if you're the owner)
If you created the kitchen, you can share it with family, roommates or colleagues. Anyone who enters the invitation code will have immediate access and can add or remove products.
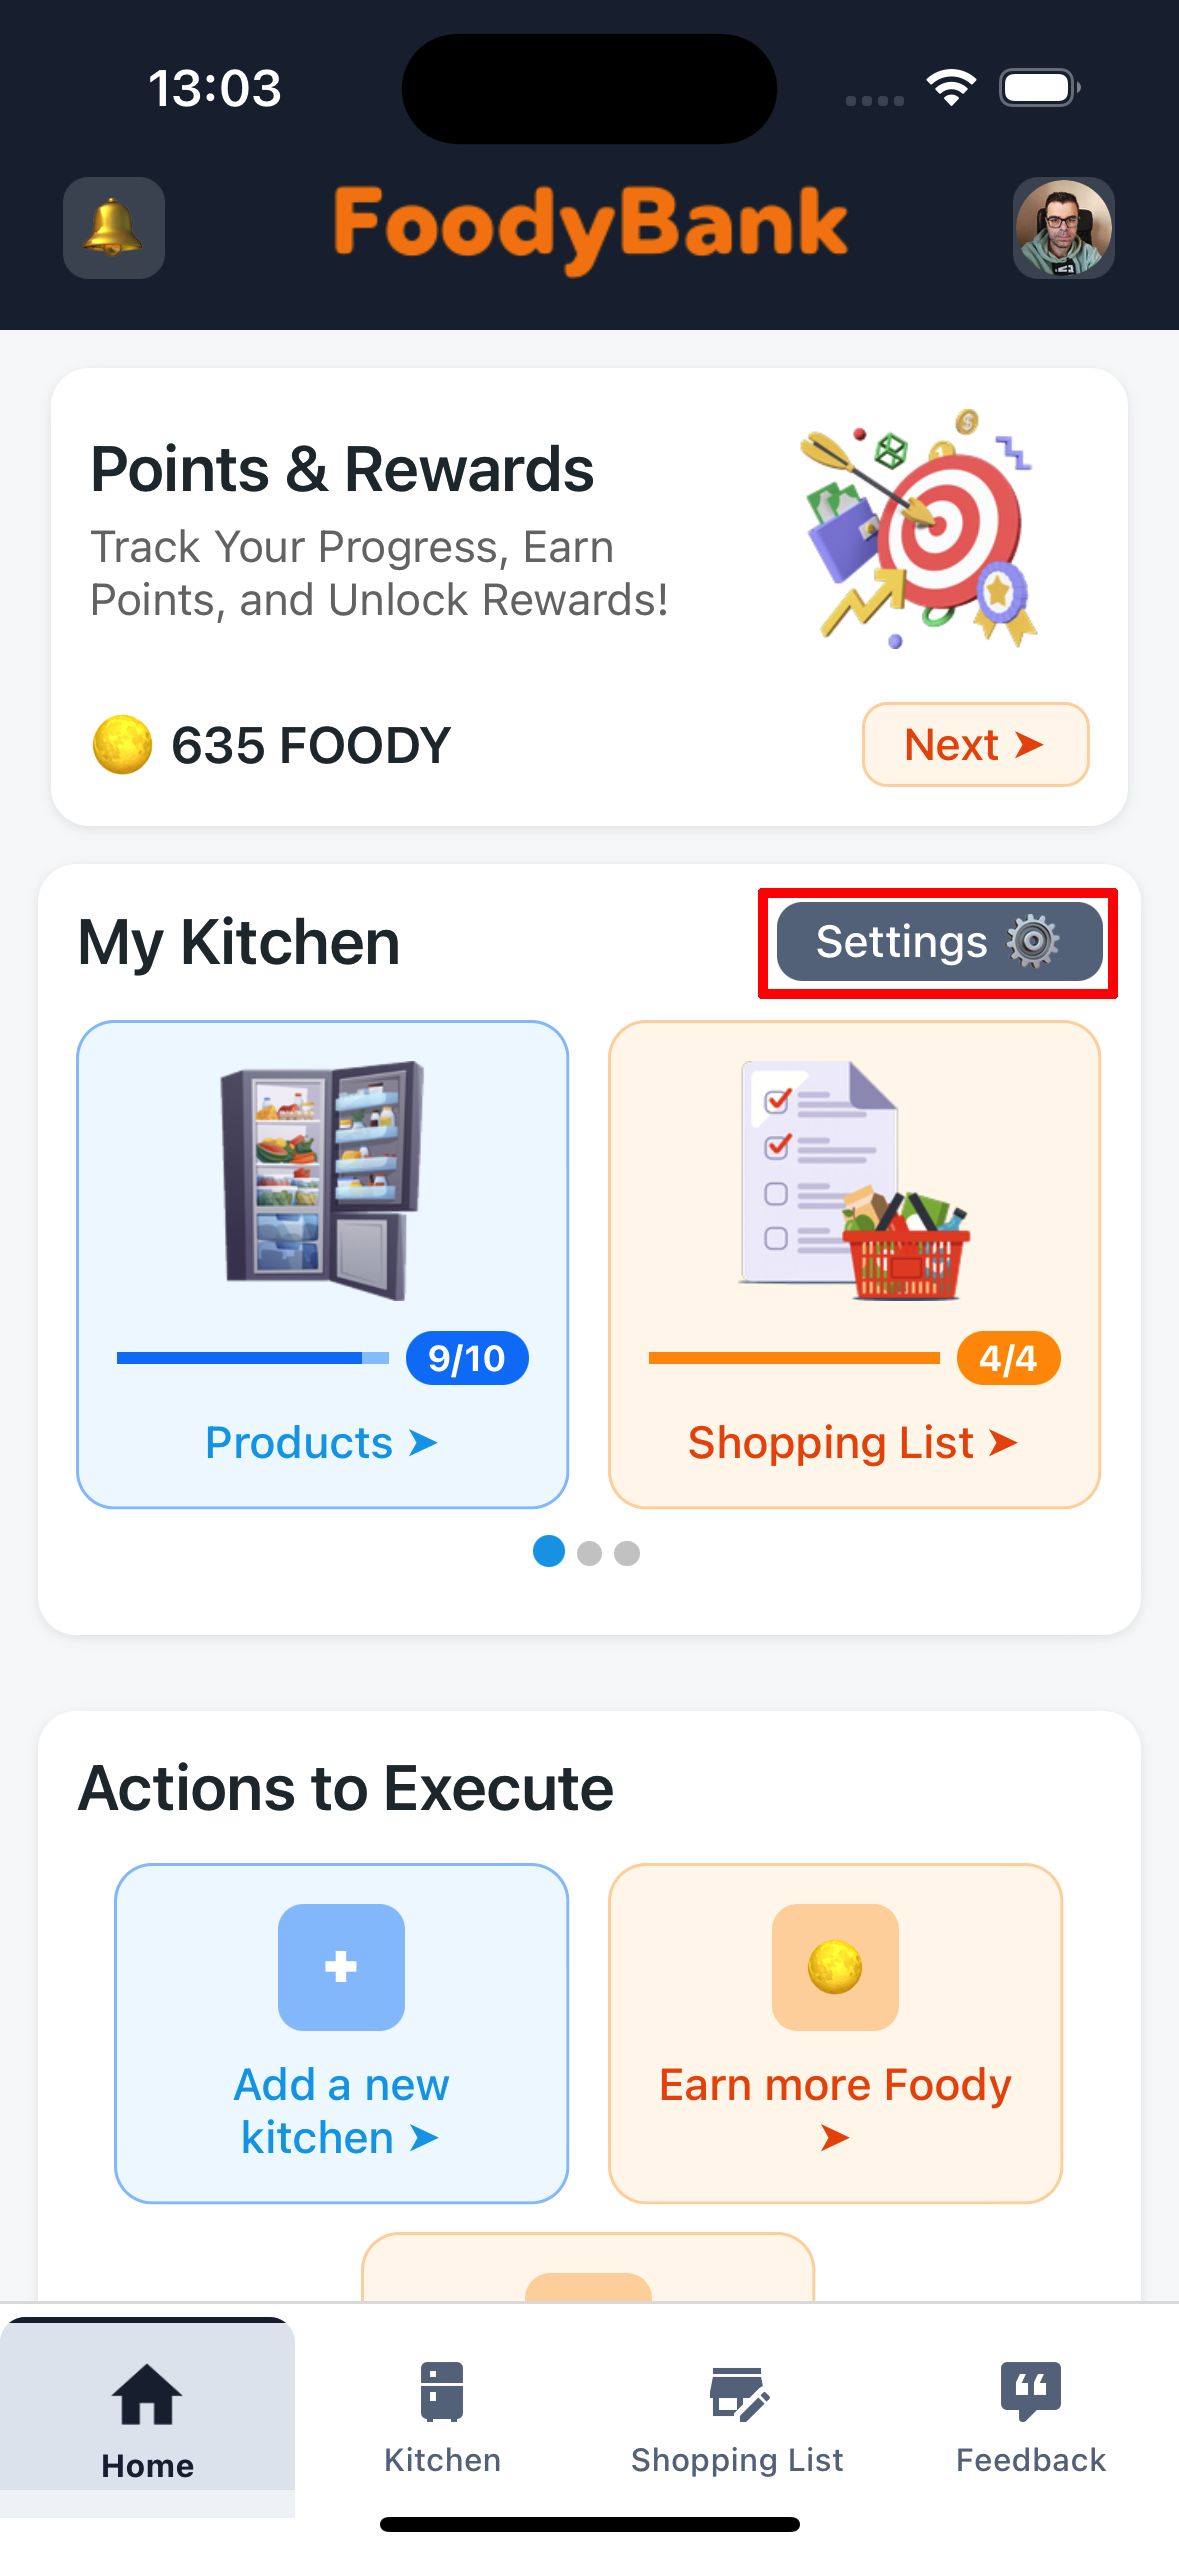
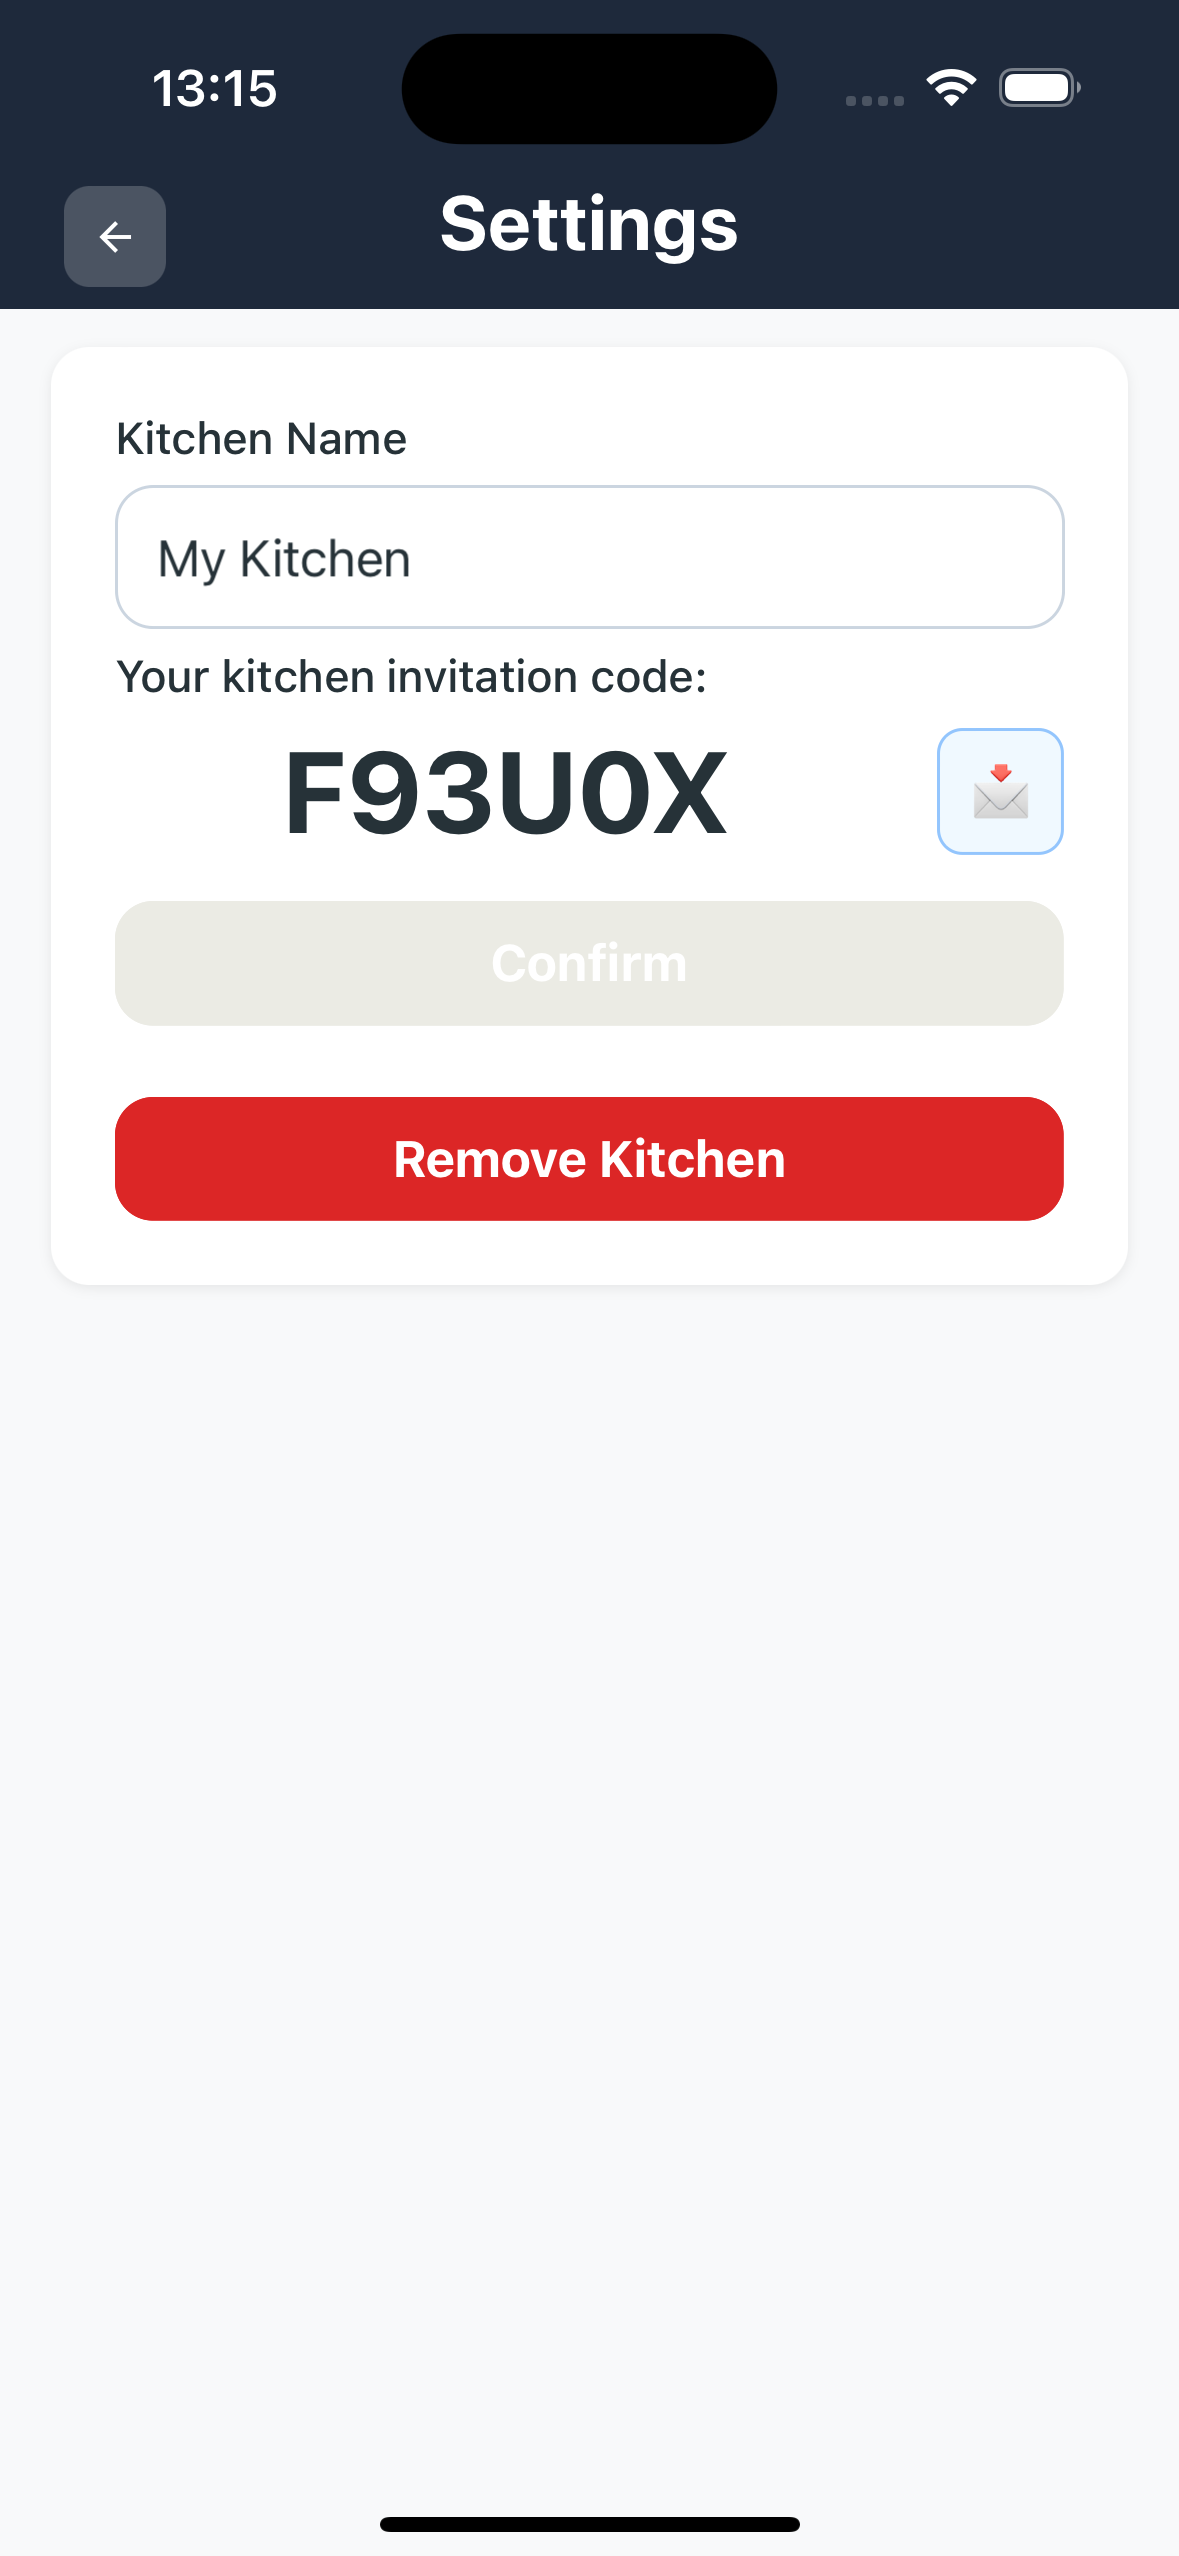
Steps:
- From Home, scroll through your kitchen list
- Find the kitchen you want to share
- Press the "Settings" button (⚙️) for that kitchen
- In the "Edit Kitchen" screen you'll find the invitation code
- Press the 📩 share button to send it via WhatsApp, SMS or email
- Whoever receives the code can join immediately!
👥 1.3 Join an existing kitchen
Has someone invited you to join their container? Enter the code you received to access immediately and see all products in real-time.
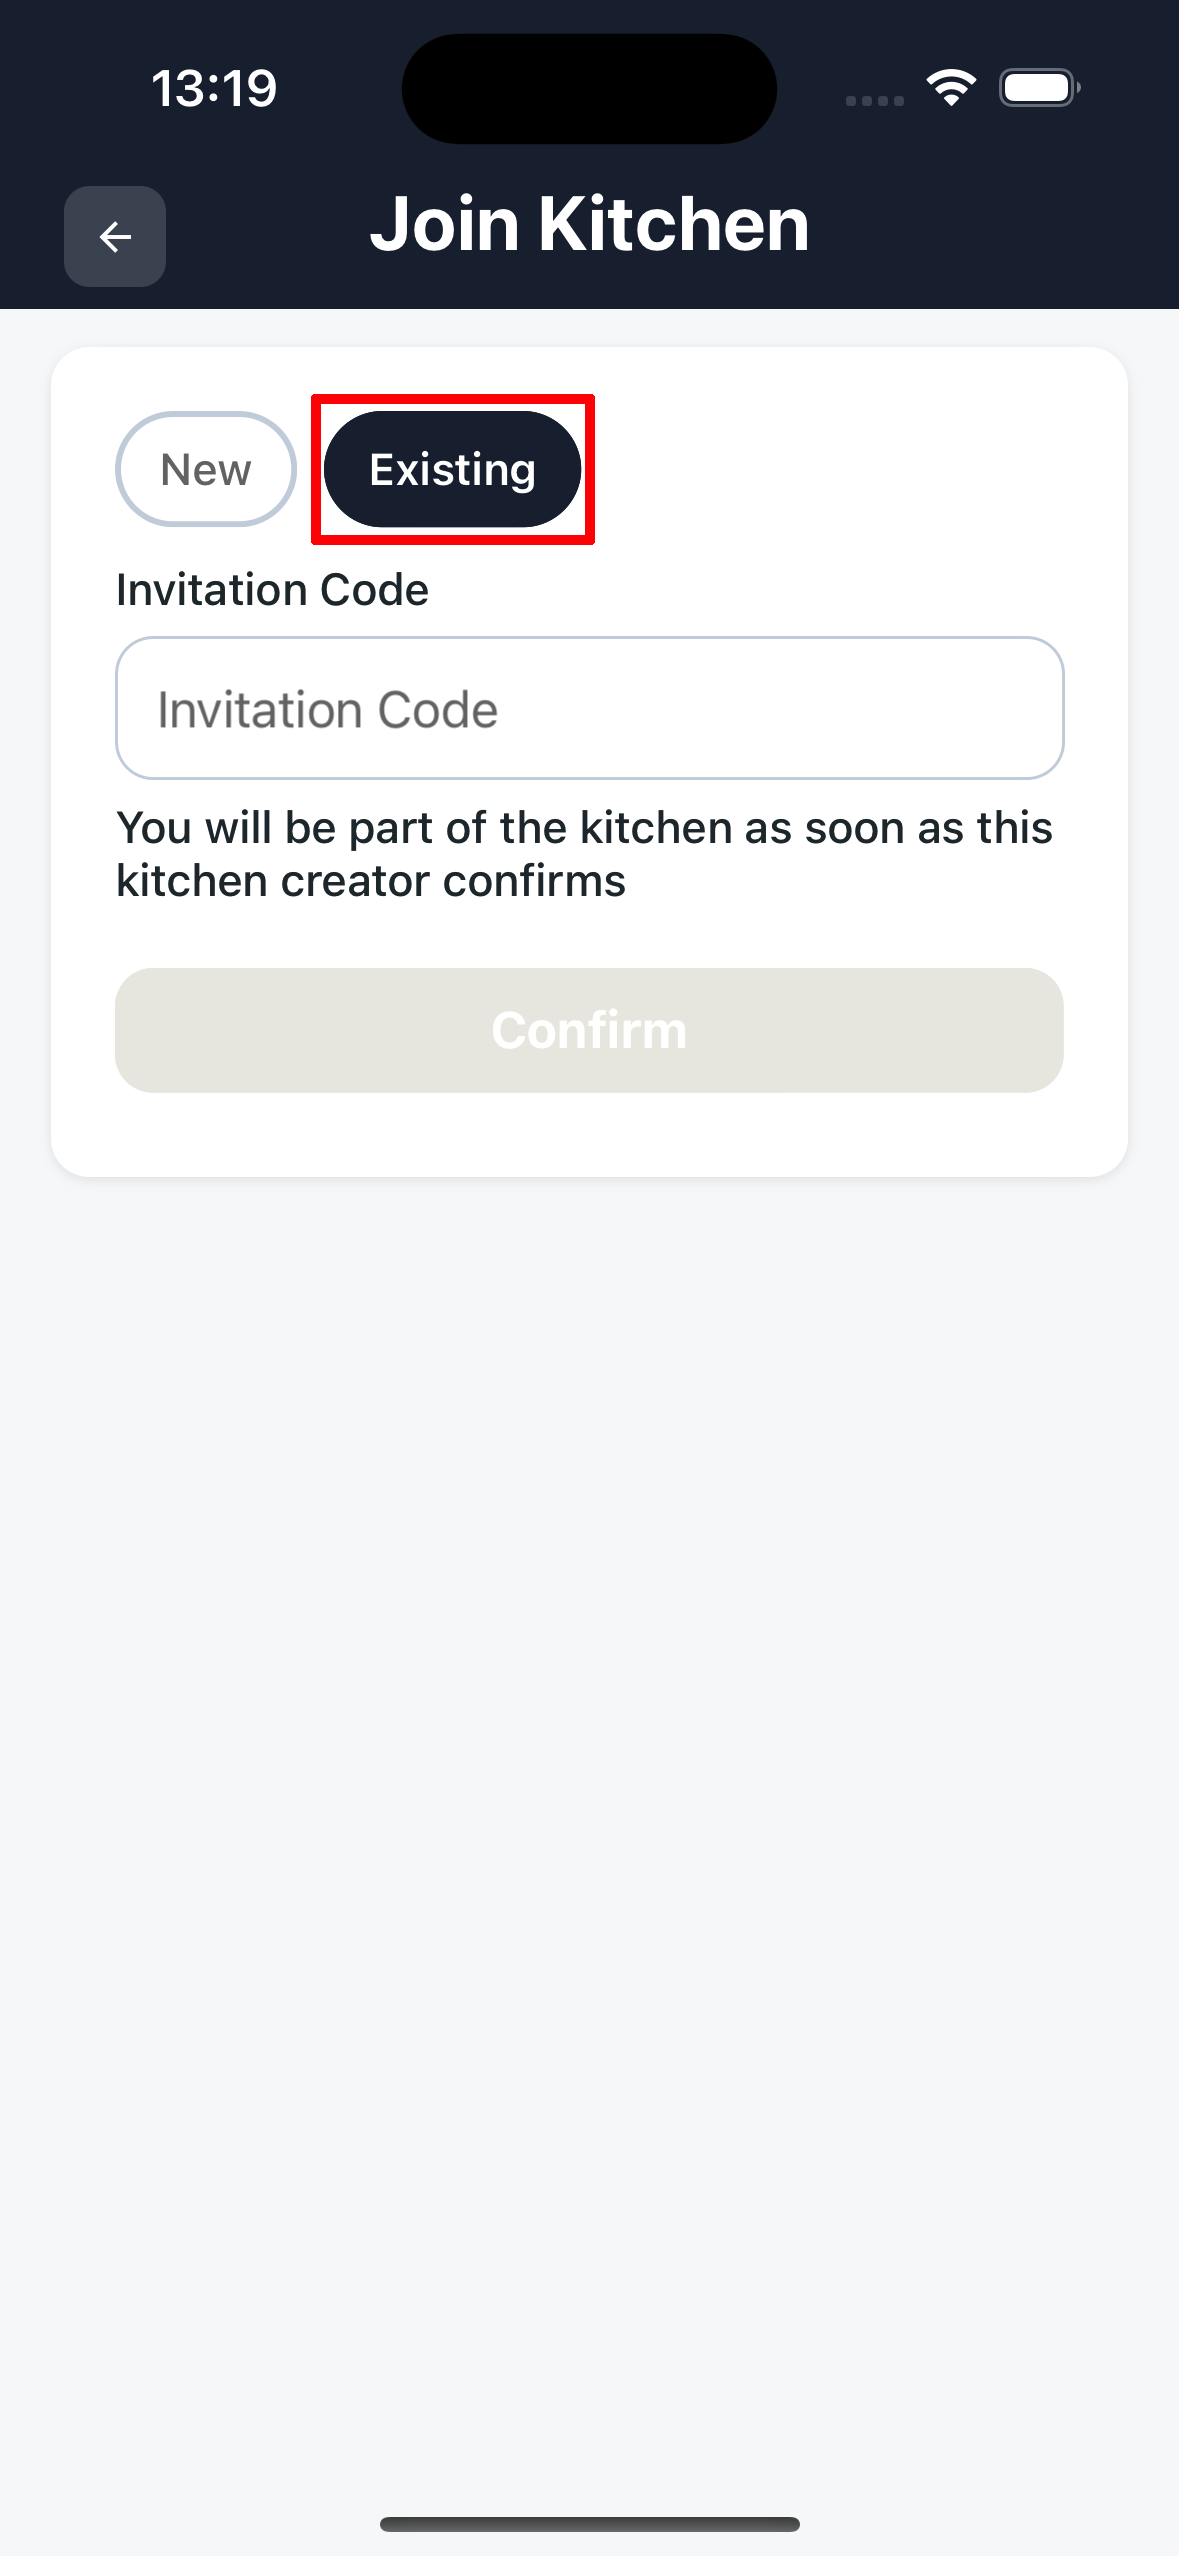
Steps:
- From Home, click on "Add a new kitchen"
- In the screen that opens, select the "Existing" button at the top
- Enter the invitation code you received in the field
- Press "Confirm"
- Immediate access! Now you can see all products in the shared container
🚪 1.4 Leave a shared kitchen
If you're part of a kitchen created by someone else and want to leave it, you can do so at any time. You won't lose your data, you simply won't see that kitchen's products anymore.
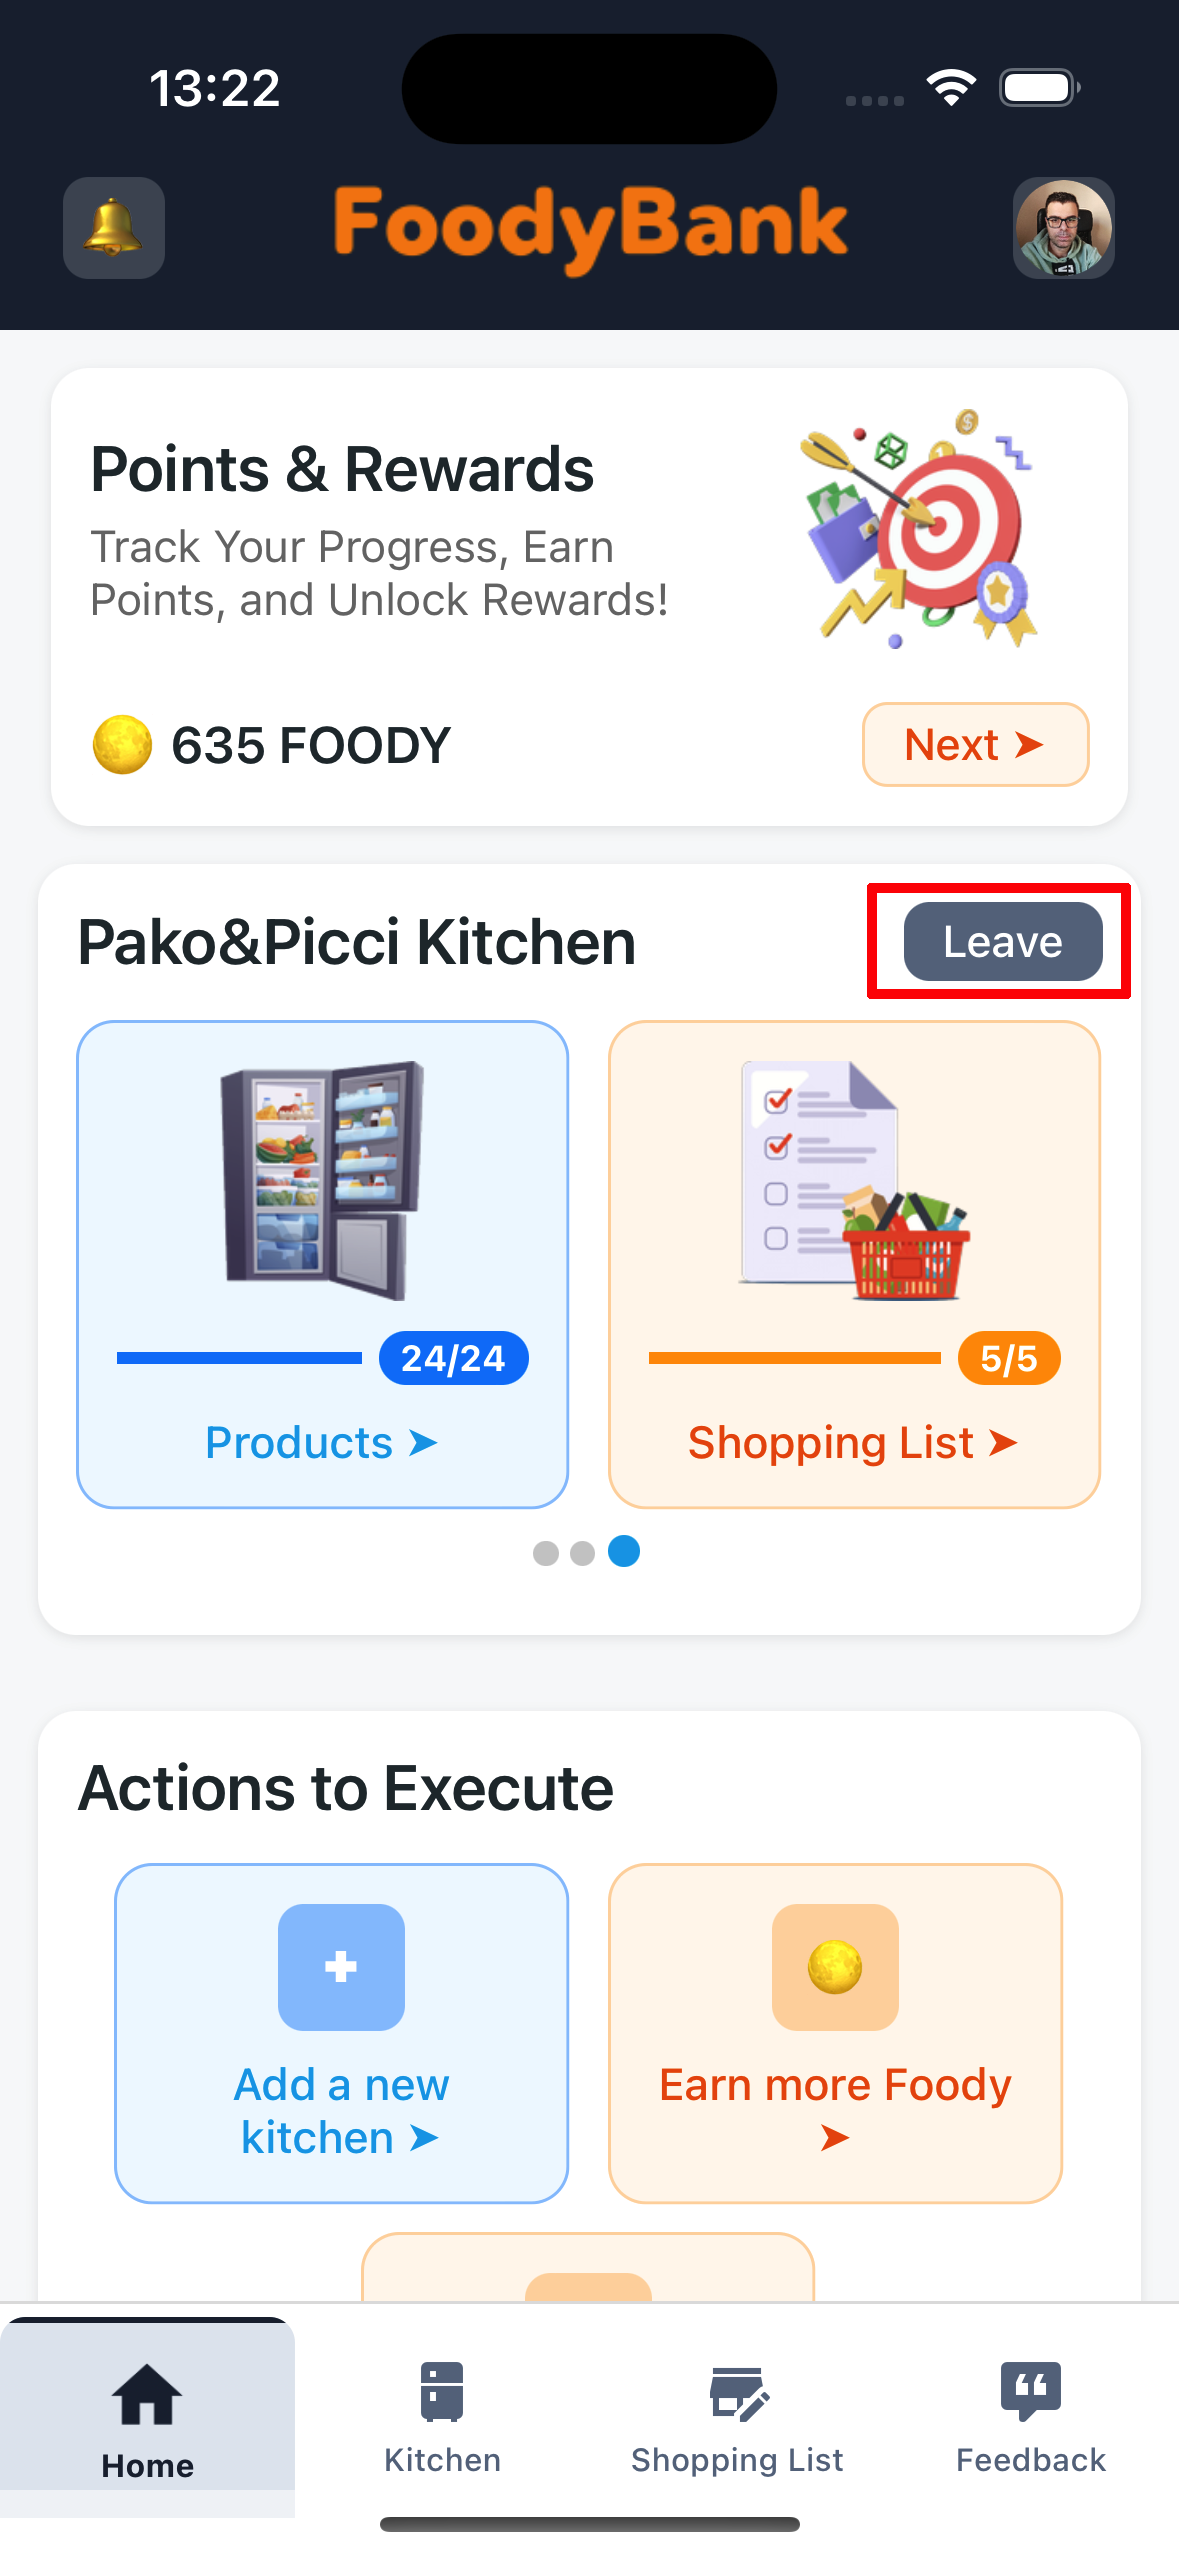
Steps:
- From Home, scroll through your kitchen list
- Find the shared kitchen you want to leave
- Press the "Leave kitchen" button
- Confirm the operation
- You're no longer part of that kitchen
If you're the kitchen owner, you'll see "Settings" instead of "Leave kitchen". To completely delete a kitchen you own, go to "Settings" → "Delete kitchen".
📦 2. Add Products
FoodyBank offers 4 different ways to add products to your kitchen or shopping list. Choose the one you prefer based on the situation: quick manual entry, barcode scanning, voice input or receipt photo!
✏️ 2.1 Manual Entry (quick and direct)
The quickest way to add a single product: type the name and it's added immediately. Perfect when you want to quickly enter an item without details.
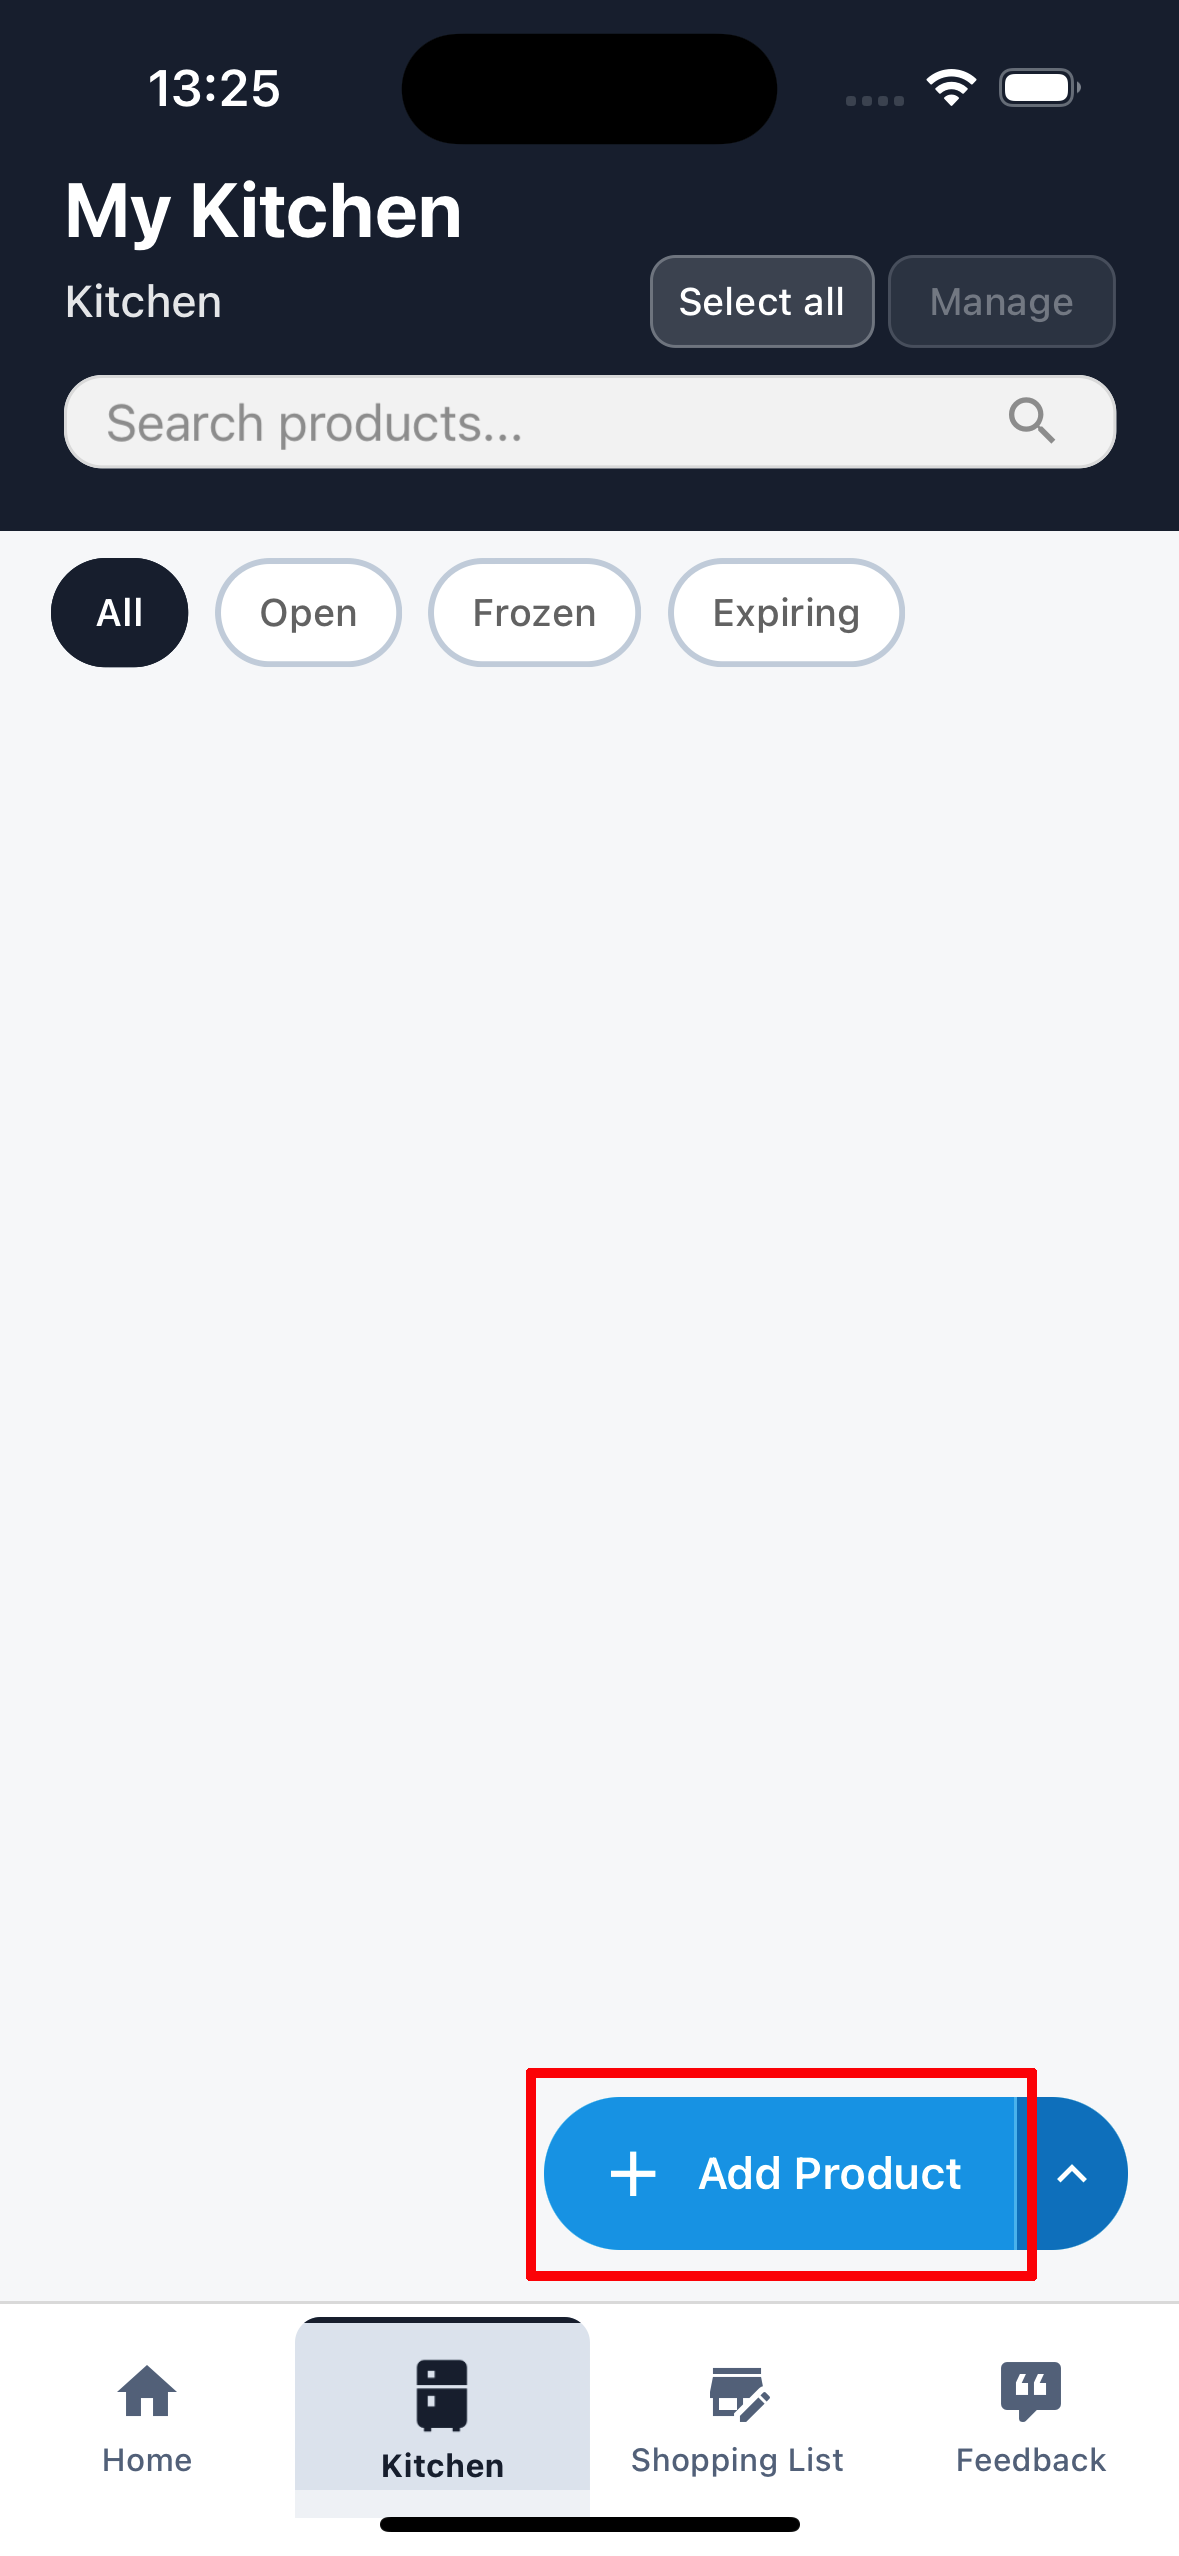
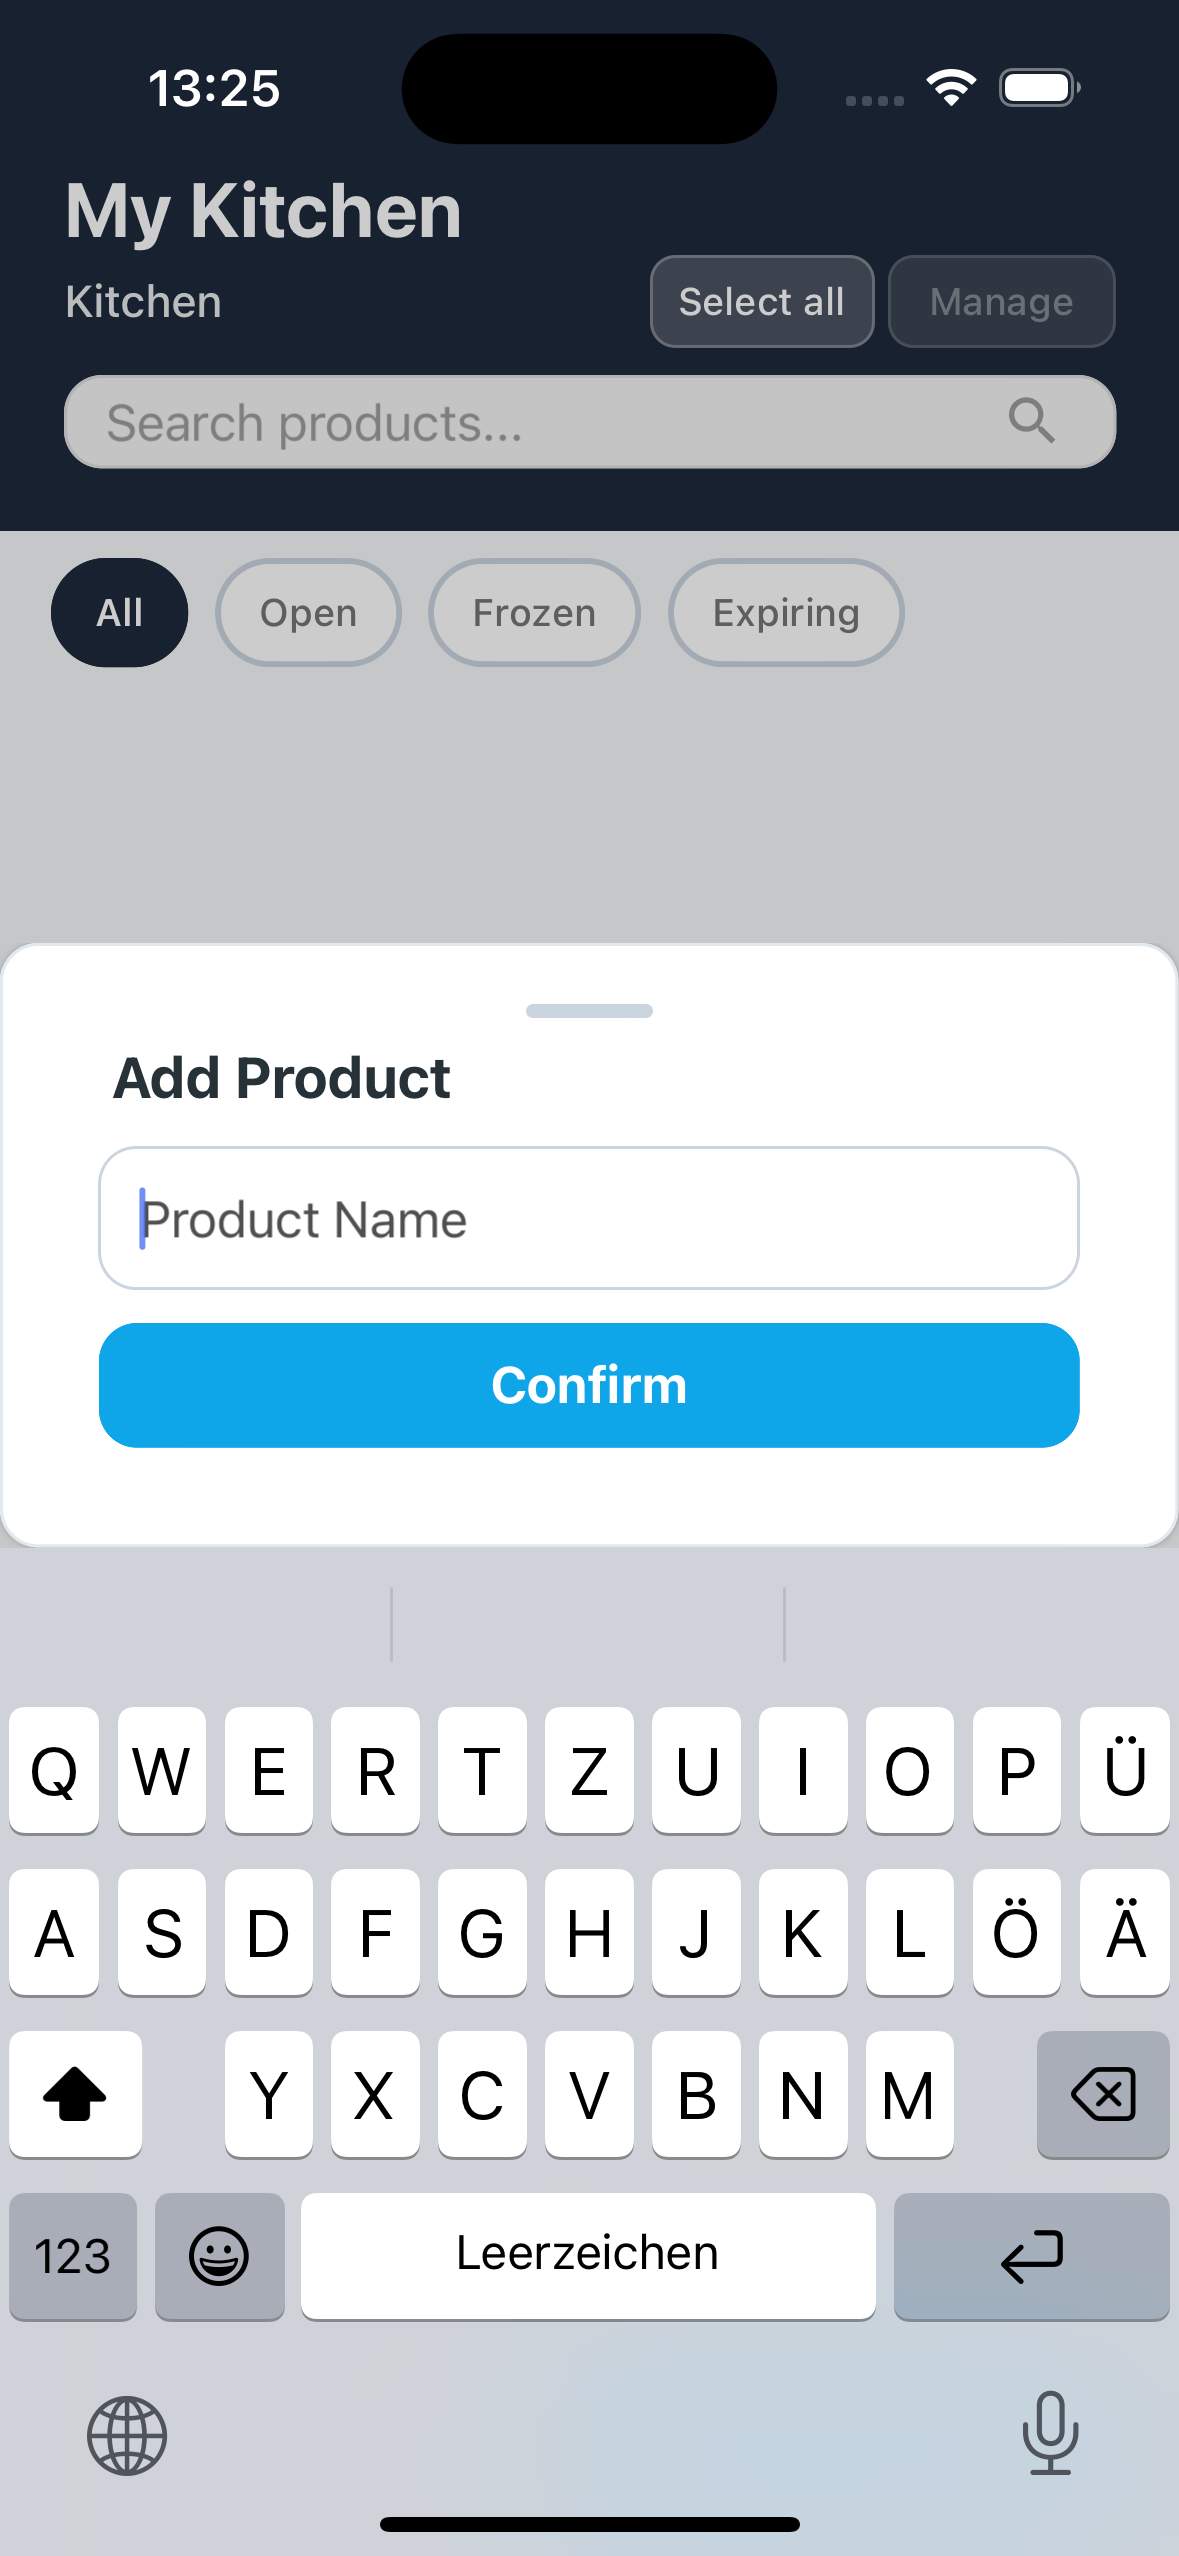
Steps:
- From the Kitchen or Shopping List screen, look for the "Add Product" button at the bottom
- Press directly on the main button (the big one with +)
- A text field will open
- Type the product name (e.g. "Milk", "Pasta", "Tomatoes")
- Press "Confirm"
- The product has been added immediately! You can edit it later
This is the only method that adds the product directly. All other methods will take you to the product management screen (see section 2.5).
📷 2.2 Barcode Scanning
Scan the product's barcode to automatically get name, brand and image. The most accurate way to catalog your products!
Steps:
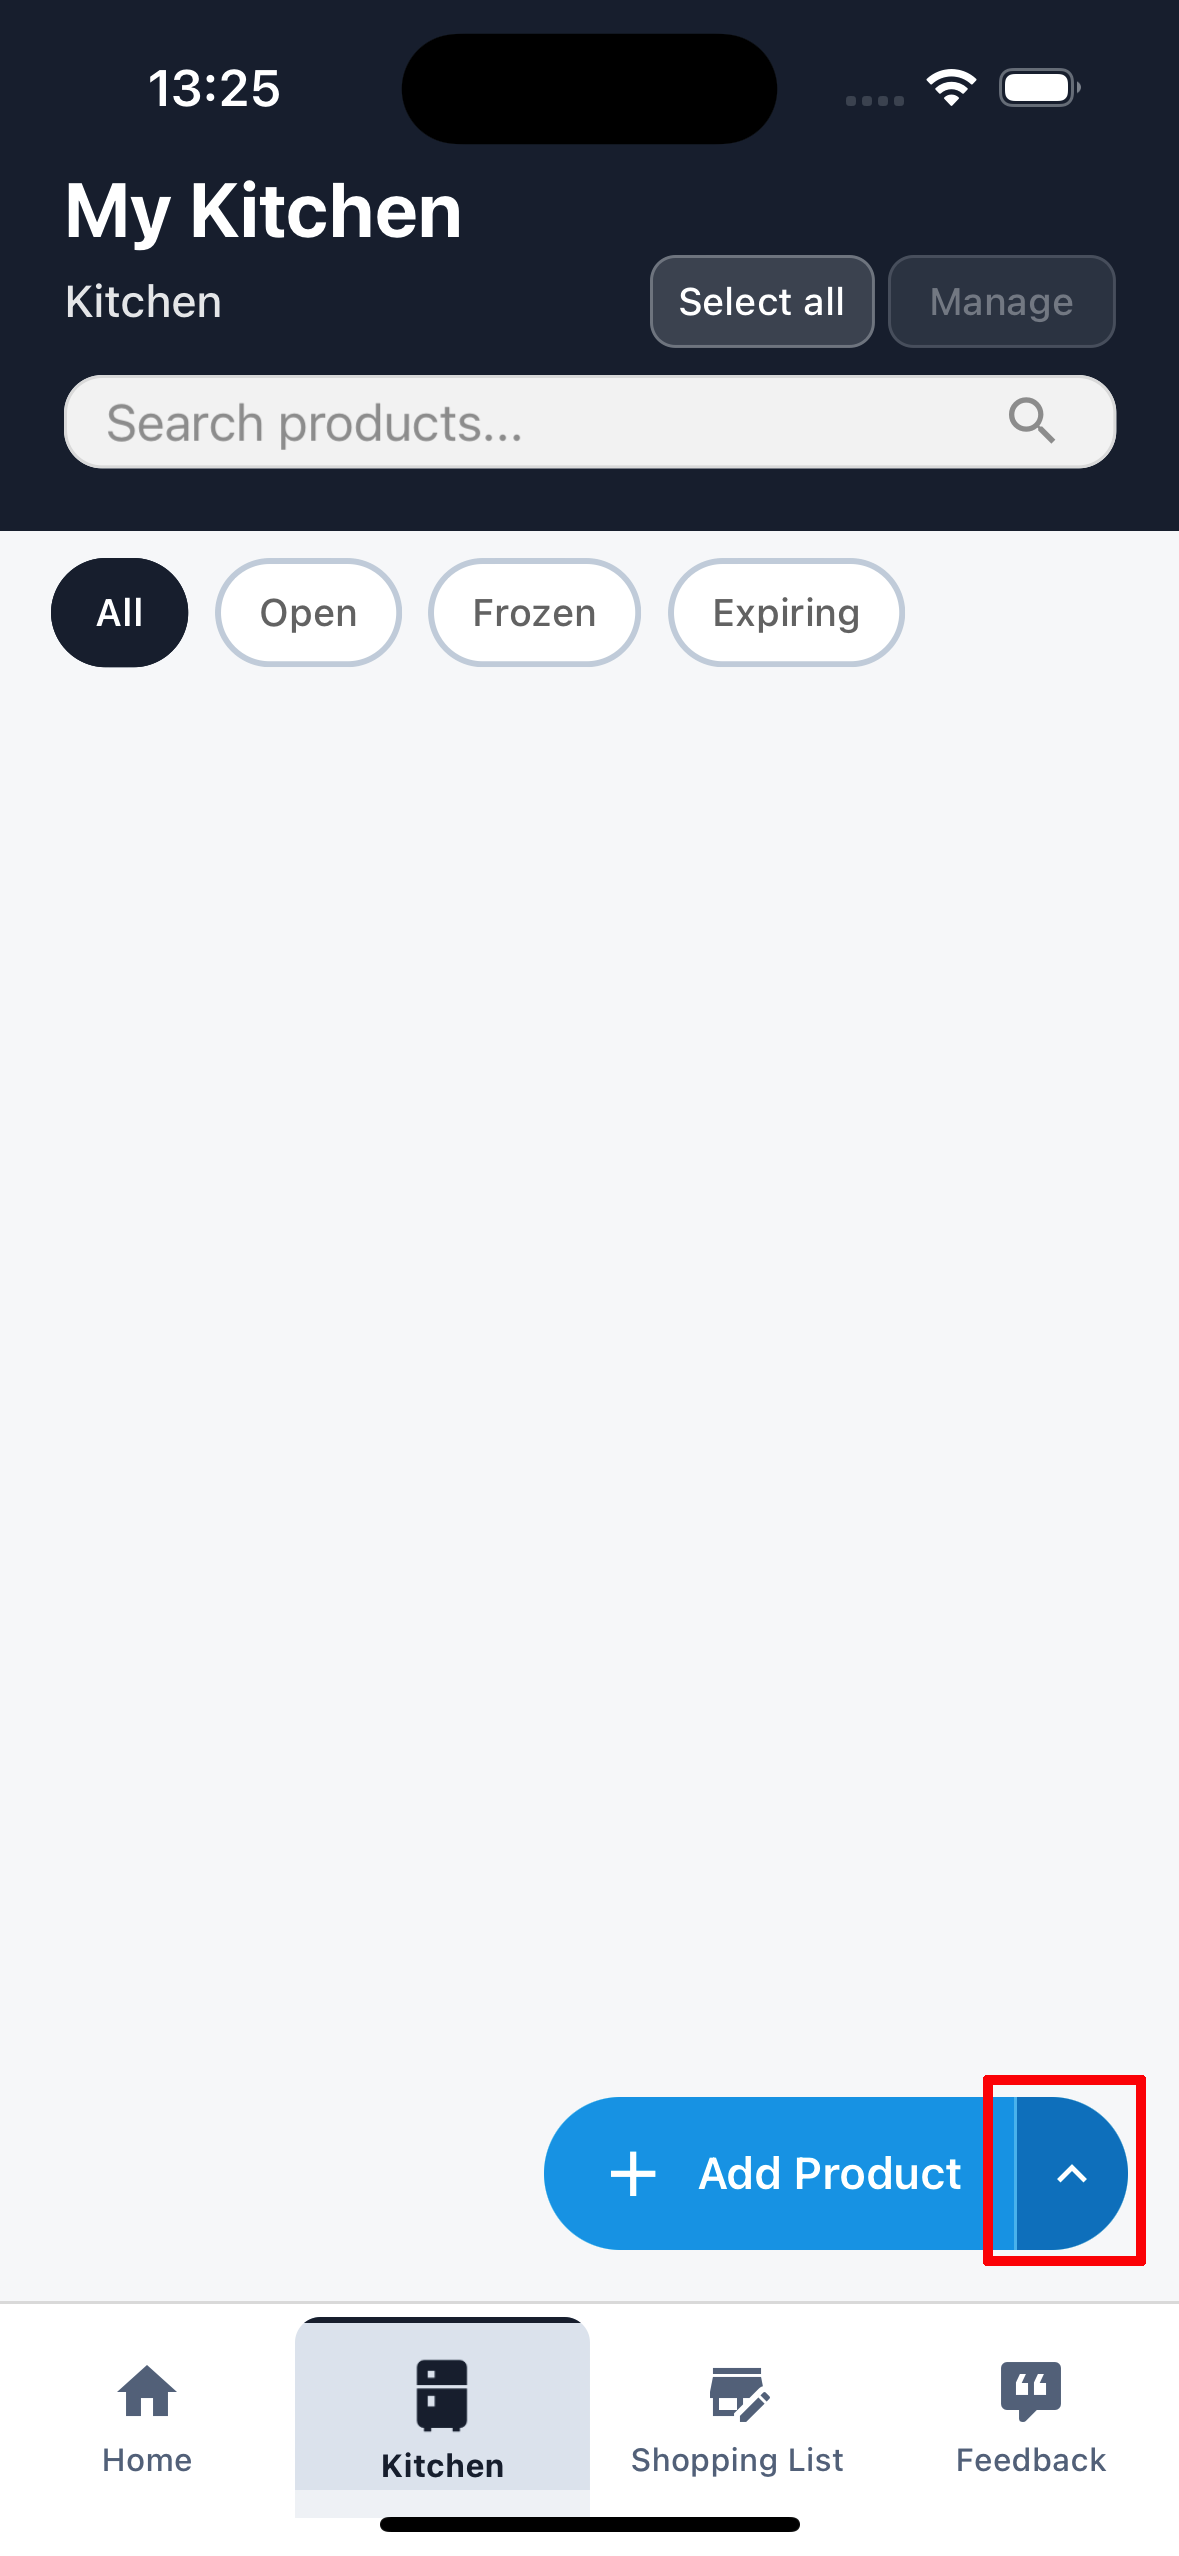
- From the Kitchen or Shopping List screen, look for the "Add Product" button at the bottom
- Press the up arrow (^) next to the button
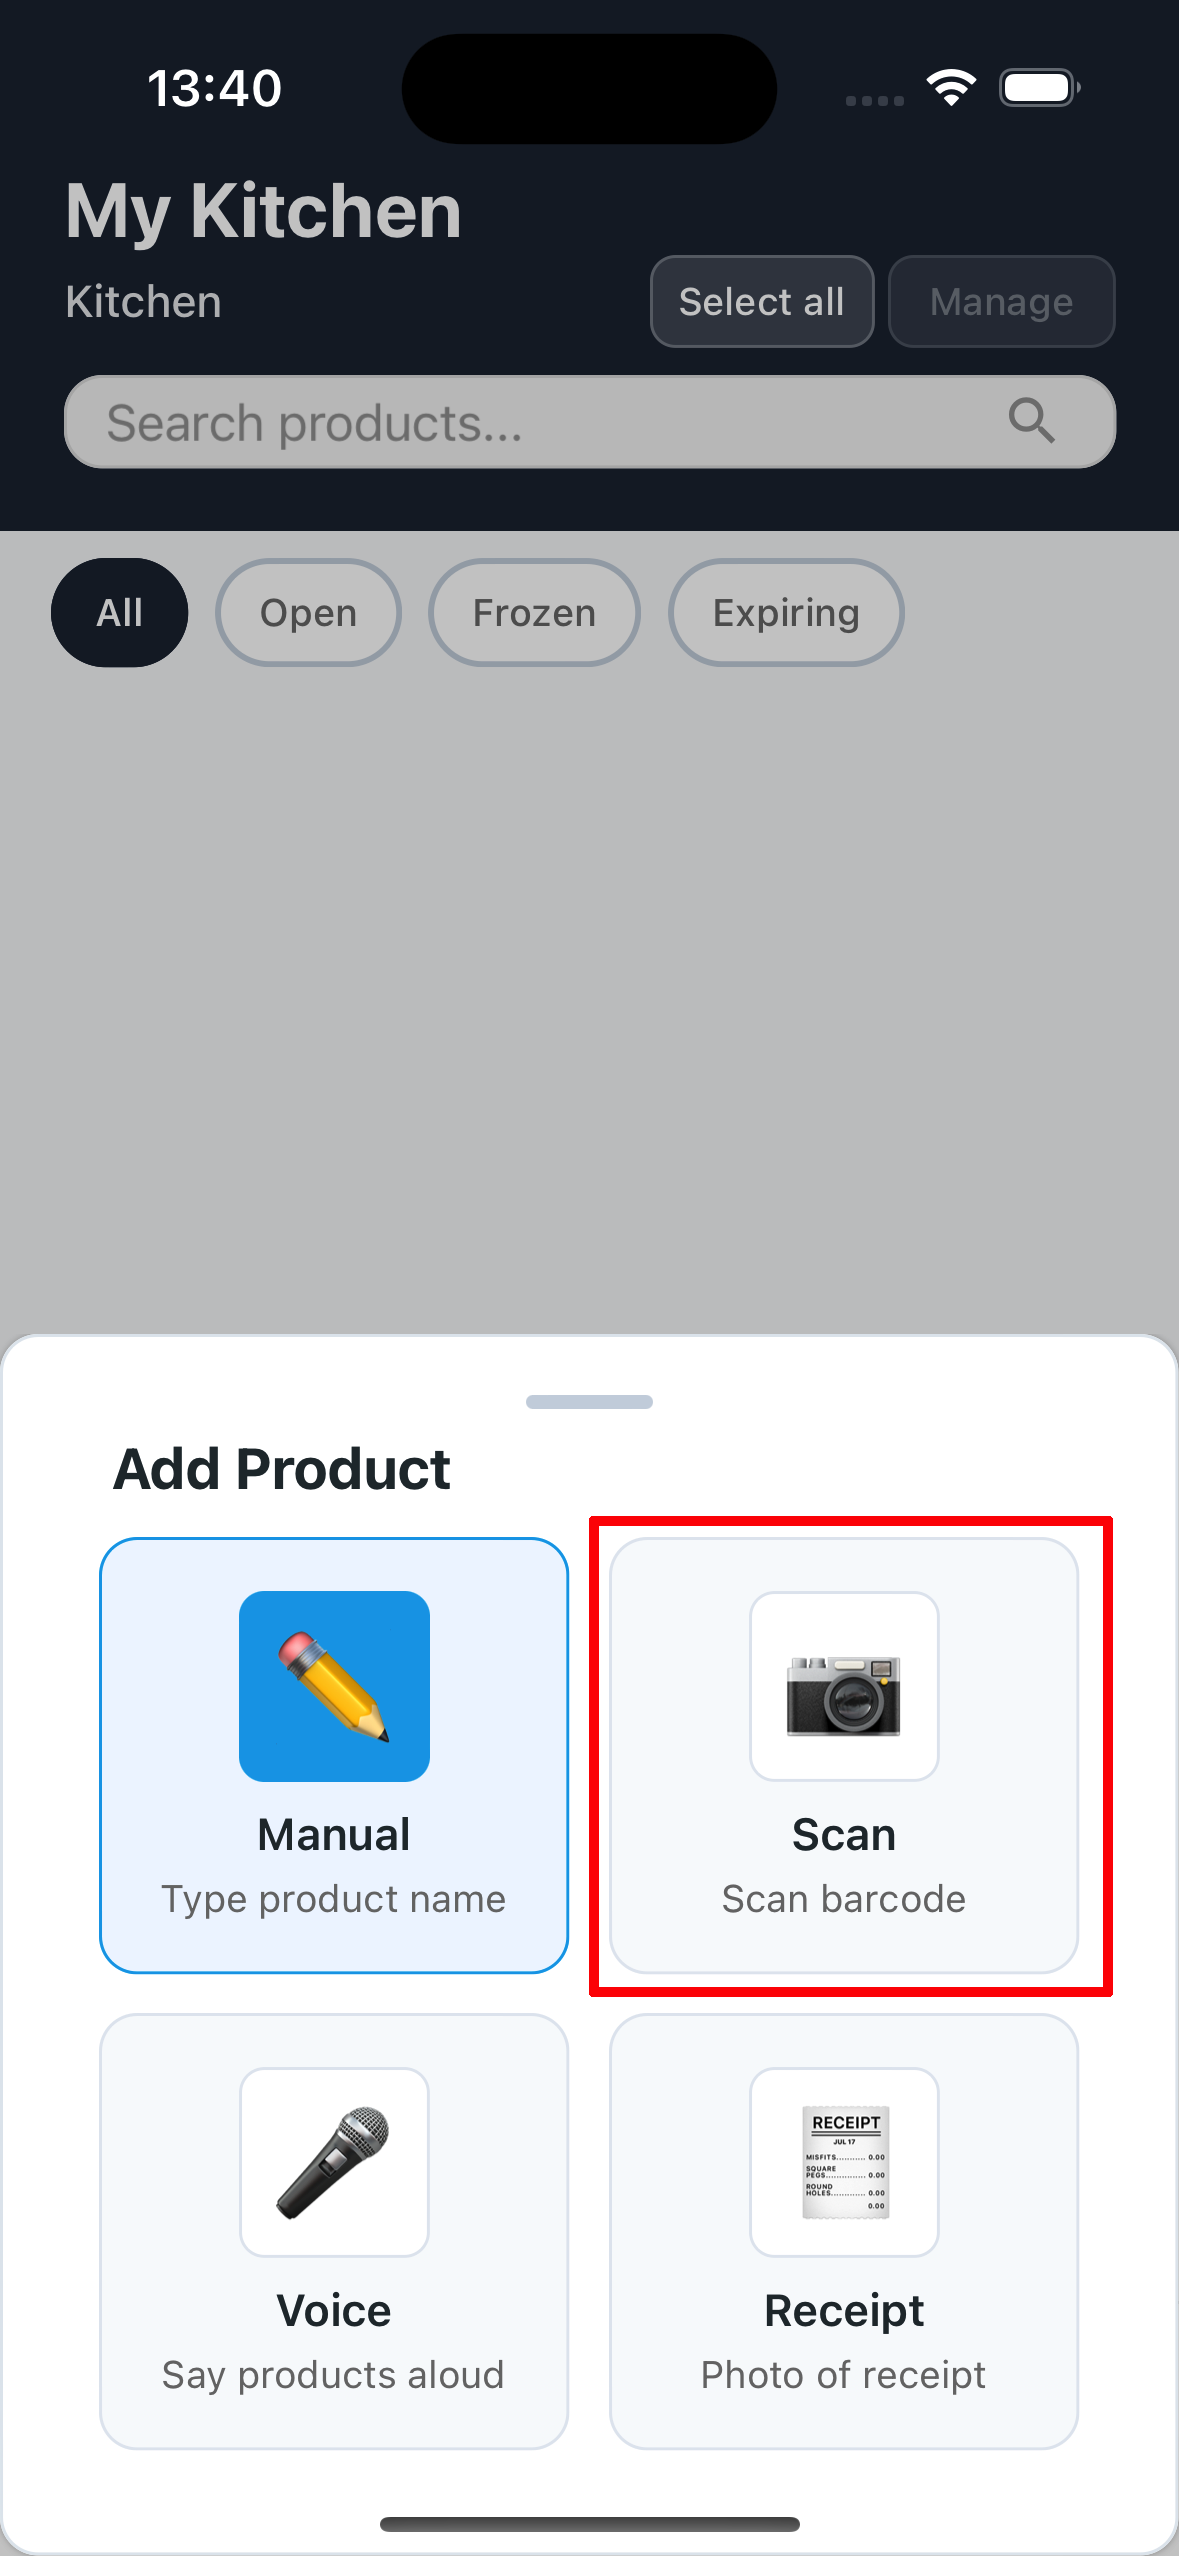
- A menu with 4 options will open
- Select 📷 "Scan" → "Scan barcode"
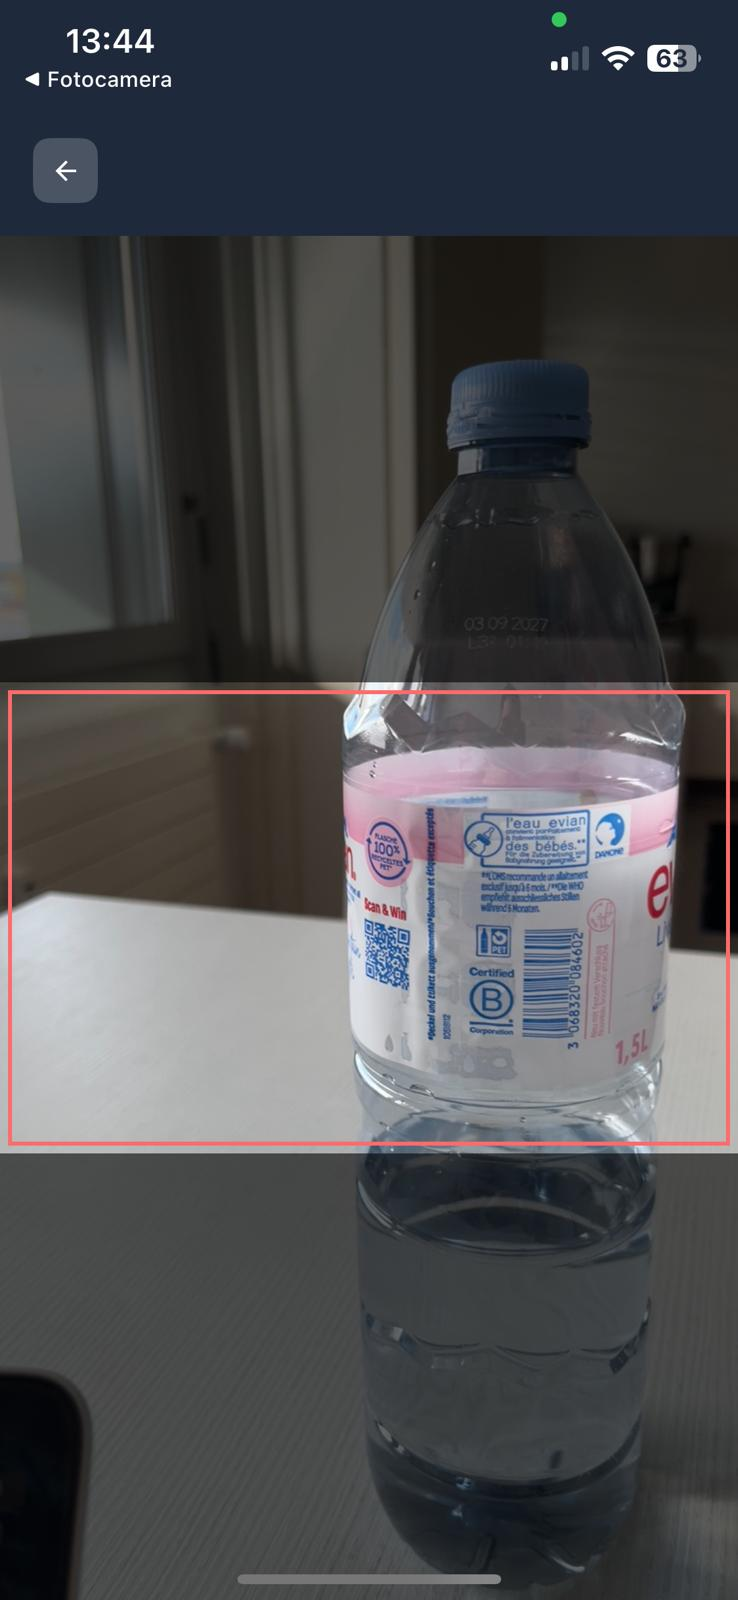
- Frame the product's barcode with the camera
- The product will be automatically recognized
- You'll be taken to the management screen where you can set quantities and expiration dates
🎤 2.3 Voice Input
Are your hands full? Say the products you want to add out loud! FoodyBank will recognize and enter them for you. You can also specify quantities and expiration dates by voice.
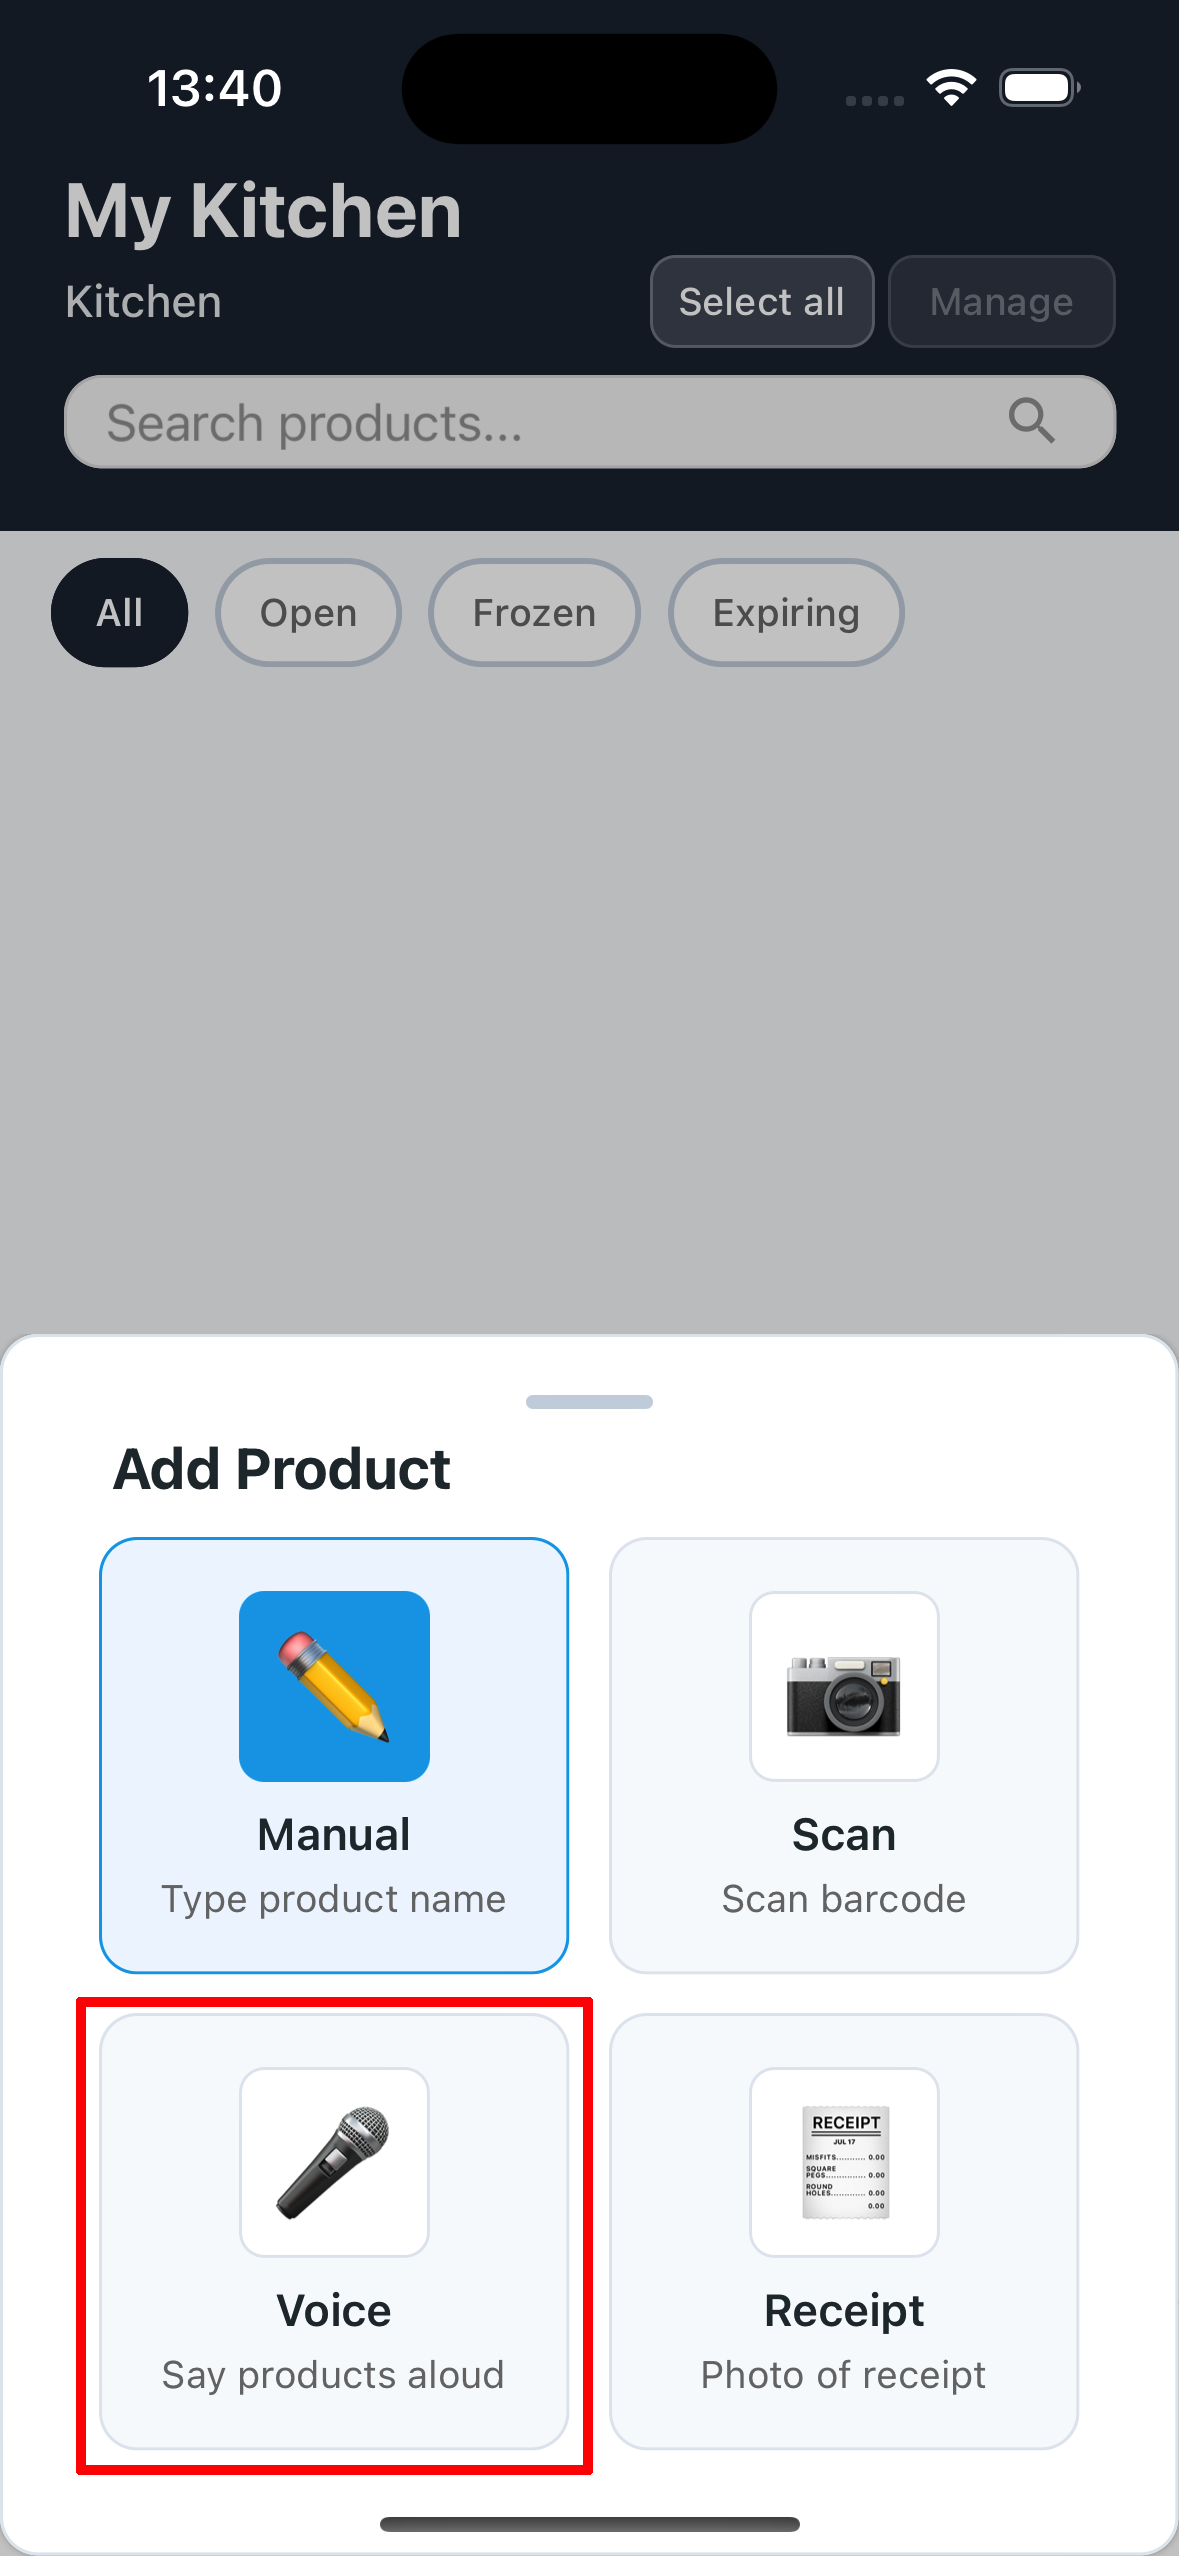
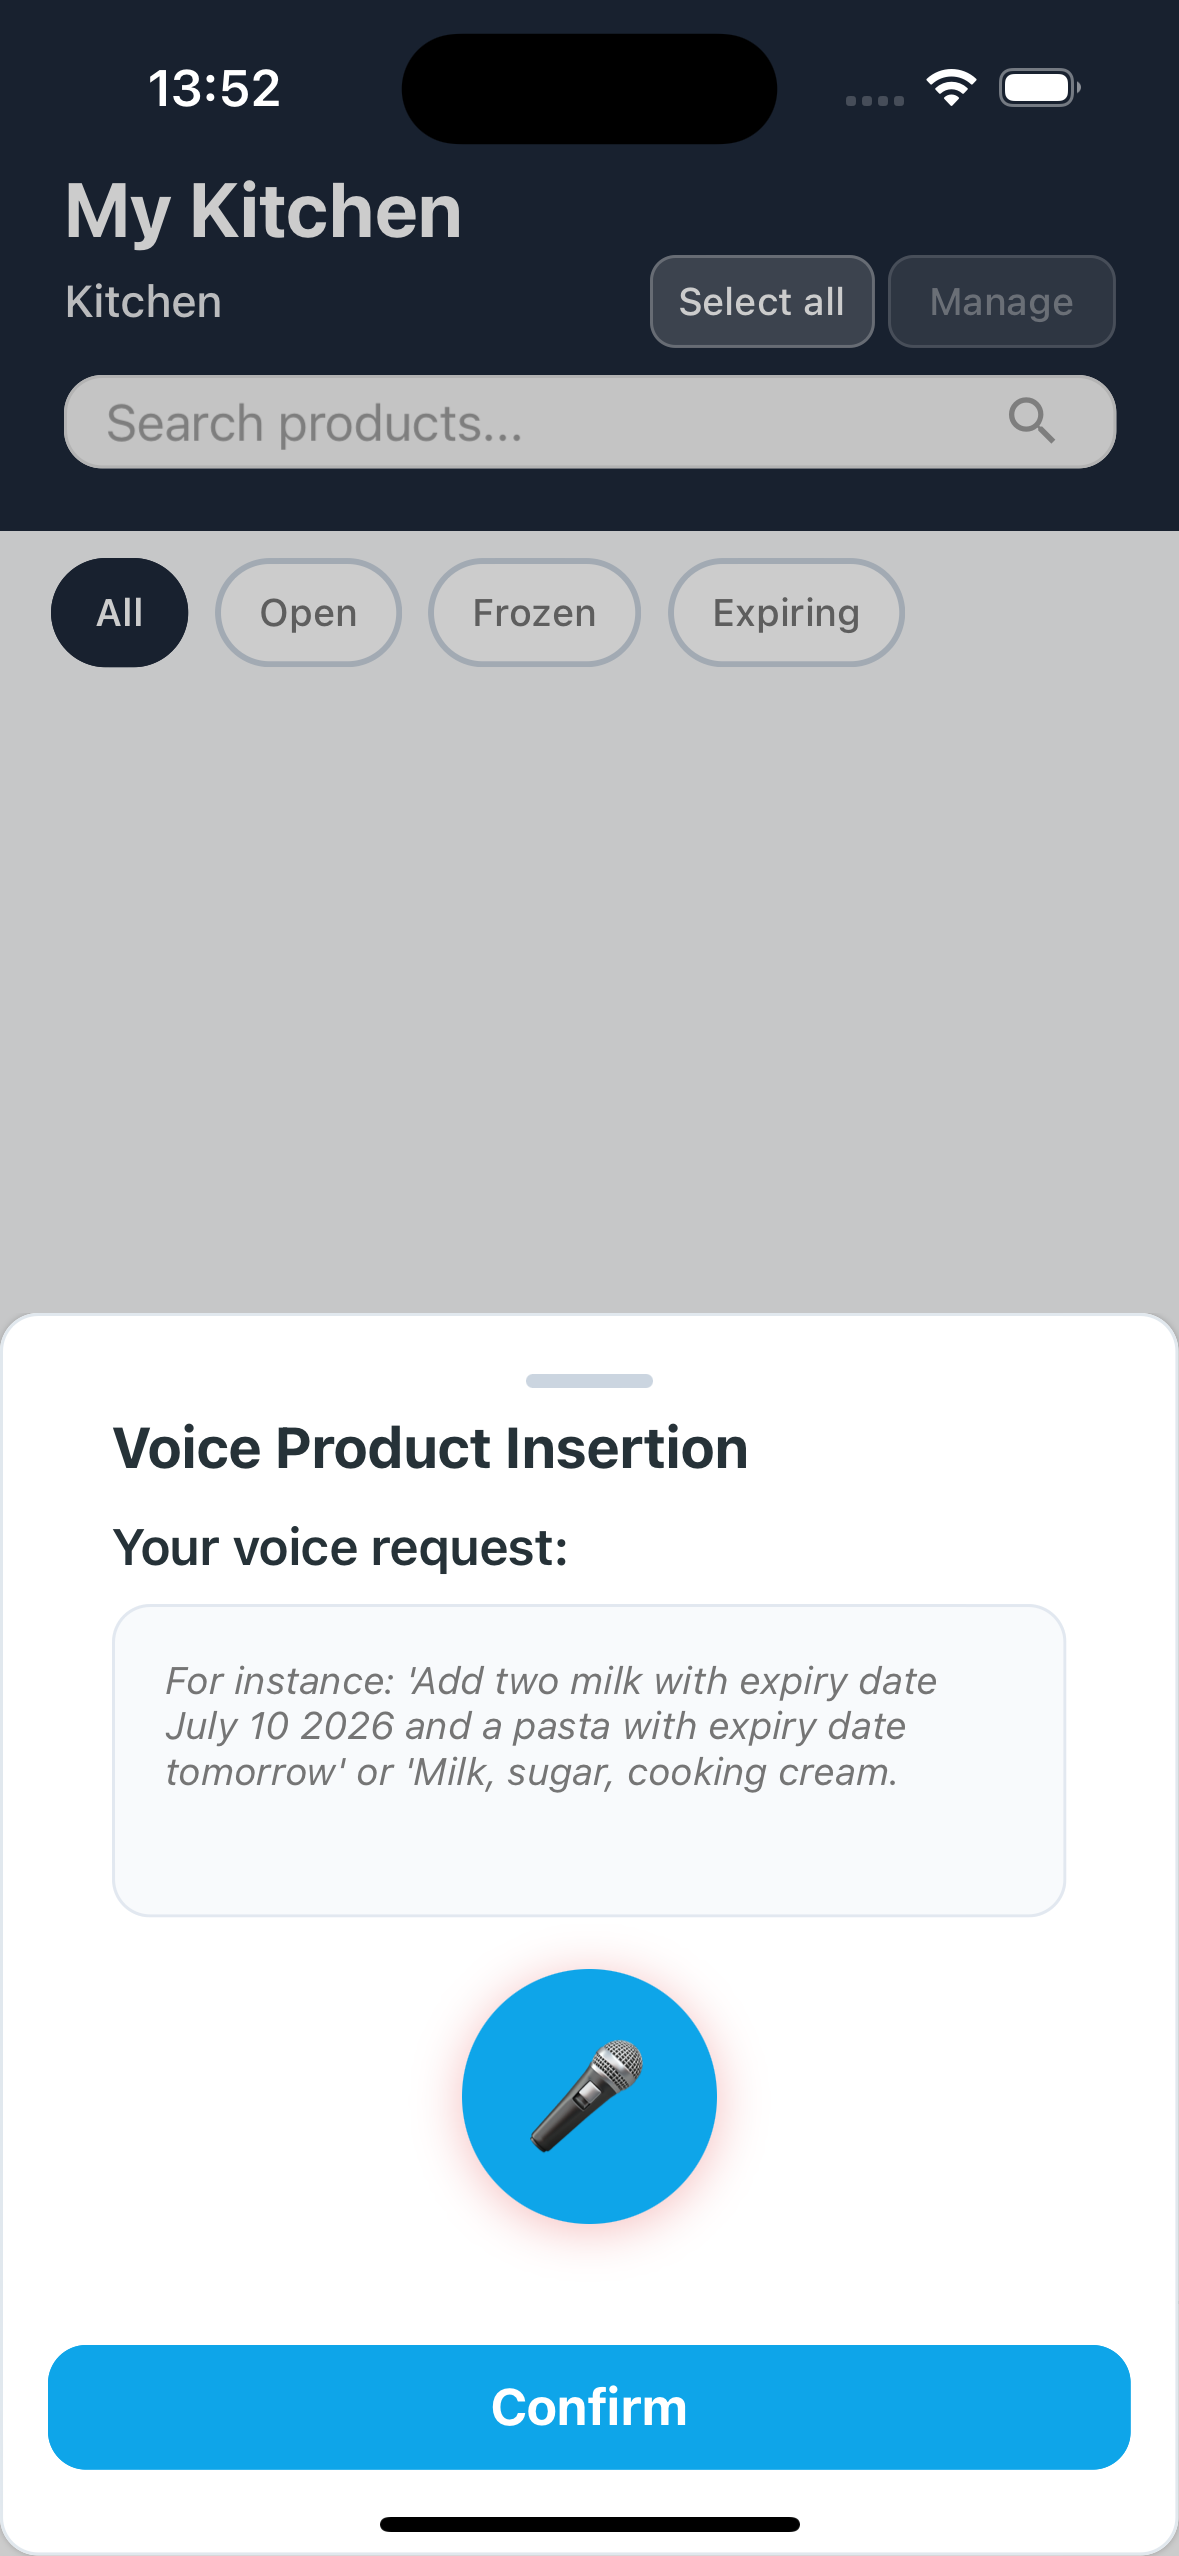
Steps:
- From the Kitchen or Shopping List screen, look for the "Add Product" button at the bottom
- Press the up arrow (^) next to the button
- A menu with 4 options will open
- Select 🎤 "Voice" → "List products by voice"
- Hold down the microphone button and speak
- Release the button when you're done
- You'll be taken to the management screen where you can review and edit the recognized products
"Milk, sugar, cooking cream"
"Add two milk with expiration date July 10, 2026"
"One pasta with expiration date tomorrow"
🧾 2.4 Receipt Photo
Just finished shopping? Take a photo of the receipt and FoodyBank will automatically recognize all purchased products. The fastest way to add many products at once!
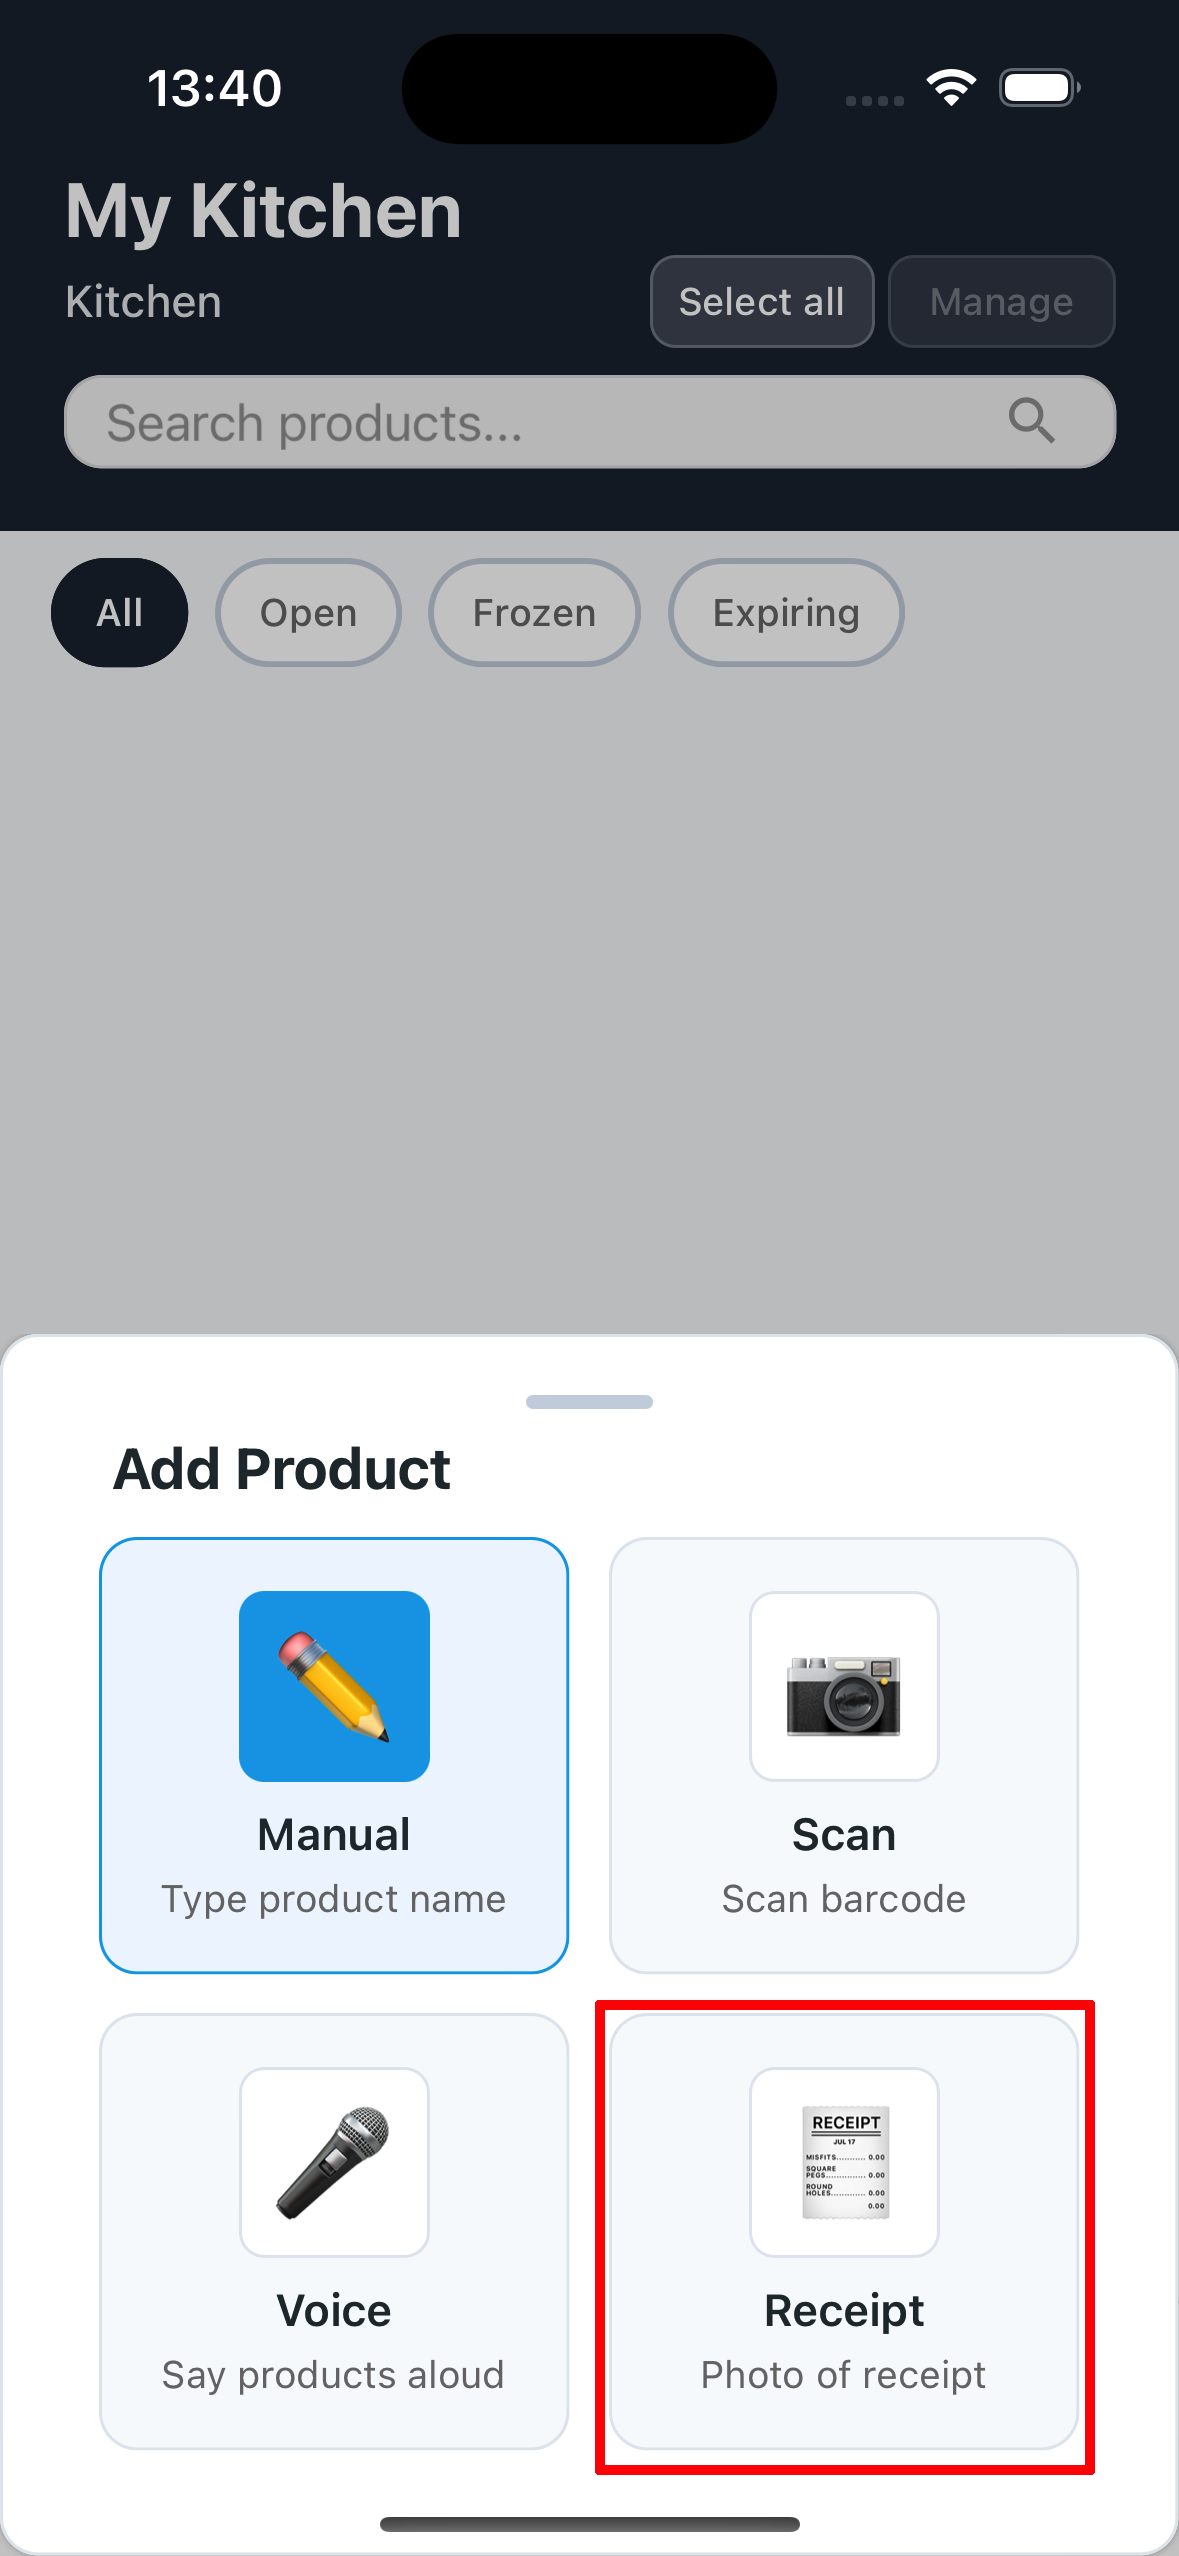
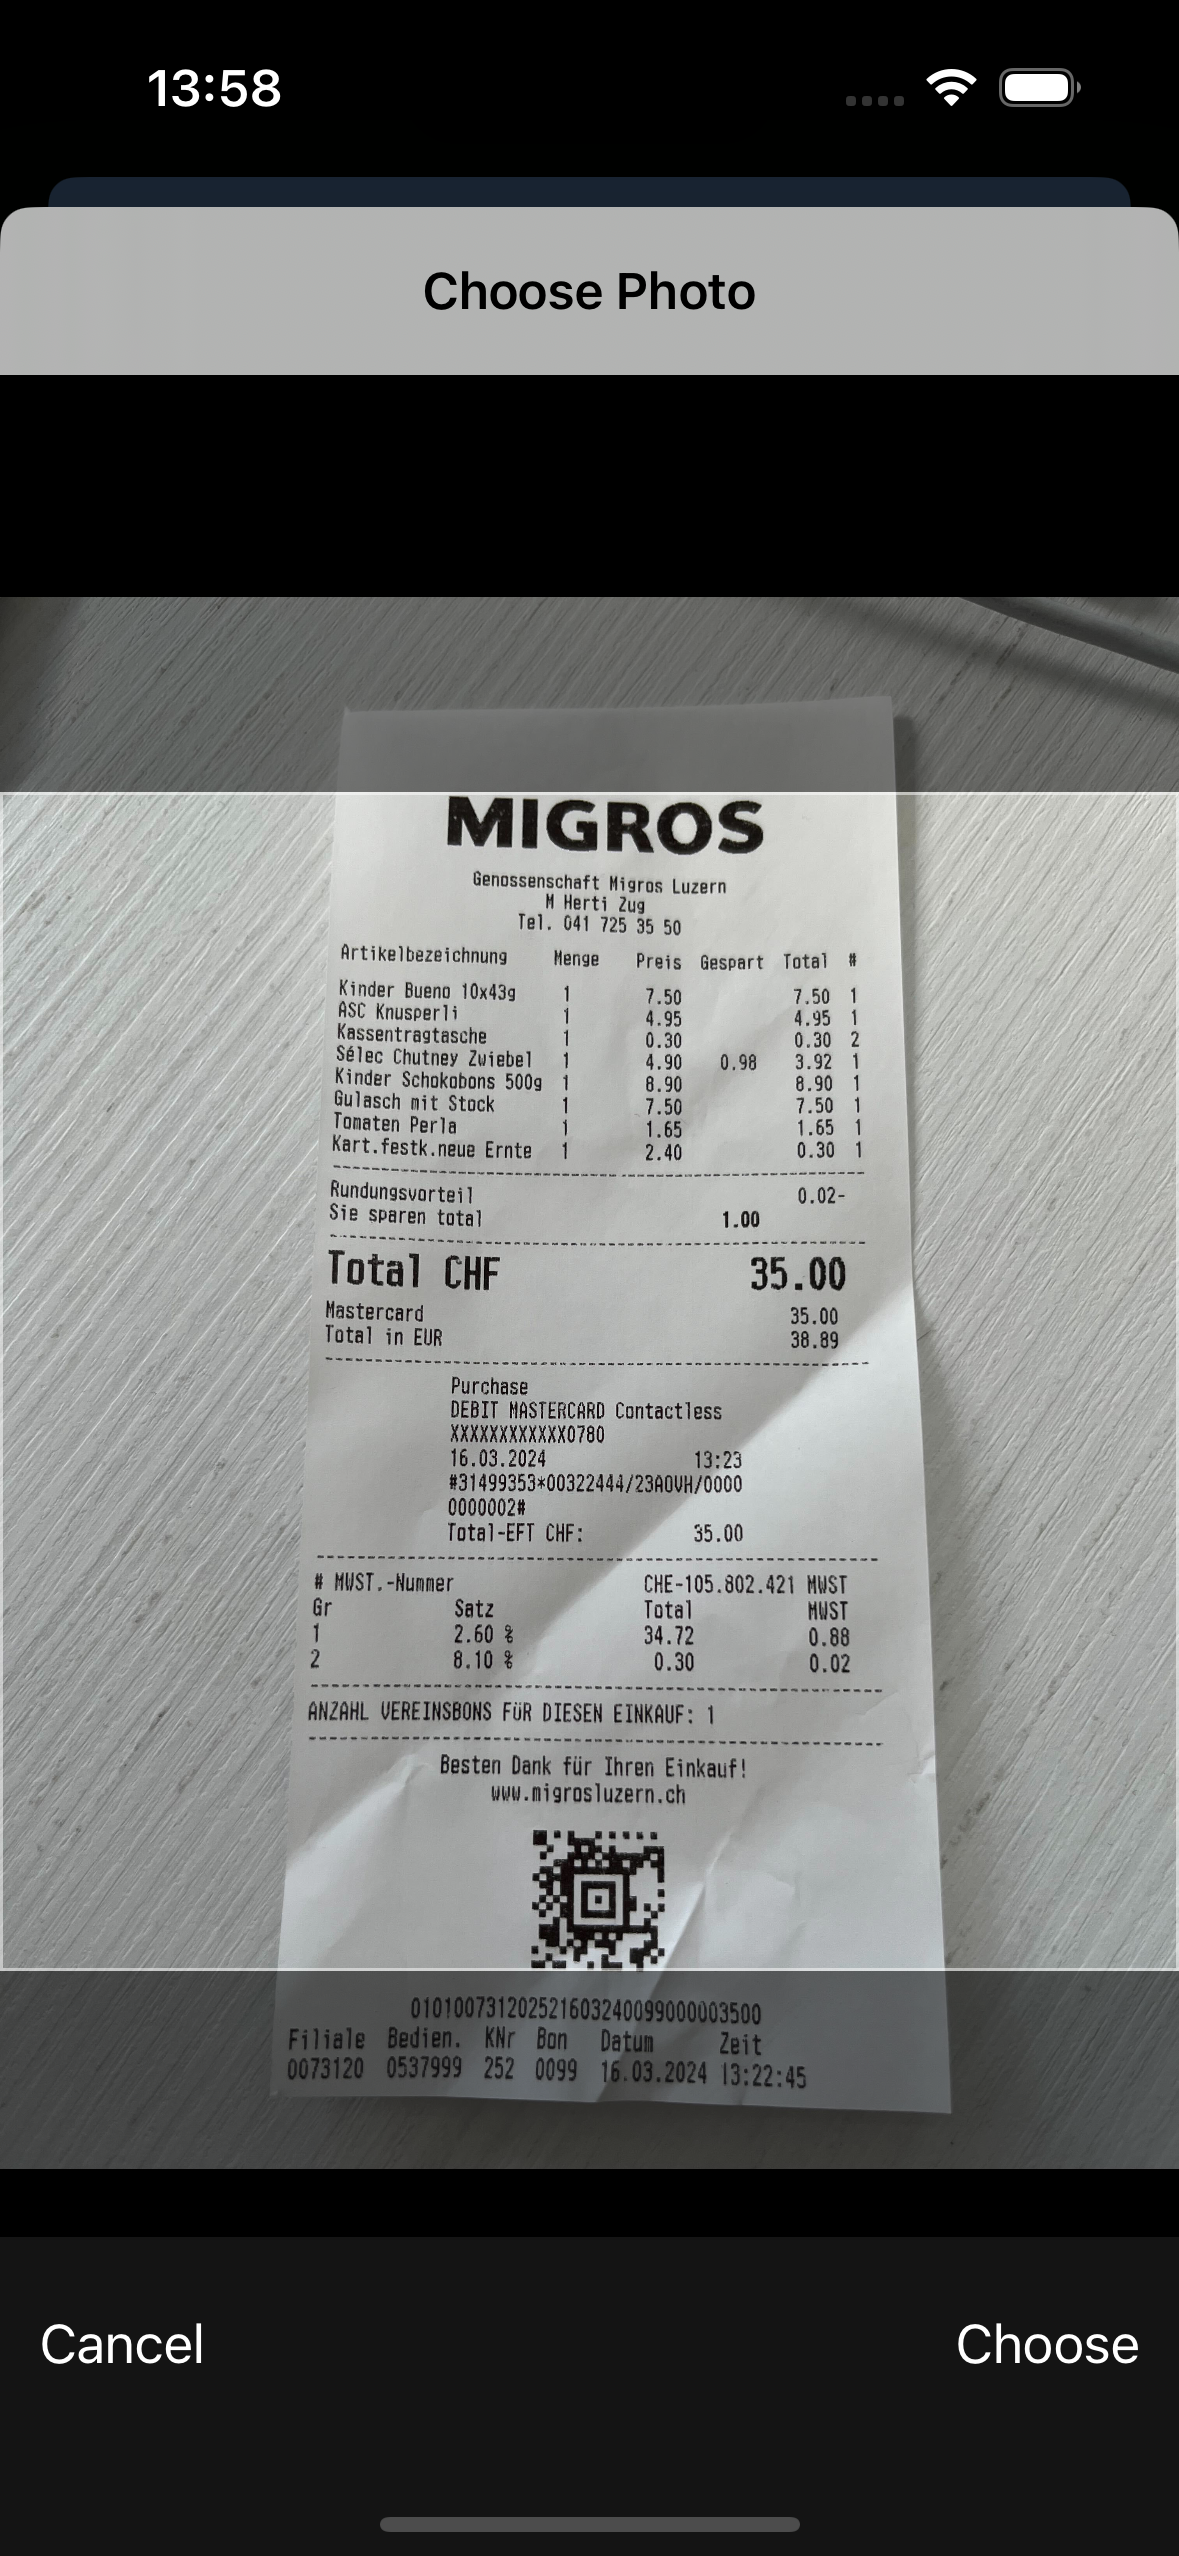
Steps:
- From the Kitchen or Shopping List screen, look for the "Add Product" button at the bottom
- Press the up arrow (^) next to the button
- A menu with 4 options will open
- Select 🧾 "Receipt" → "Receipt photo"
- Take a photo of the receipt, trying to frame all the text well
- FoodyBank will analyze the receipt and recognize the products
- You'll be taken to the management screen where you can confirm and edit
📝 2.5 Manage Products (Summary Screen)
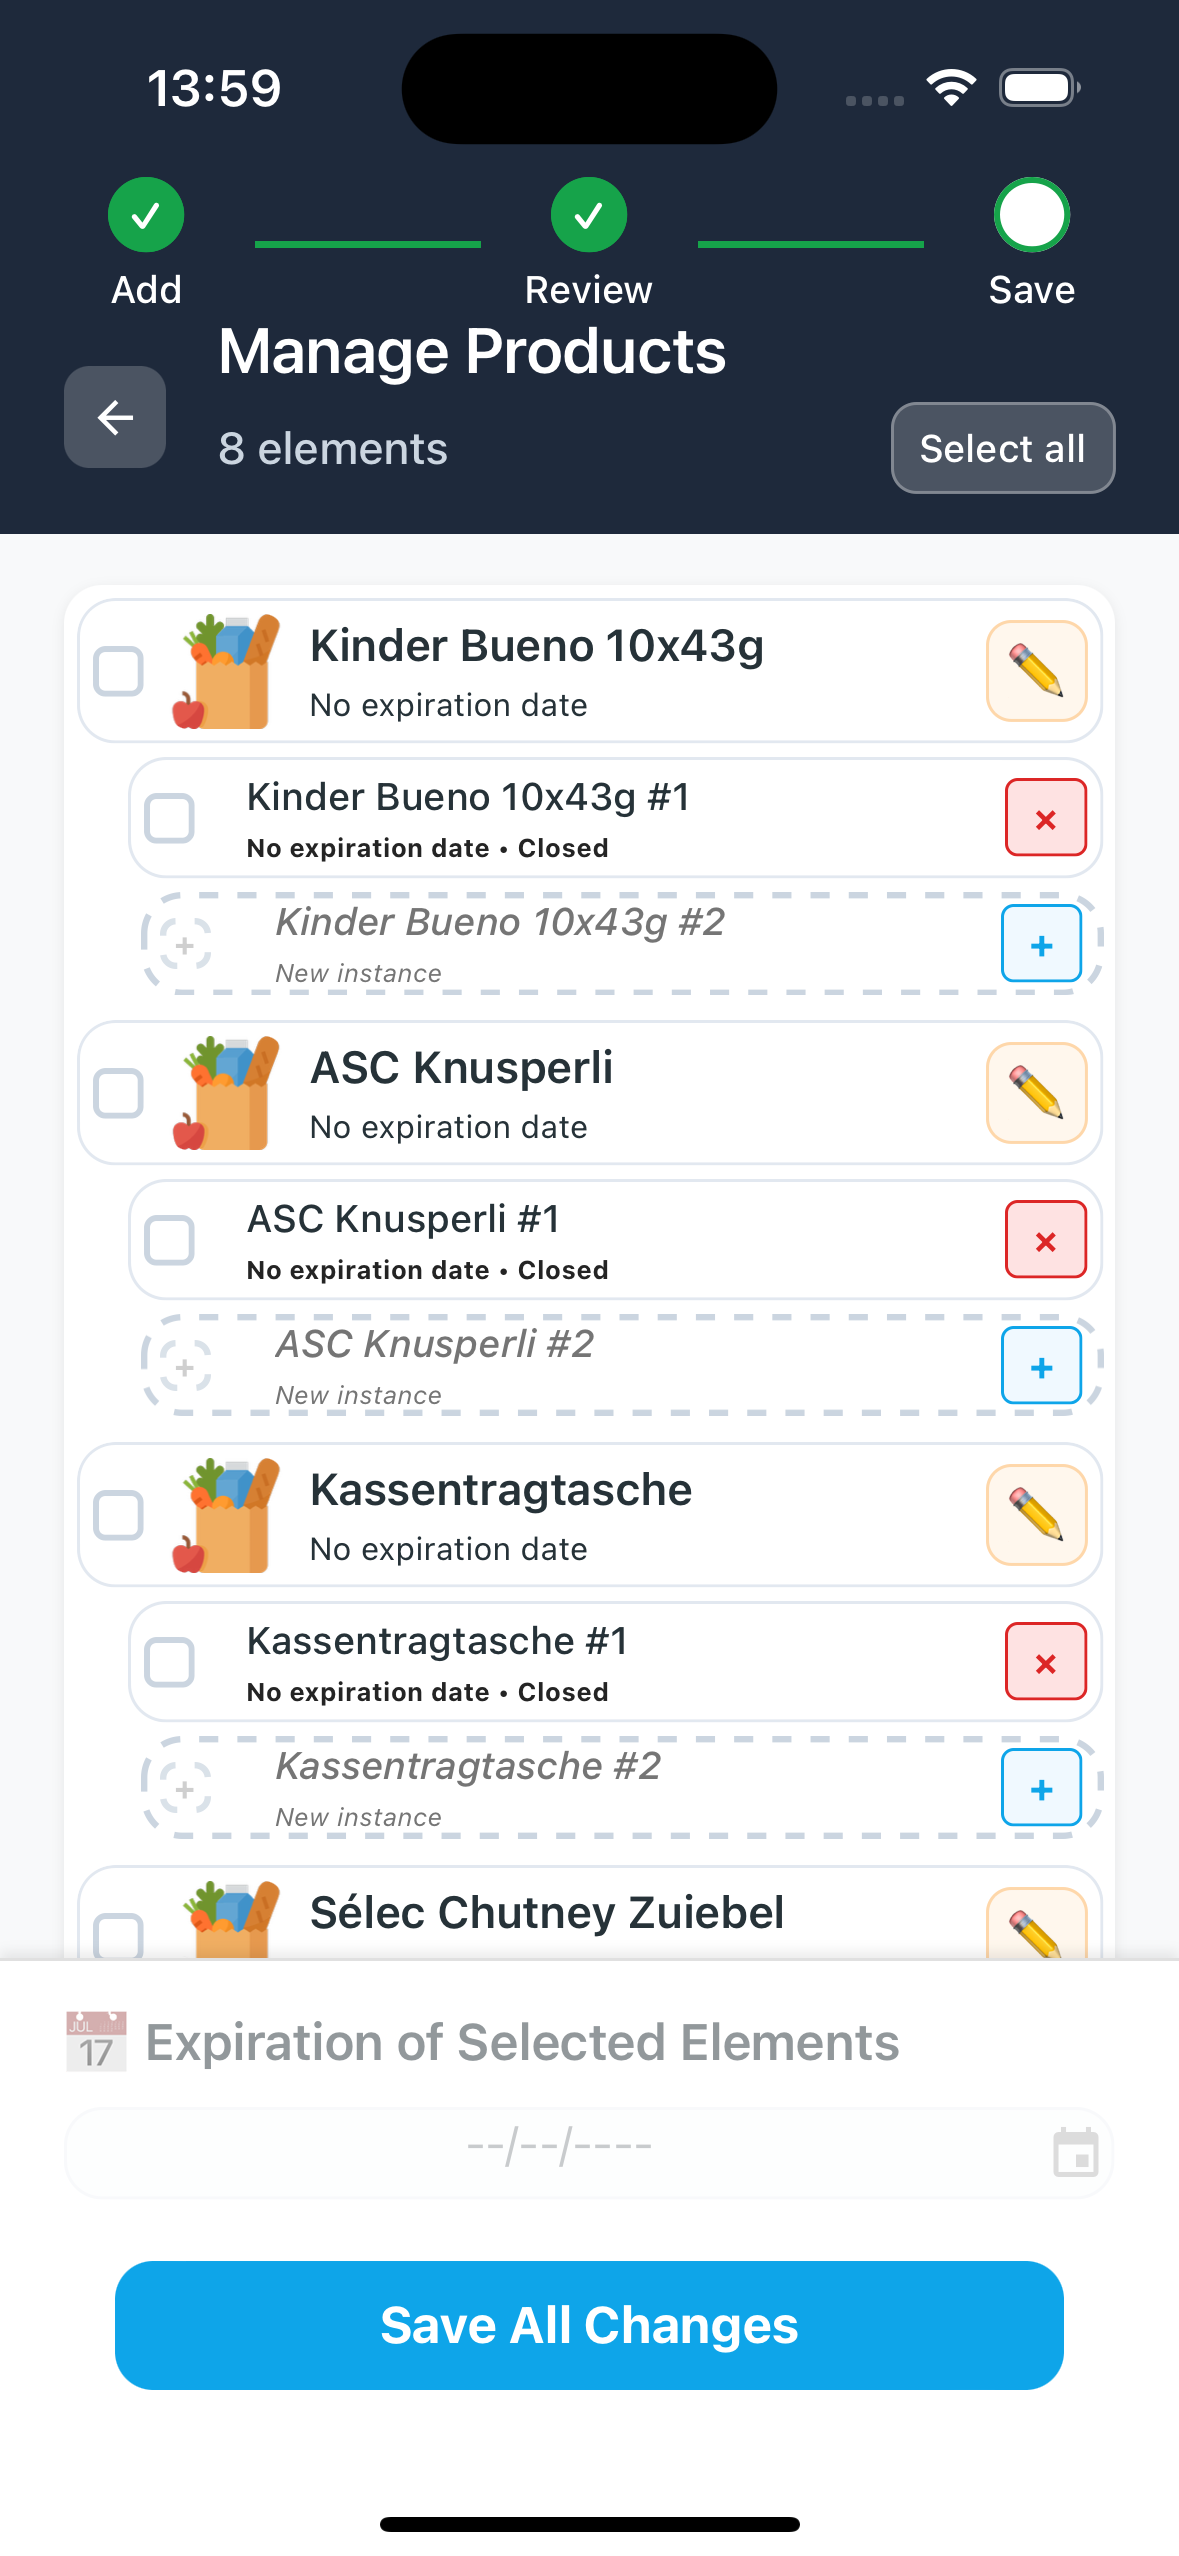
After adding products with Scan, Voice or Receipt, you arrive at this screen where you can perfect everything before saving. Here you can modify photo, name, quantities and expiration dates of all products.
A) 🔄 Transform generic products into specific ones (IMPORTANT!)
This is a key feature of FoodyBank! If you've entered a generic product (e.g. "cookies"), you can refine it by scanning the barcode to get the specific product from the database (e.g. "Mulino Bianco Macine 500g"). This saves the product's EAN and makes your inventory more accurate!
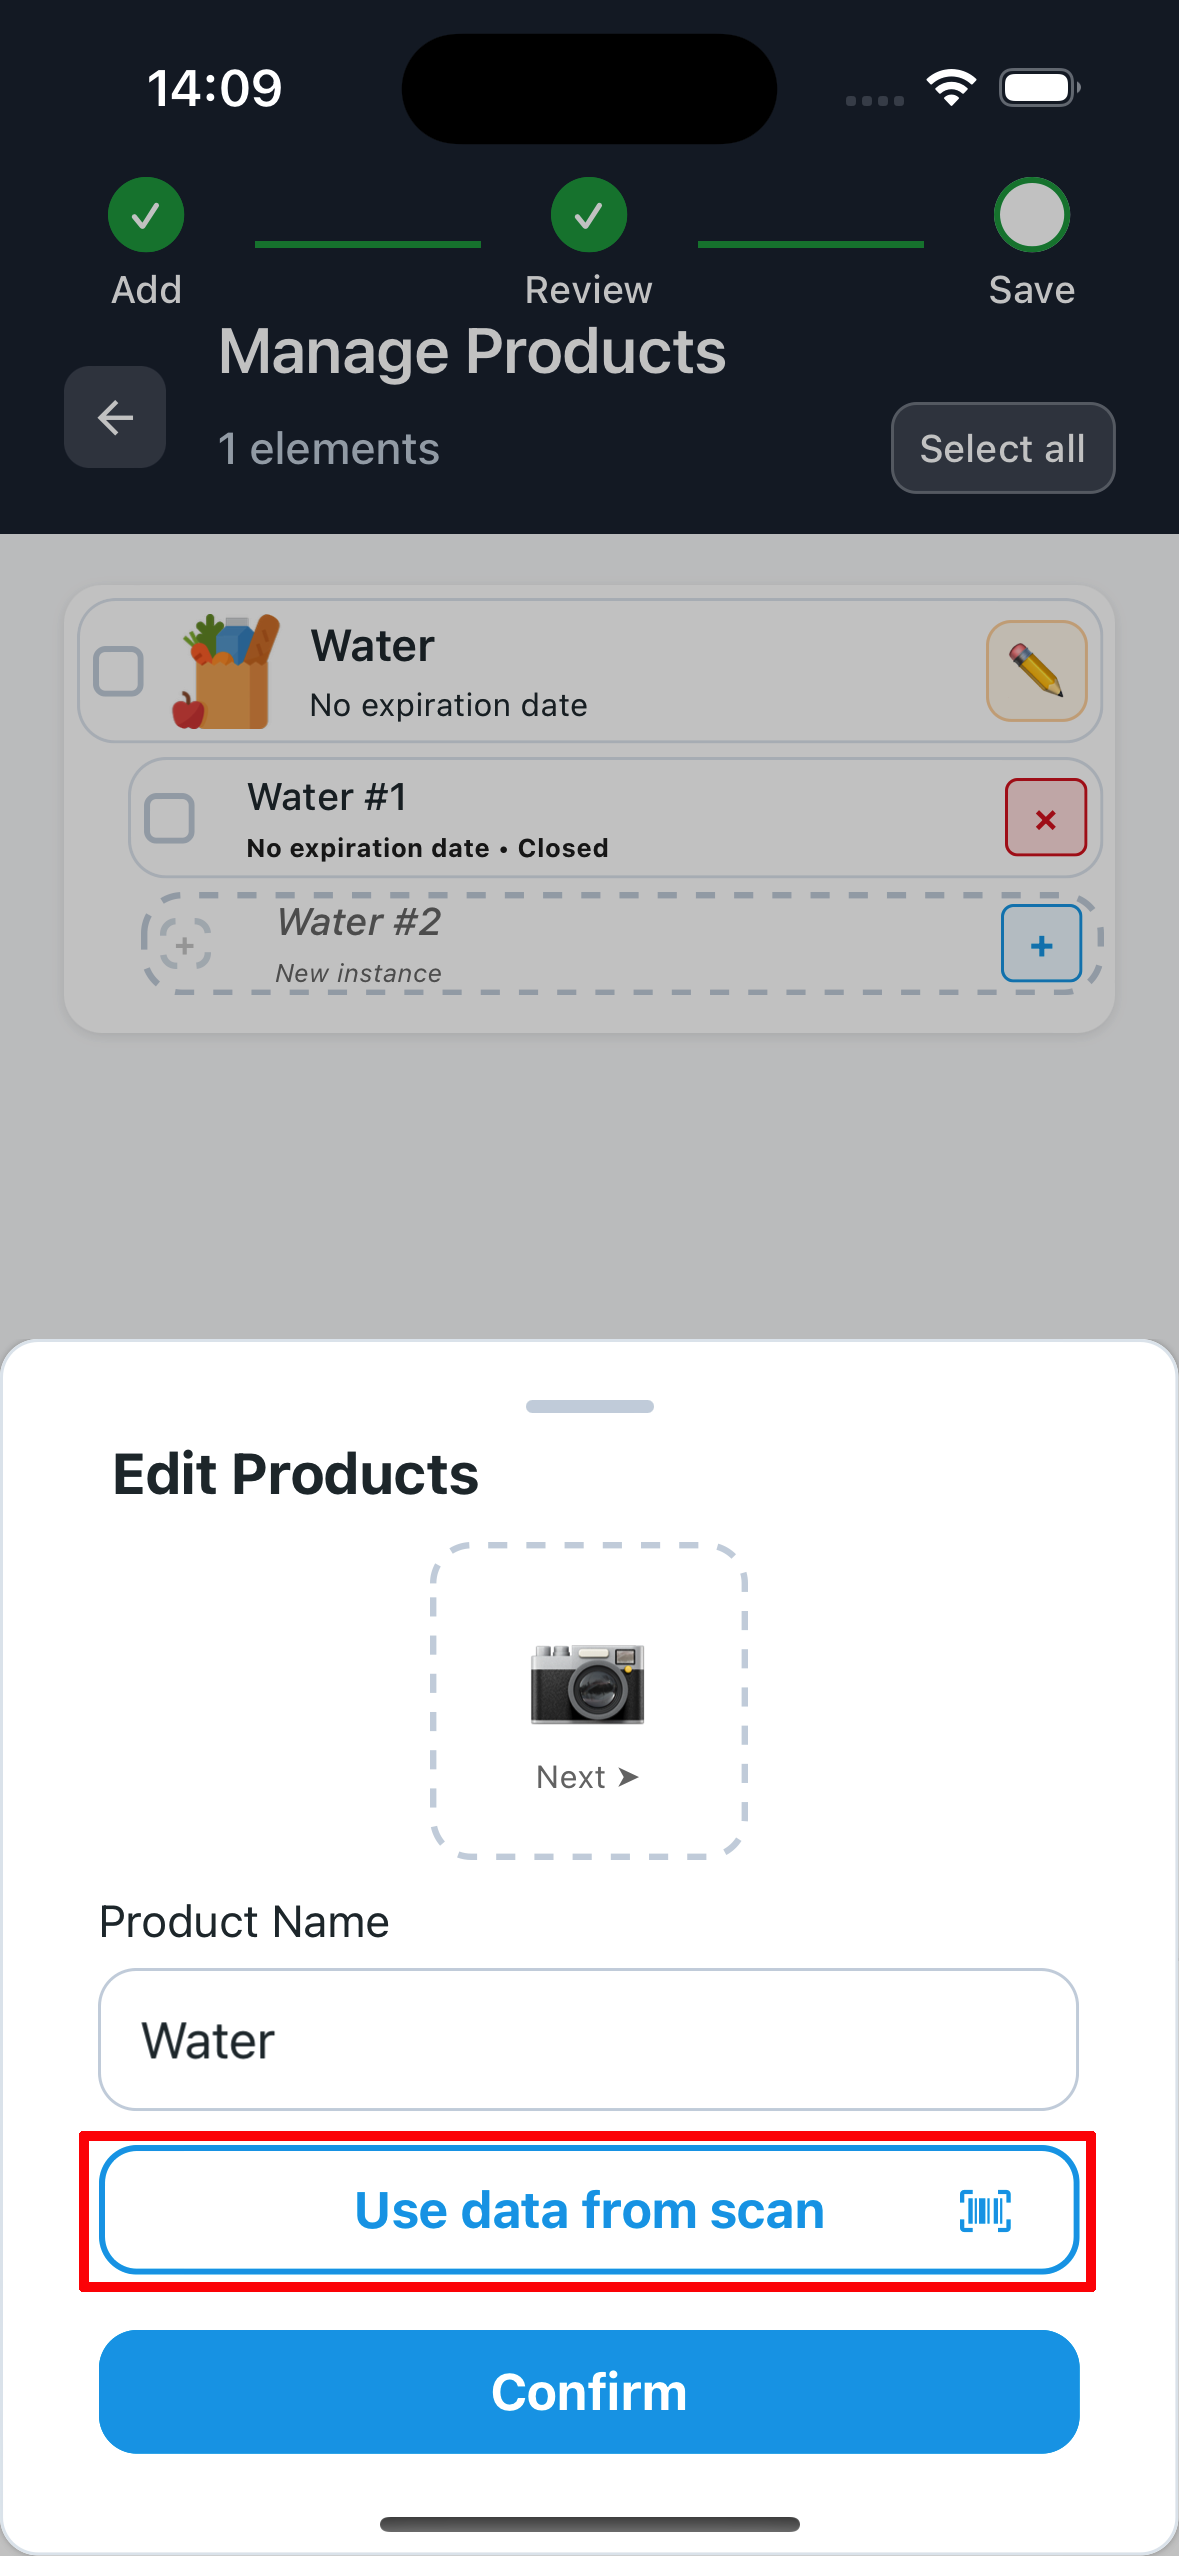
- Press the pencil icon (✏️) next to the generic product
- The product edit popup opens
- You see the current name of the product (e.g. "cookies")
- Press the "Use scan data" button at the bottom
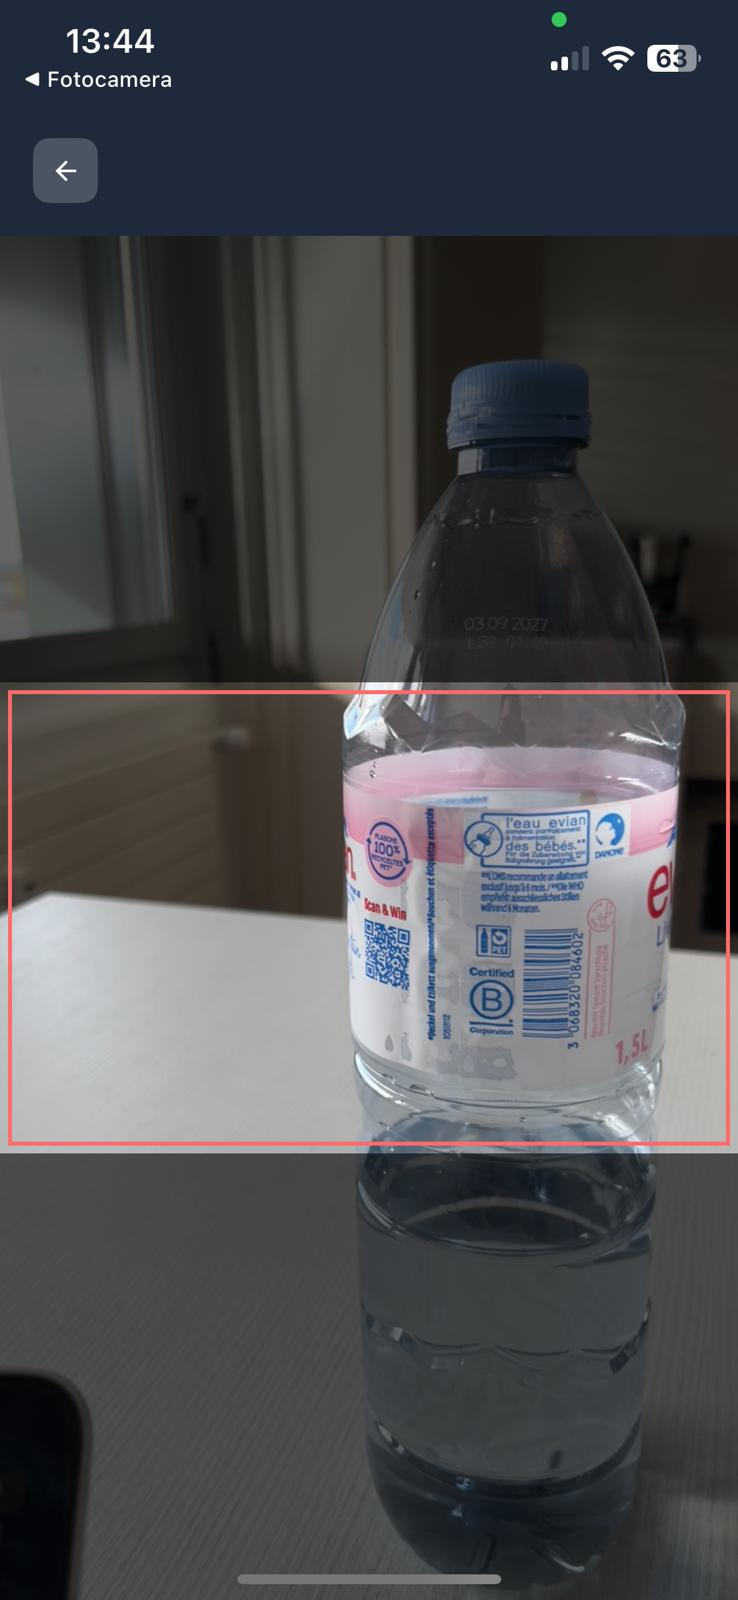
- Scan the barcode of the actual product
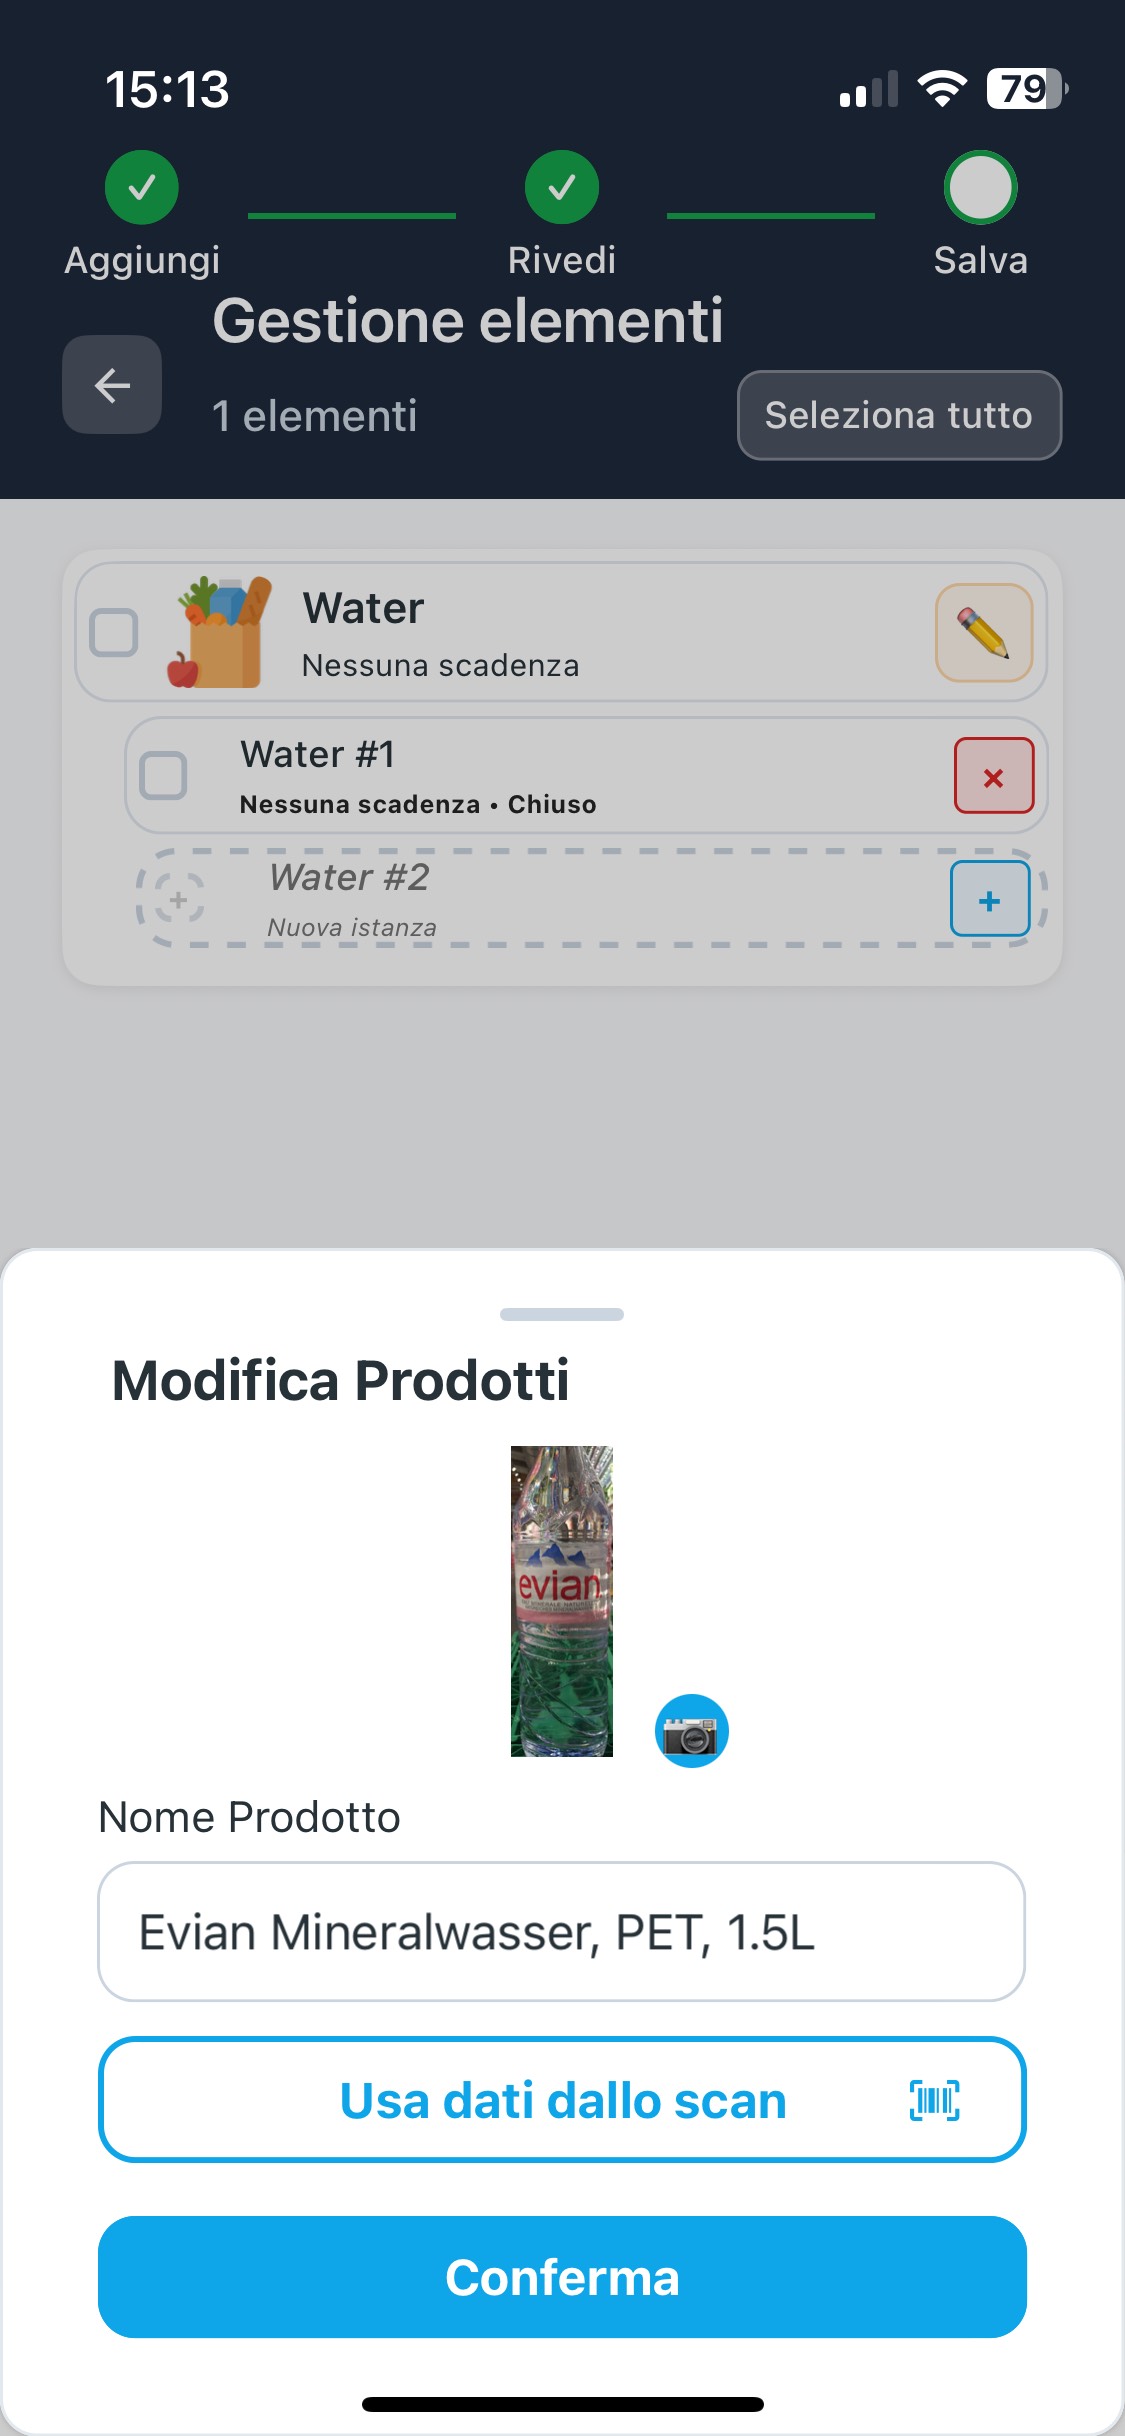
- FoodyBank searches the database and finds the specific product (e.g. "Mulino Bianco Macine 500g")
- Name, photo and EAN are automatically updated
- Press "Confirm" to save
• Manually change the product name
• Press on the photo to take a new image or select from gallery
B) + × Add and remove quantities
Each product can have multiple "instances" with different expiration dates. Perfect when you buy 3 milk cartons with different expiration dates!
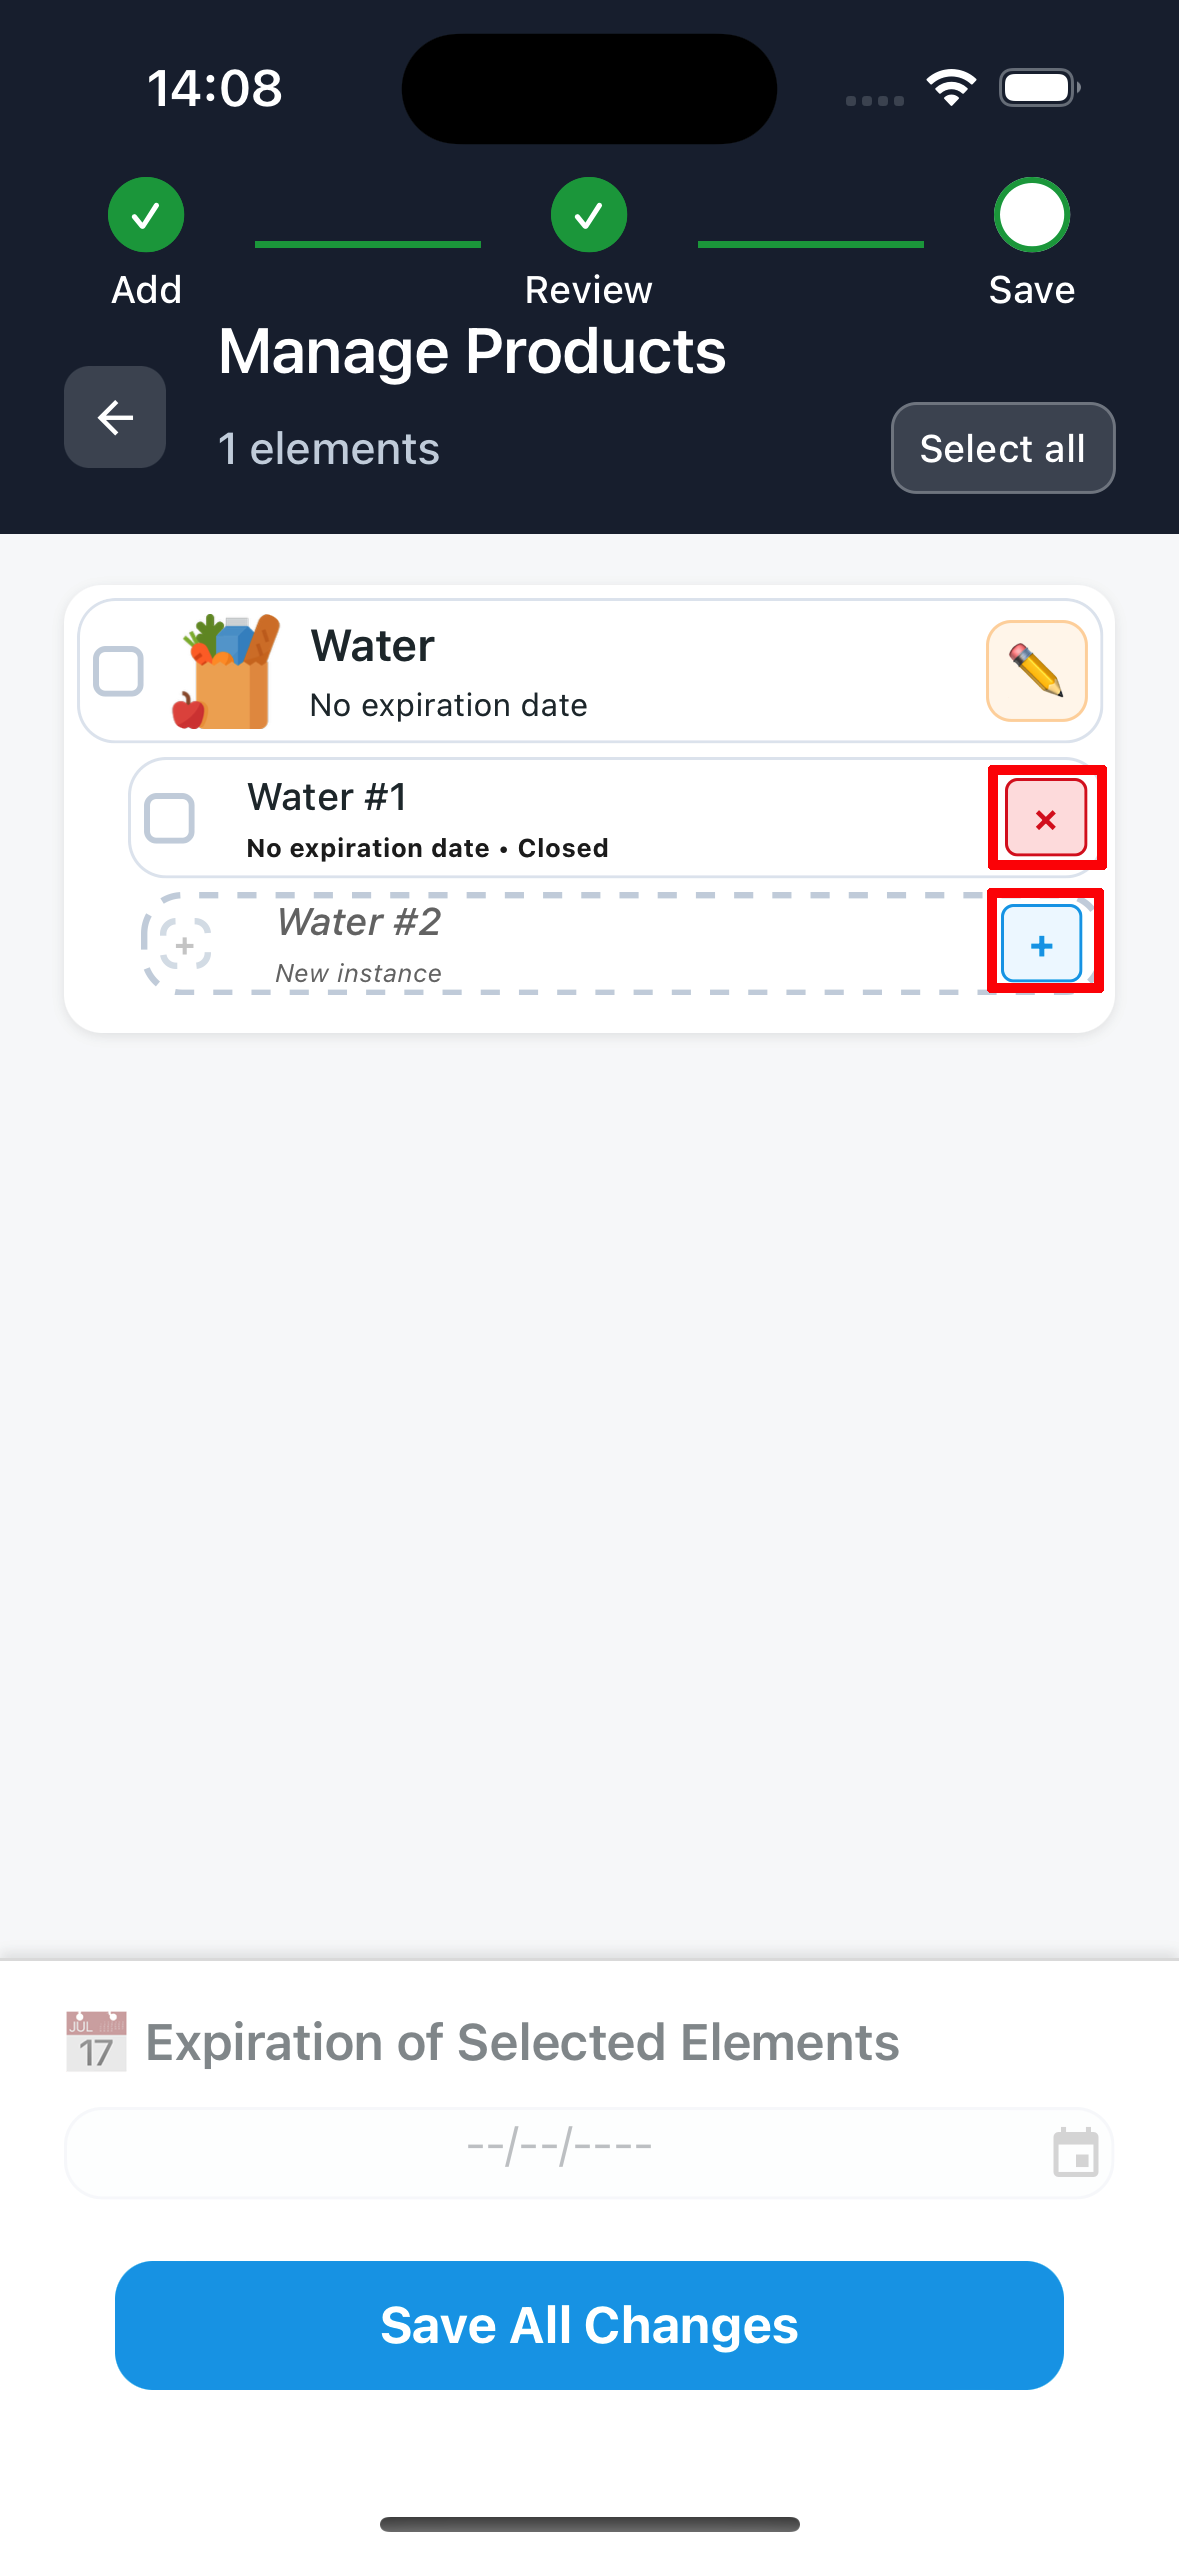
- Use the + button at the bottom (last row) to add a new quantity
- Use the × button (cross) on the right of each quantity to remove it
- Each instance can have a different expiration date
C) 🗓️ Set expiration dates (for multiple products simultaneously)
Did you buy many products with the same expiration date? Select them all and set the date just once!
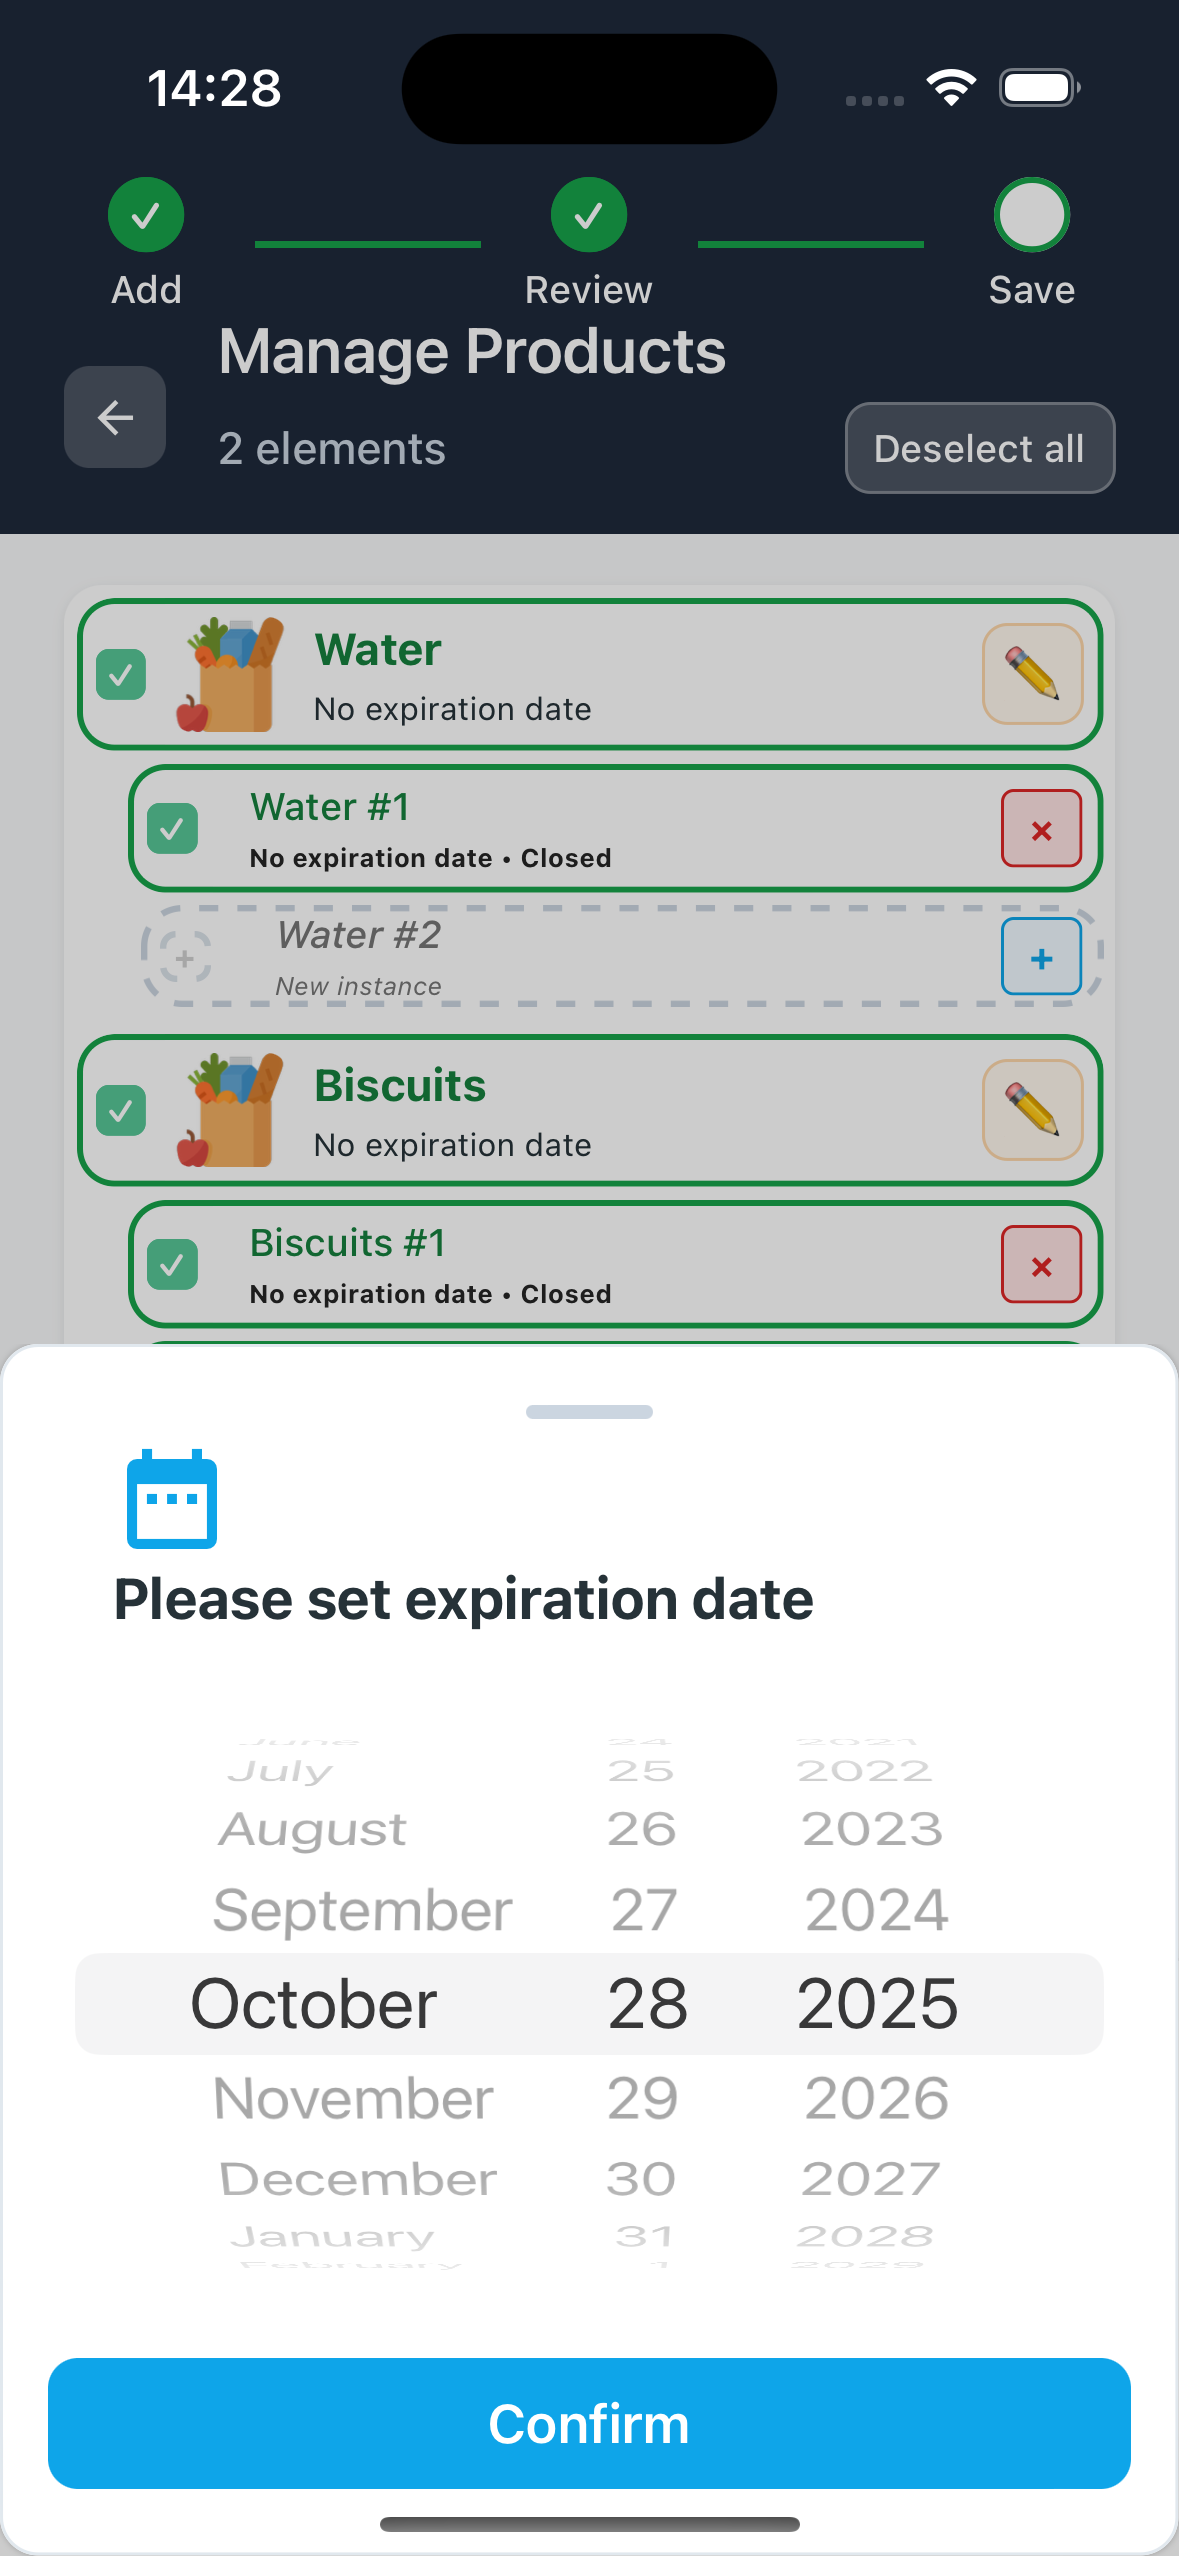
- Select (checkbox) the quantities you want to modify together
- The "Change expiration for selected items" section appears at the bottom
- Choose a date from the calendar below
- The date will be applied to all selected items simultaneously
D) 💾 Save everything
- When you've finished all modifications, press the "Save all changes" button at the bottom
- All products will be saved to your kitchen or shopping list!
This screen is also used when you press "Edit" on products already in your kitchen.
📅 3. Manage Expiration Dates and Notifications
FoodyBank helps you keep track of your products' expiration dates and alerts you before they expire, so you avoid waste and save money!
🔍 3.1 View products by status
In the Kitchen screen, you can filter products based on their status to quickly see what you need to consume or check.
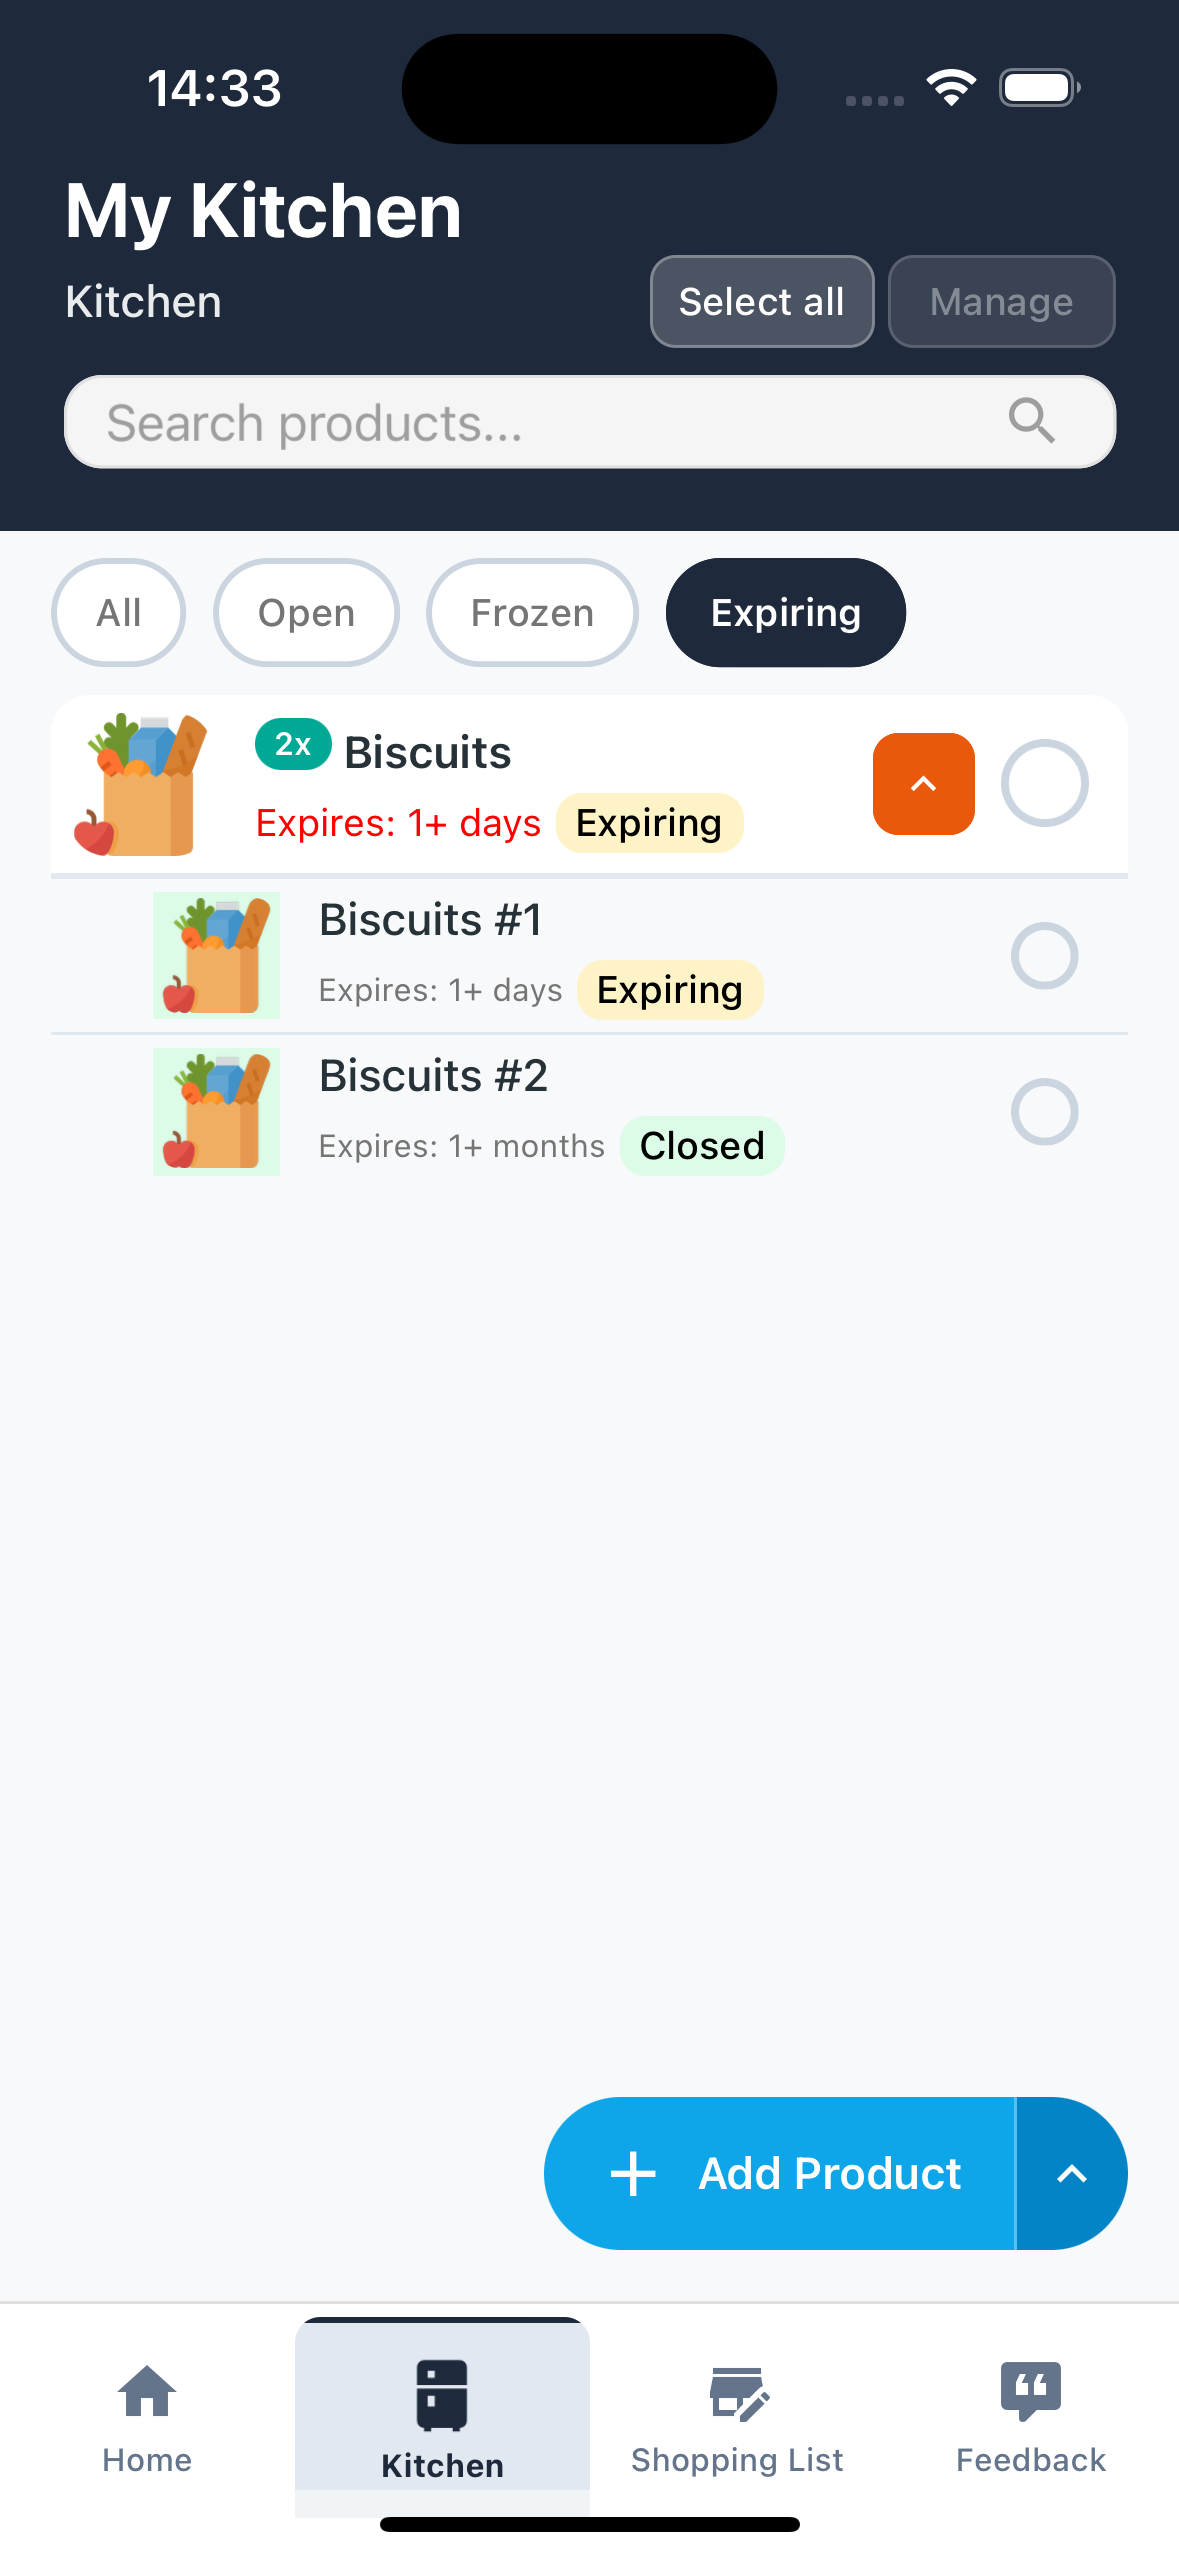
Available filters:
- All - View all products in the kitchen
- Opened - Already opened products you should consume first
- Frozen - Products in the freezer
- Expiring - Products expiring soon (less than 3 days)
Steps:
- From the Kitchen screen, look at the top below the search bar
- Press on the filter you're interested in
- Products are automatically filtered
⚠️ 3.2 Expiration indicators
Each product clearly shows when it expires, with color indicators to help you immediately understand the priority.
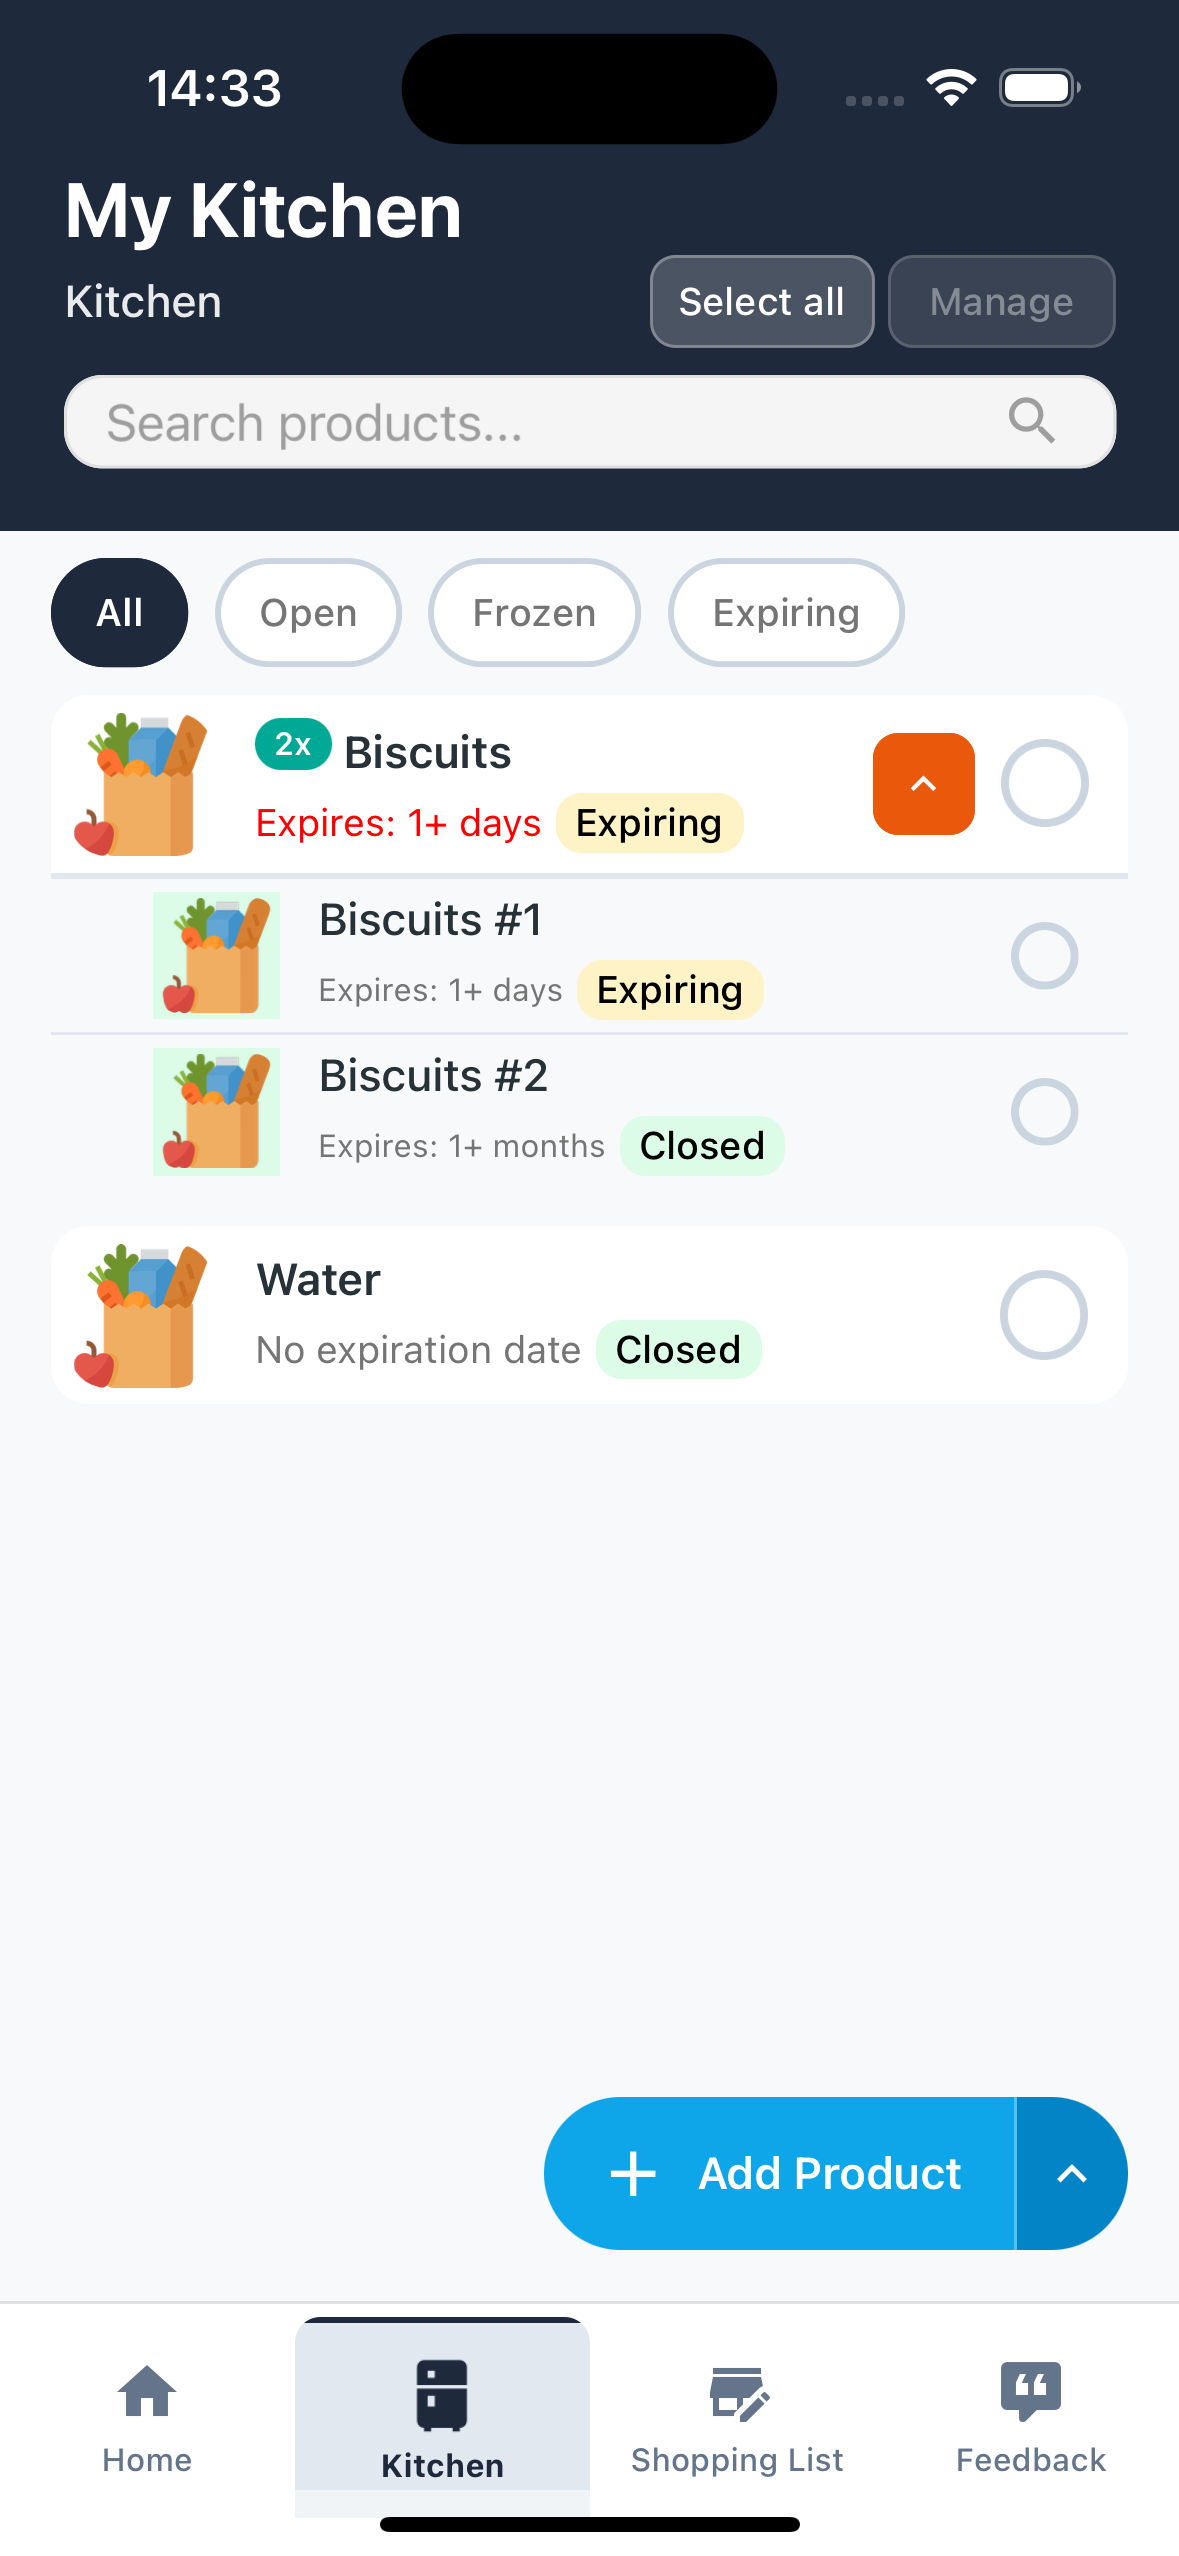
What you'll see:
- "Expires: X days" - Products with distant expiration (green)
- "Expires: 2 days" - Products expiring soon (orange/red)
- "Expired on [date]" - Already expired products
- "No expiration" - Products without expiration (e.g. pasta, canned goods)
🔔 3.3 Automatic notifications
FoodyBank sends you push notifications to remind you of expiring products, so you don't forget them!
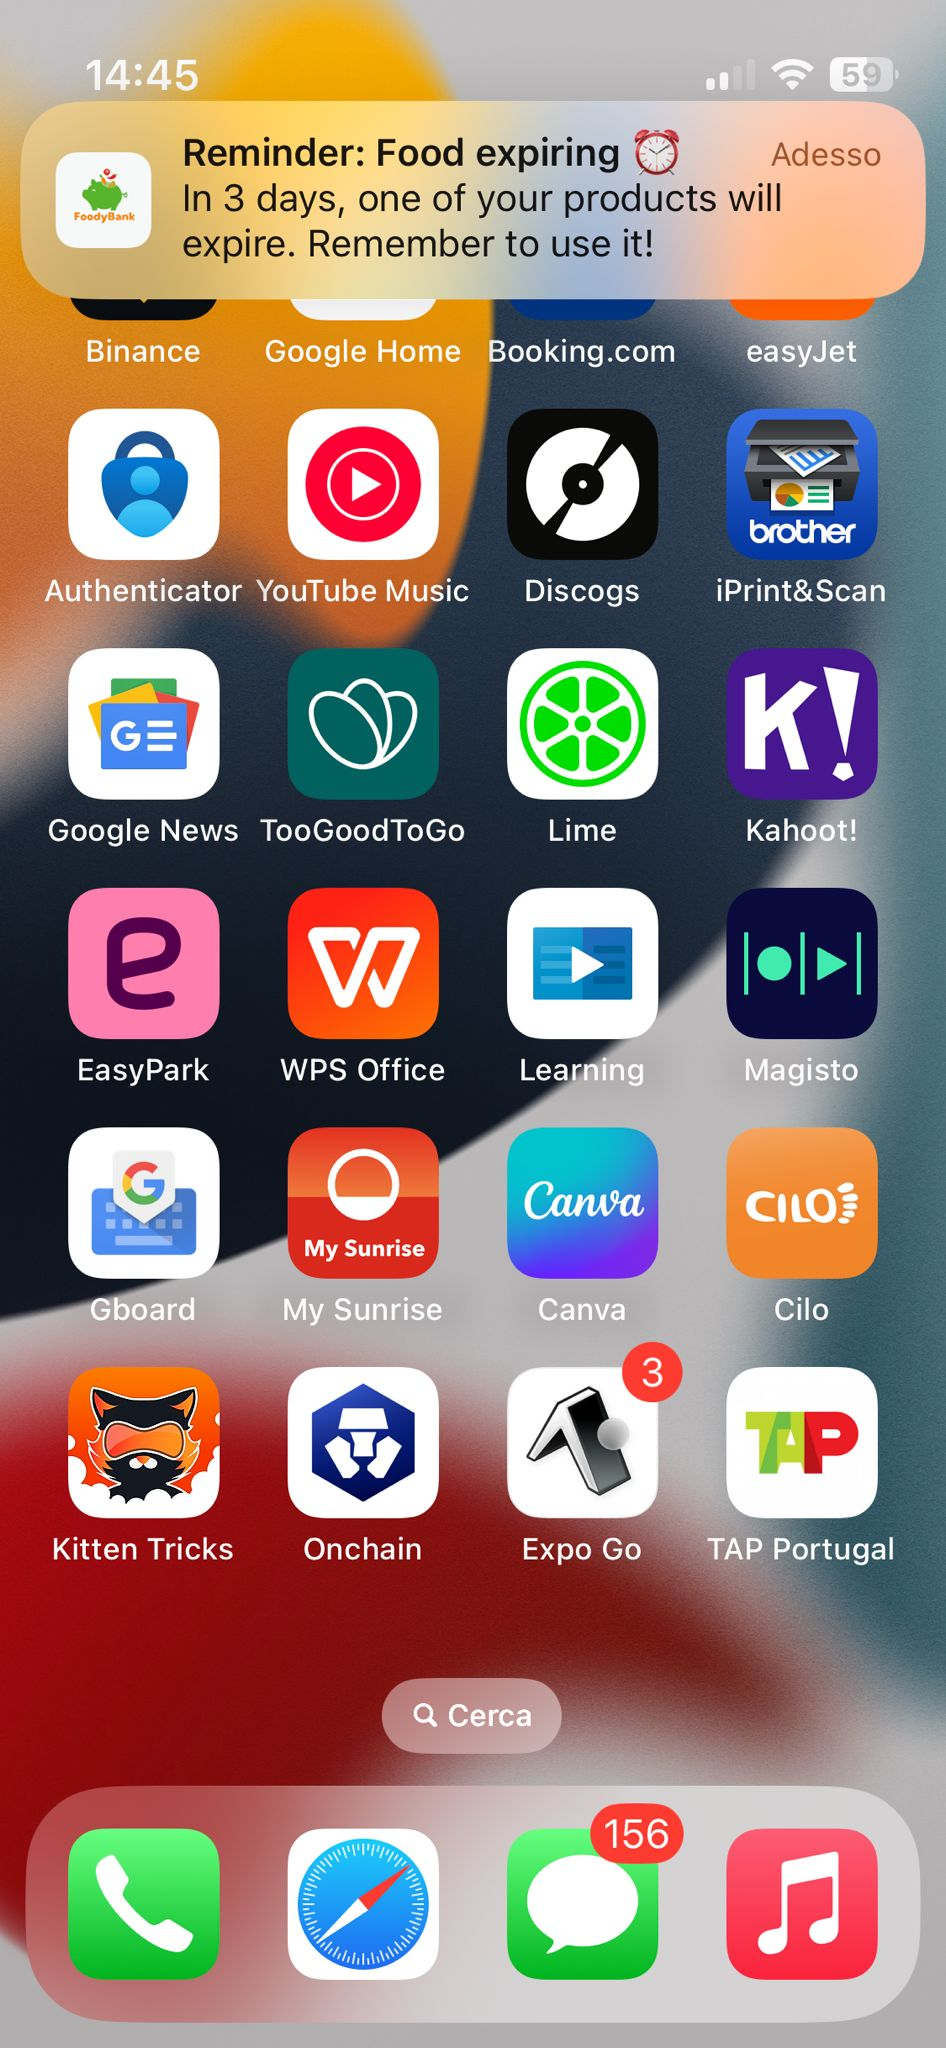
How it works:
- FoodyBank automatically checks expiration dates every day
- You receive a push notification when you have expiring products
- The notification tells you which kitchen and which product is about to expire
- Press on the notification to open the app and see details
Make sure you've enabled notifications for FoodyBank in your phone's settings.
📦 3.4 Change product status (Opened/Frozen/Closed)
One of FoodyBank's most useful features! When you open or freeze a product, the app automatically suggests a more appropriate new expiration date. For example: sealed milk expires in 2 months, but once opened it only lasts 3 days!
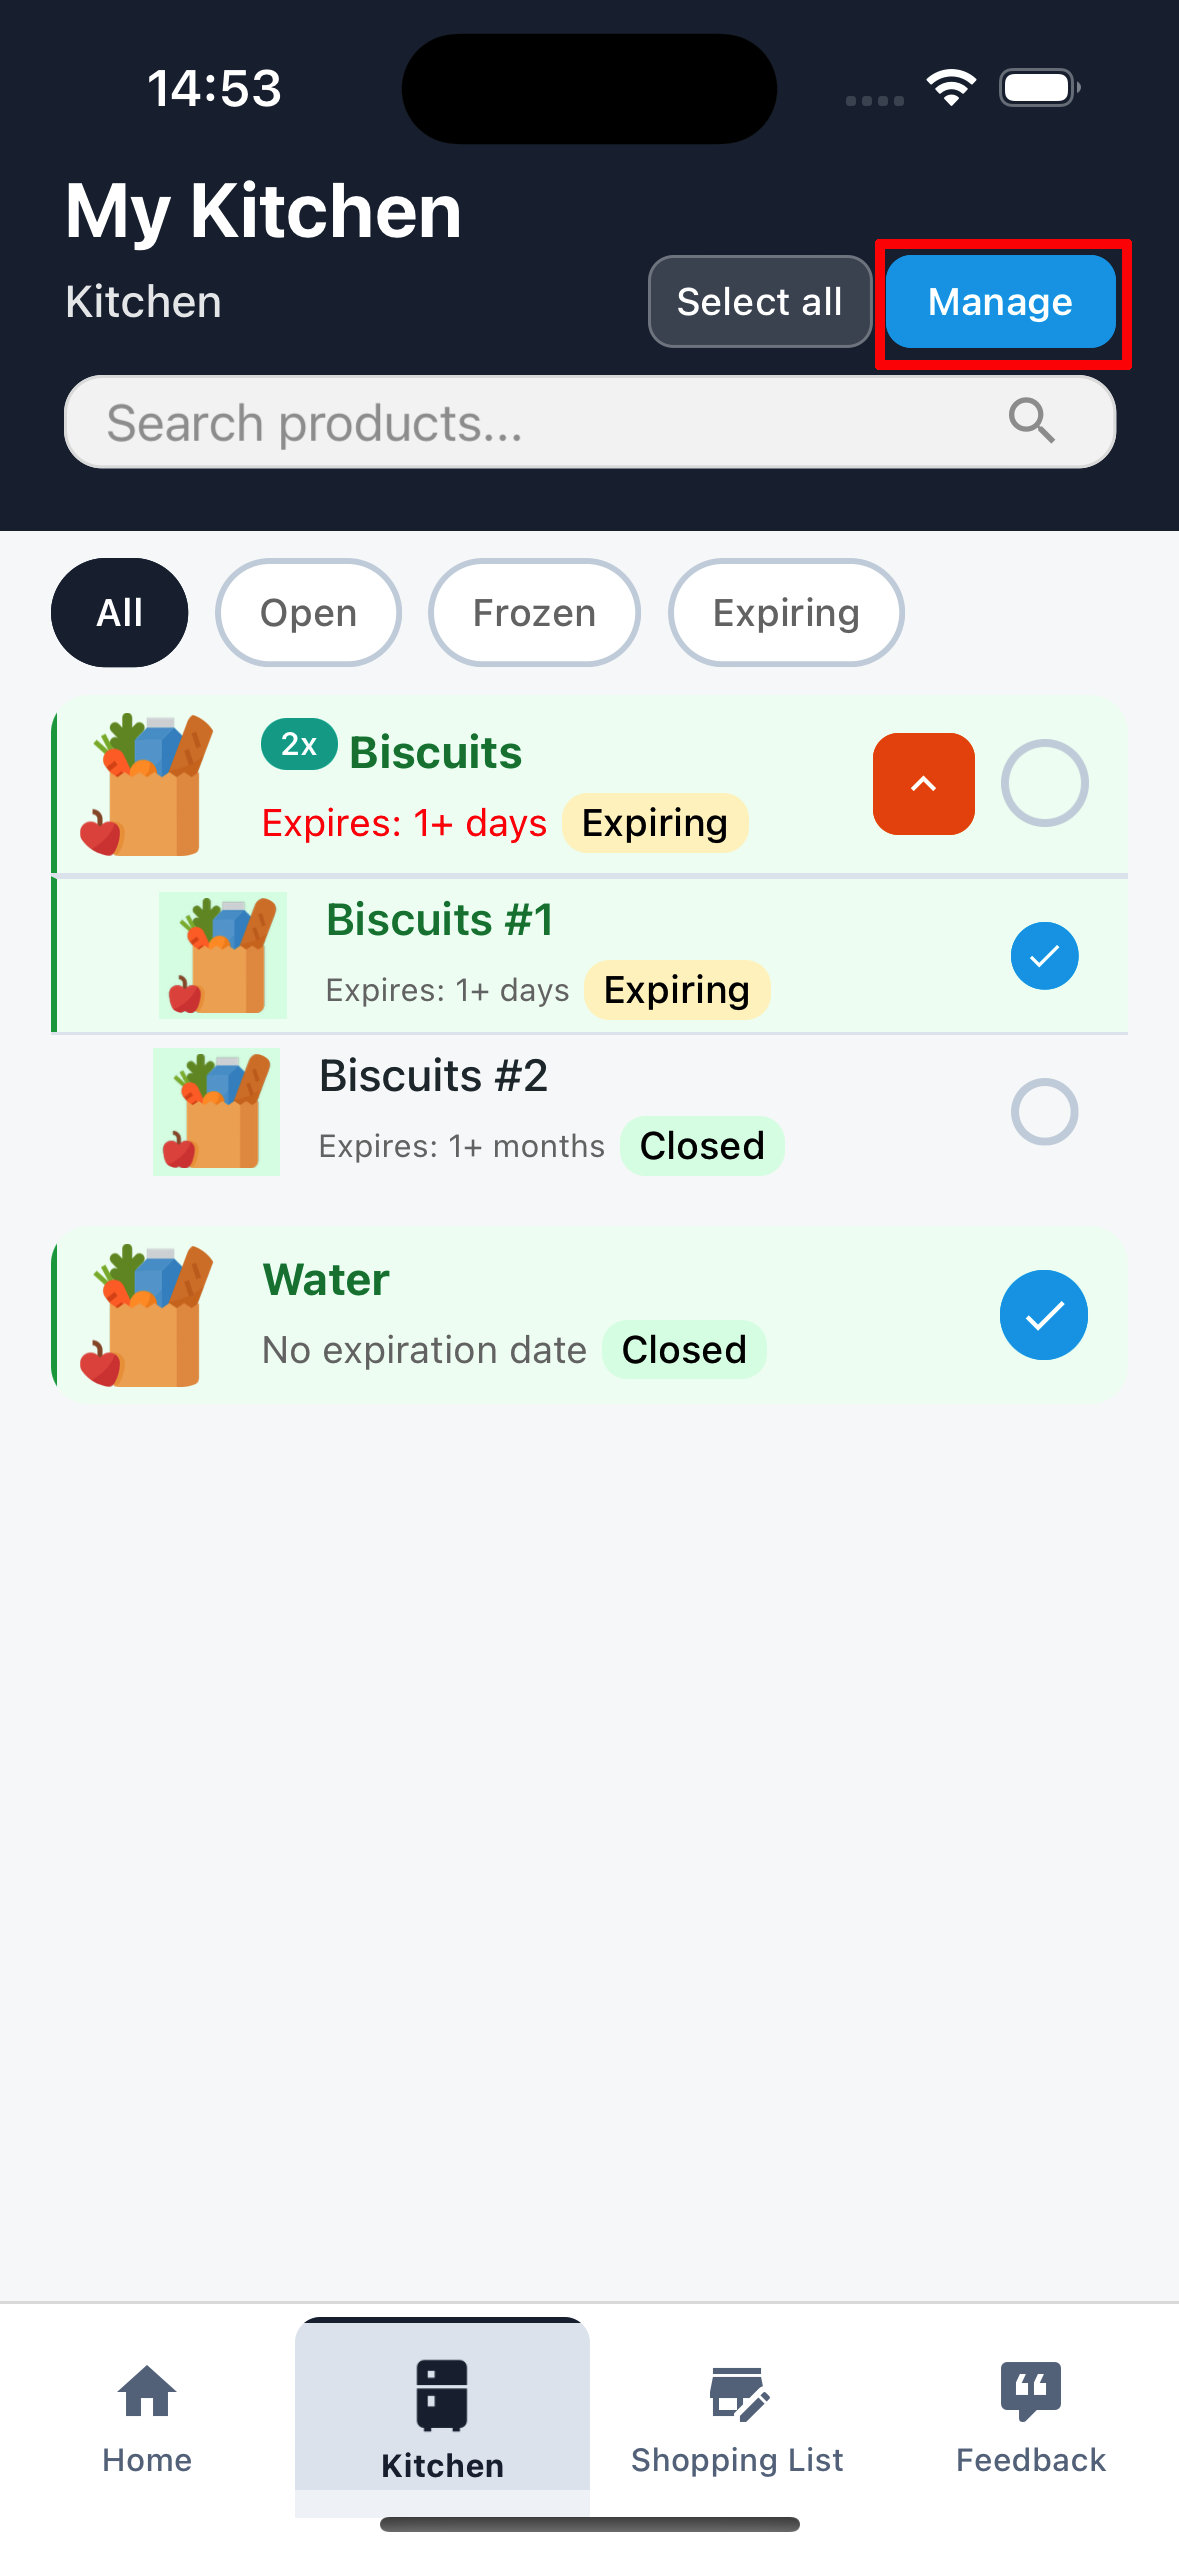
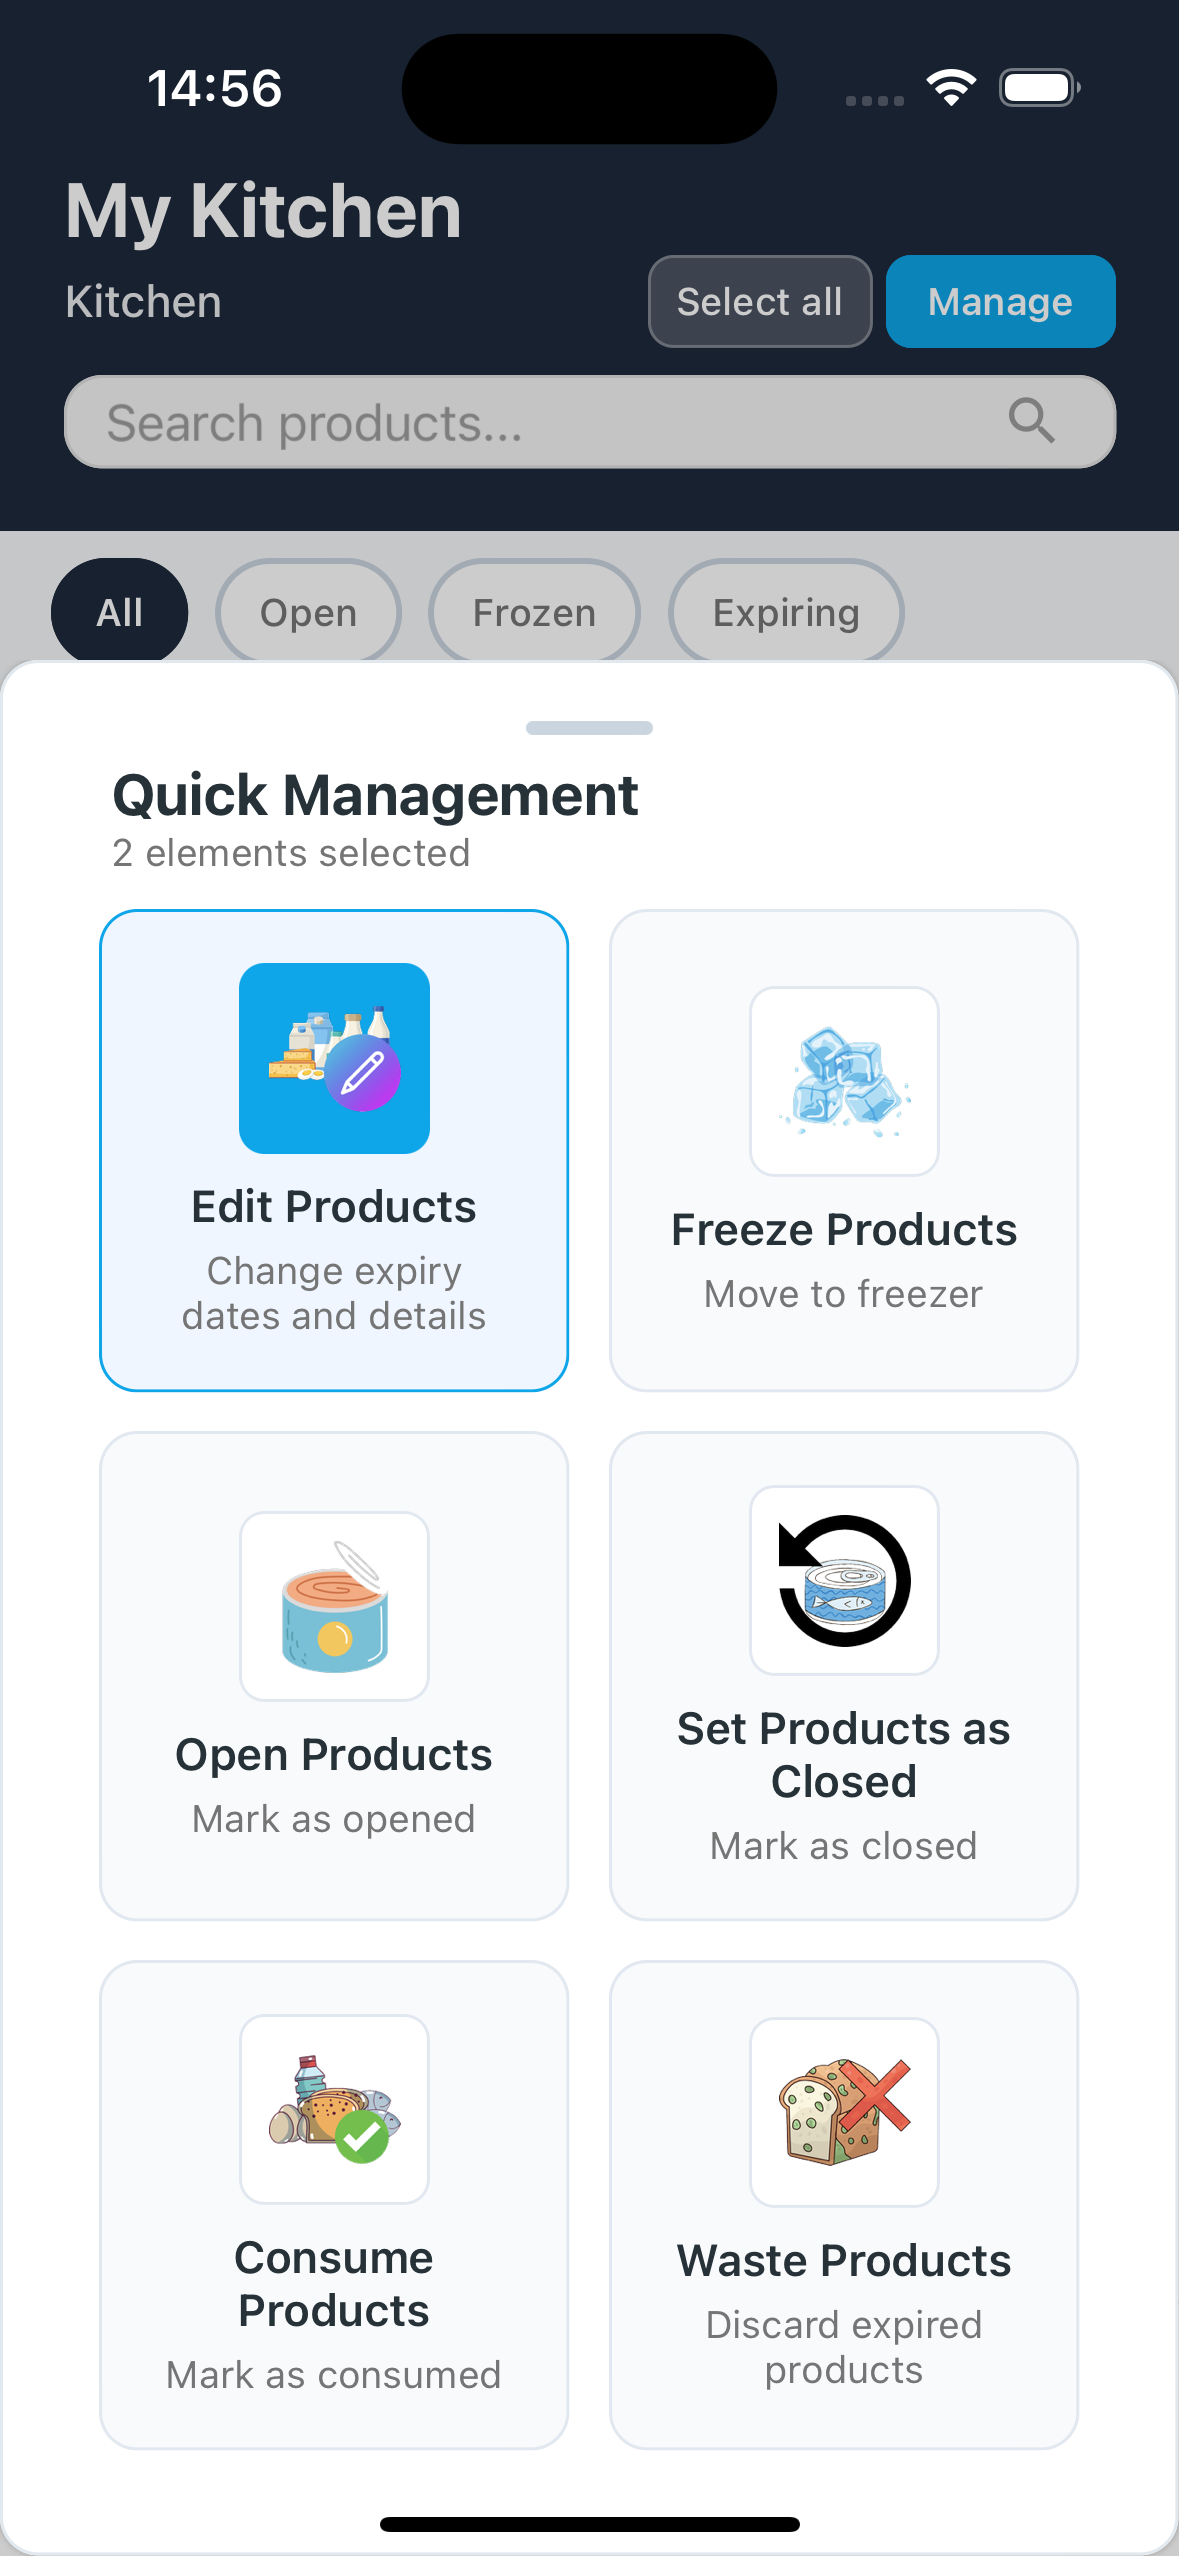
A) 🔓 Mark as "Opened"
When to use it: Just opened a product (e.g. milk, juice, yogurt)? Change the status to "Opened" and FoodyBank will suggest a shorter expiration (e.g. 3 days).
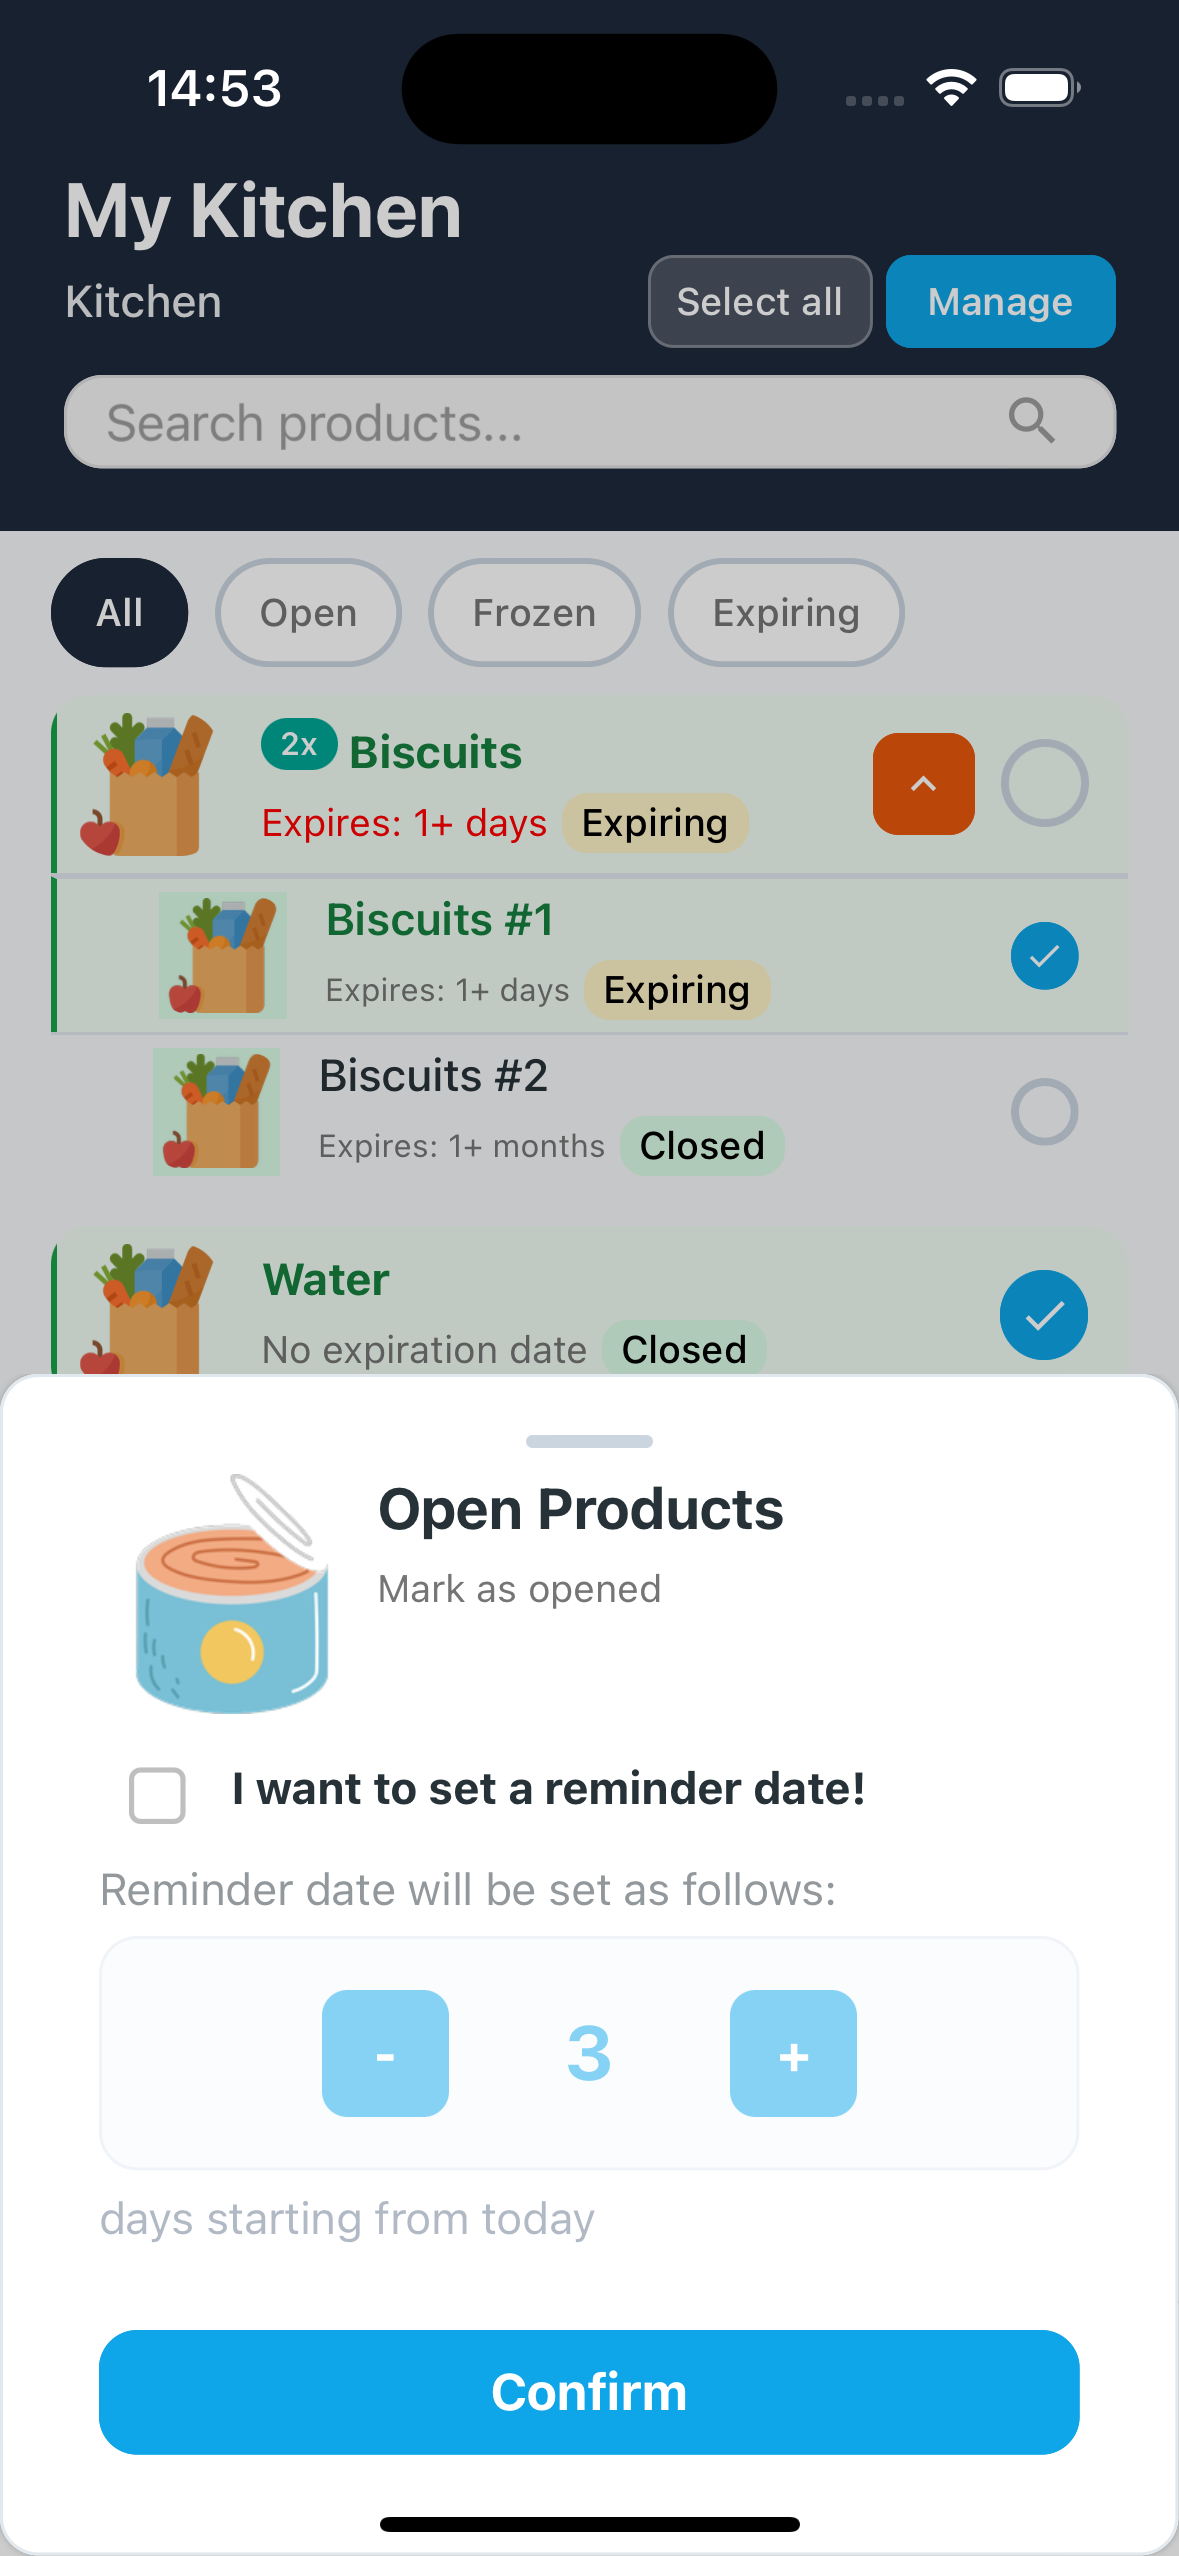
- From the Kitchen screen, select (checkbox) the products you just opened
- Press the "Manage" button at the top
- Select the "Open" action from the menu
- A window appears asking: "I want to set a reminder date!"
- Check the checkbox if you want the app to suggest a new expiration date
- The app suggests 3 days from today
- You can modify the days with the - and + buttons
- Press "Confirm"
- The product is now in "Opened" status with the new expiration date!
B) ❄️ Mark as "Frozen"
When to use it: Have a product about to expire? Freeze it! FoodyBank will suggest a much longer expiration (e.g. 90 days).
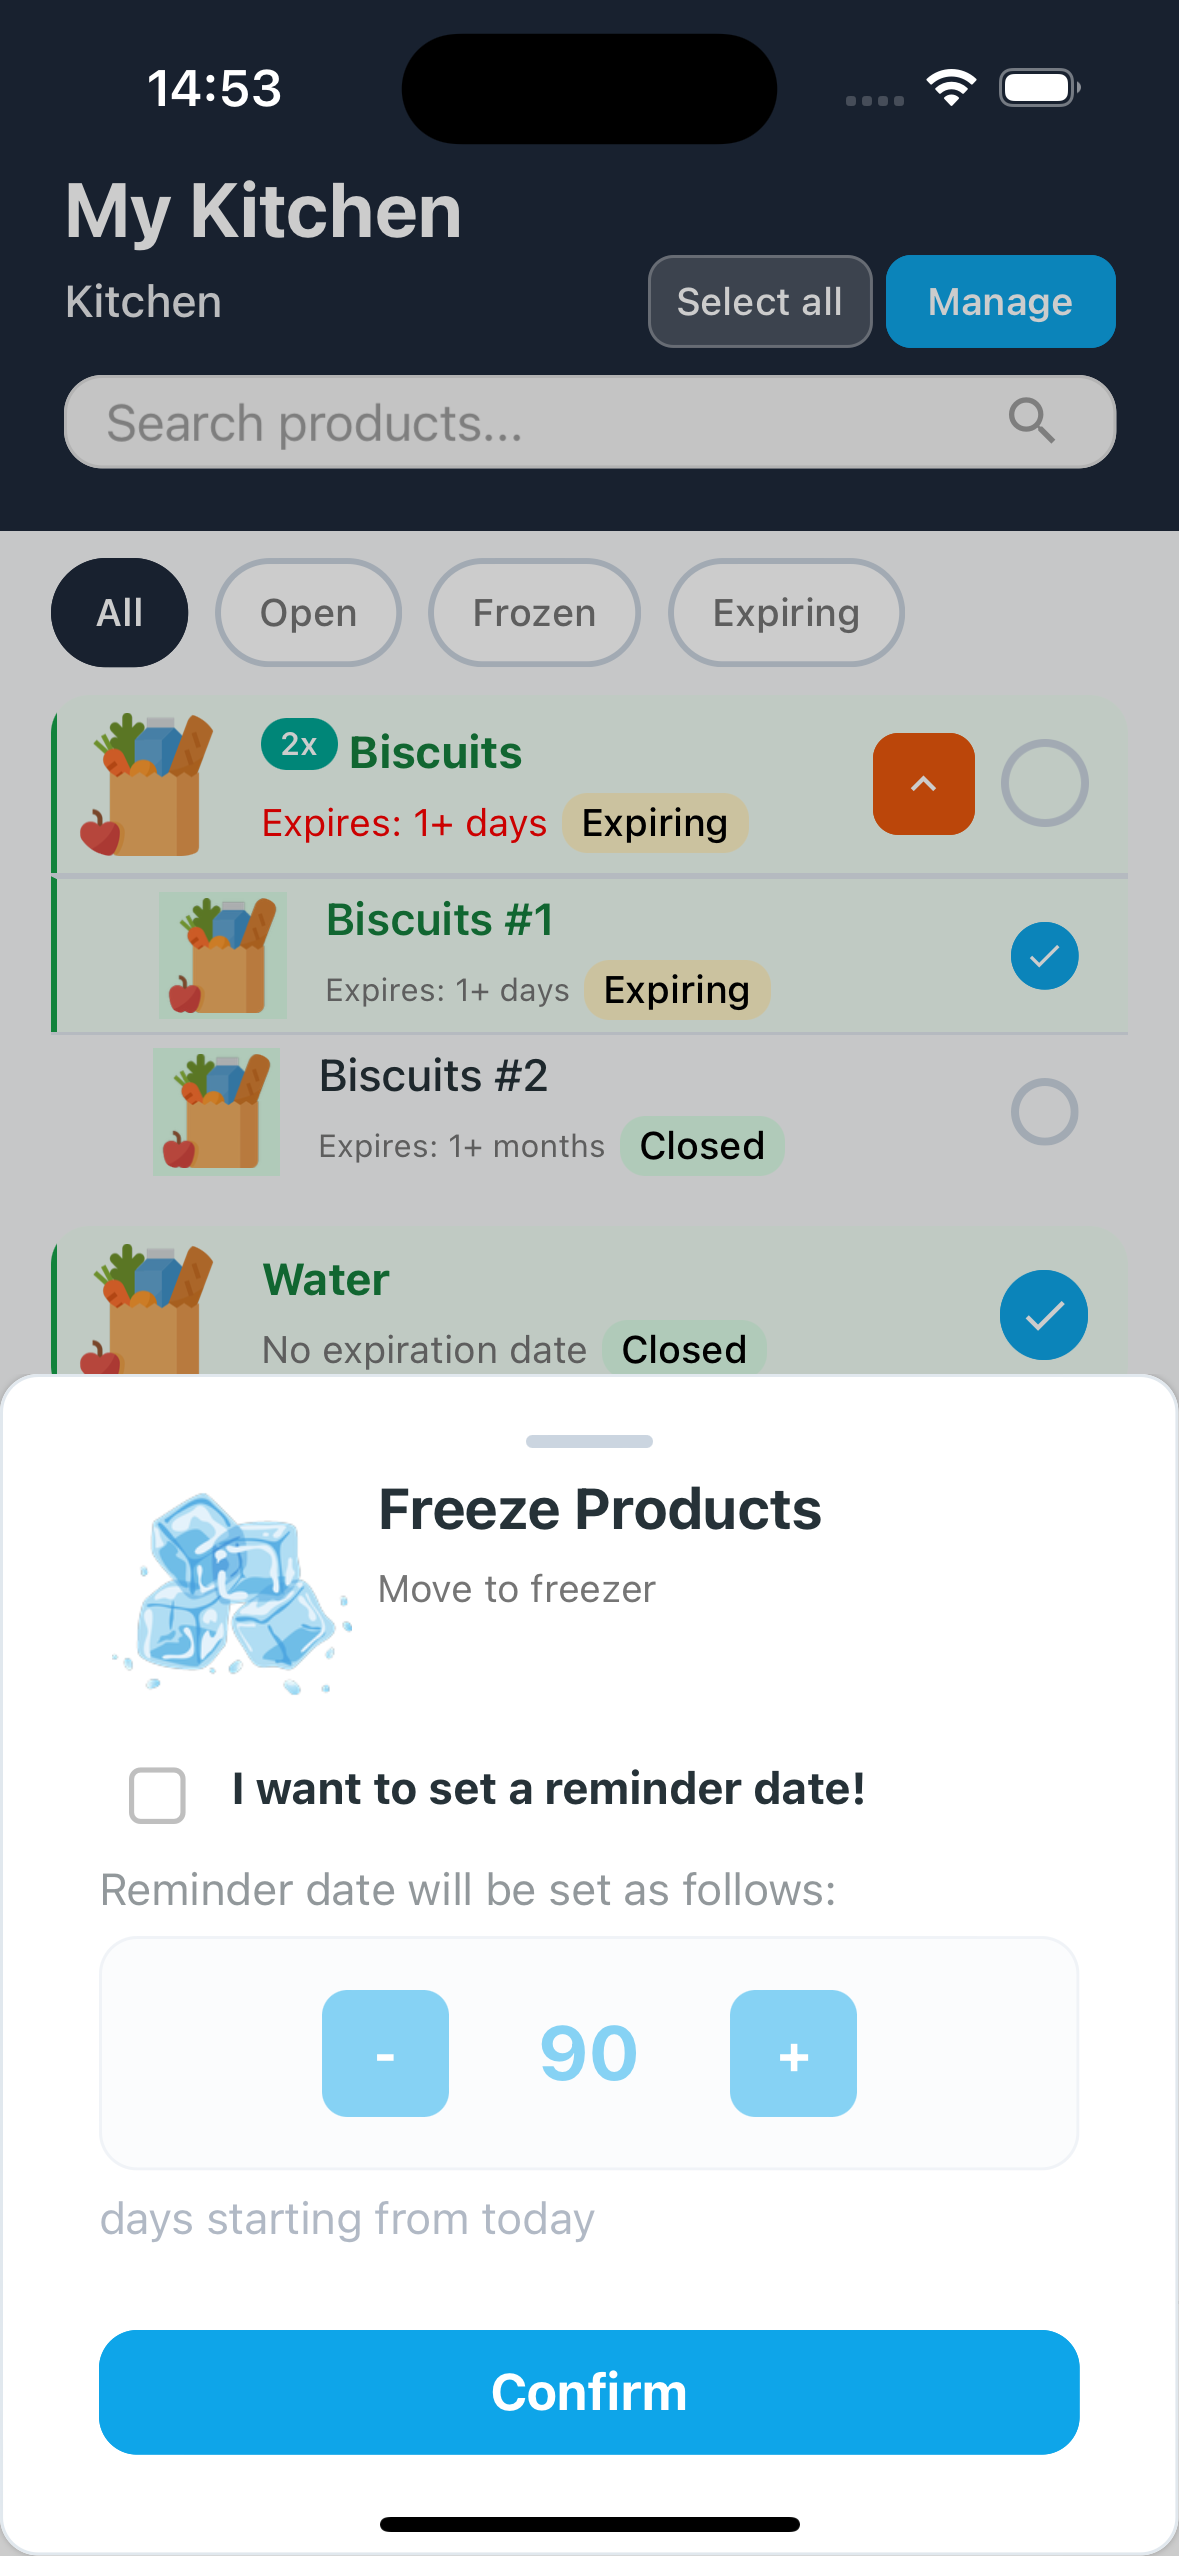
- From the Kitchen screen, select (checkbox) the products you want to freeze
- Press the "Manage" button at the top
- Select the "Freeze" action from the menu
- A window appears asking: "I want to set a reminder date!"
- Check the checkbox if you want the app to suggest a new expiration date
- The app suggests 90 days from today
- You can modify the days with the - and + buttons
- Press "Confirm"
- The product is now in "Frozen" status with the new expiration date!
C) 🔒 Return to "Closed"
When to use it: Changed your mind or made a mistake? You can return the product to "Closed" status and FoodyBank will automatically restore the original expiration date.
- From the Kitchen screen, select (checkbox) the products you want to close
- Press the "Manage" button at the top
- Select the "Close" action from the menu
- Press "Confirm"
- The product returns to "Closed" status with the original expiration date restored!
D) Consume product
When to use it: Finished a product? Mark it as "Consumed" to keep it tracked. FoodyBank will ask if you want to automatically add it to the shopping list to rebuy it!
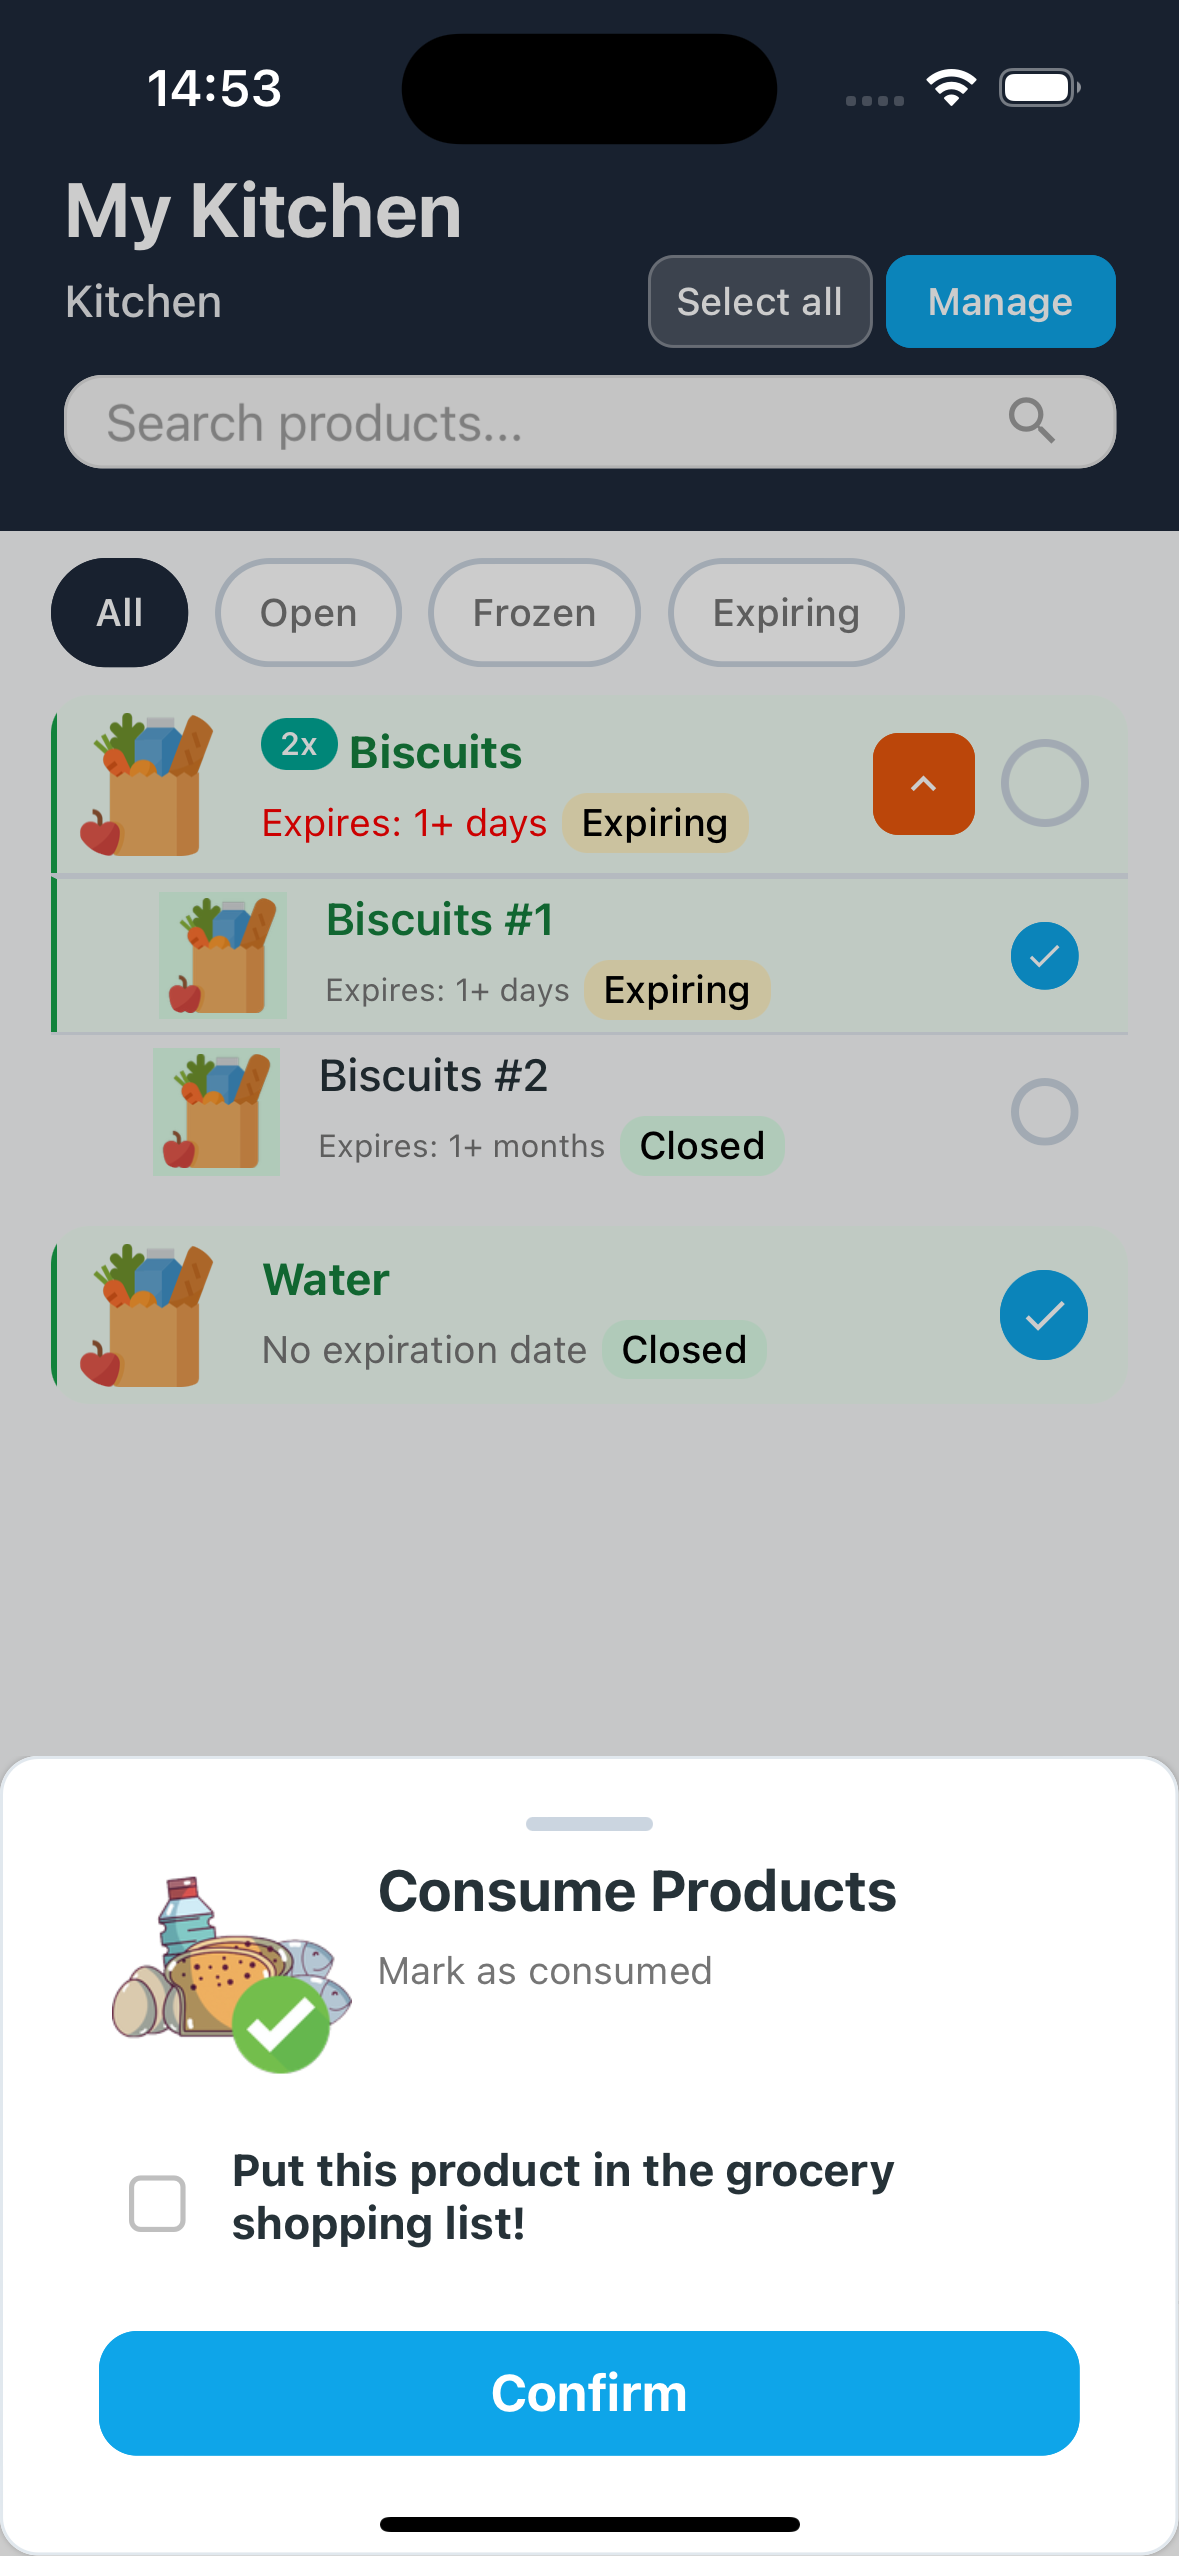
- From the Kitchen screen, select (checkbox) the products you consumed
- Press the "Manage" button at the top
- Select the "Consume" action from the menu
- A window appears with a checkbox: "Add this product to the shopping list!"
- Check the checkbox if you want to automatically add it to the list to rebuy it
- Press "Confirm"
- The product is removed from the kitchen (and optionally added to the shopping list)
E) 🗑️ Throw away product
When to use it: Is a product expired or spoiled? Mark it as "Thrown away". Here too, FoodyBank will ask if you want to add it to the shopping list to replace it.
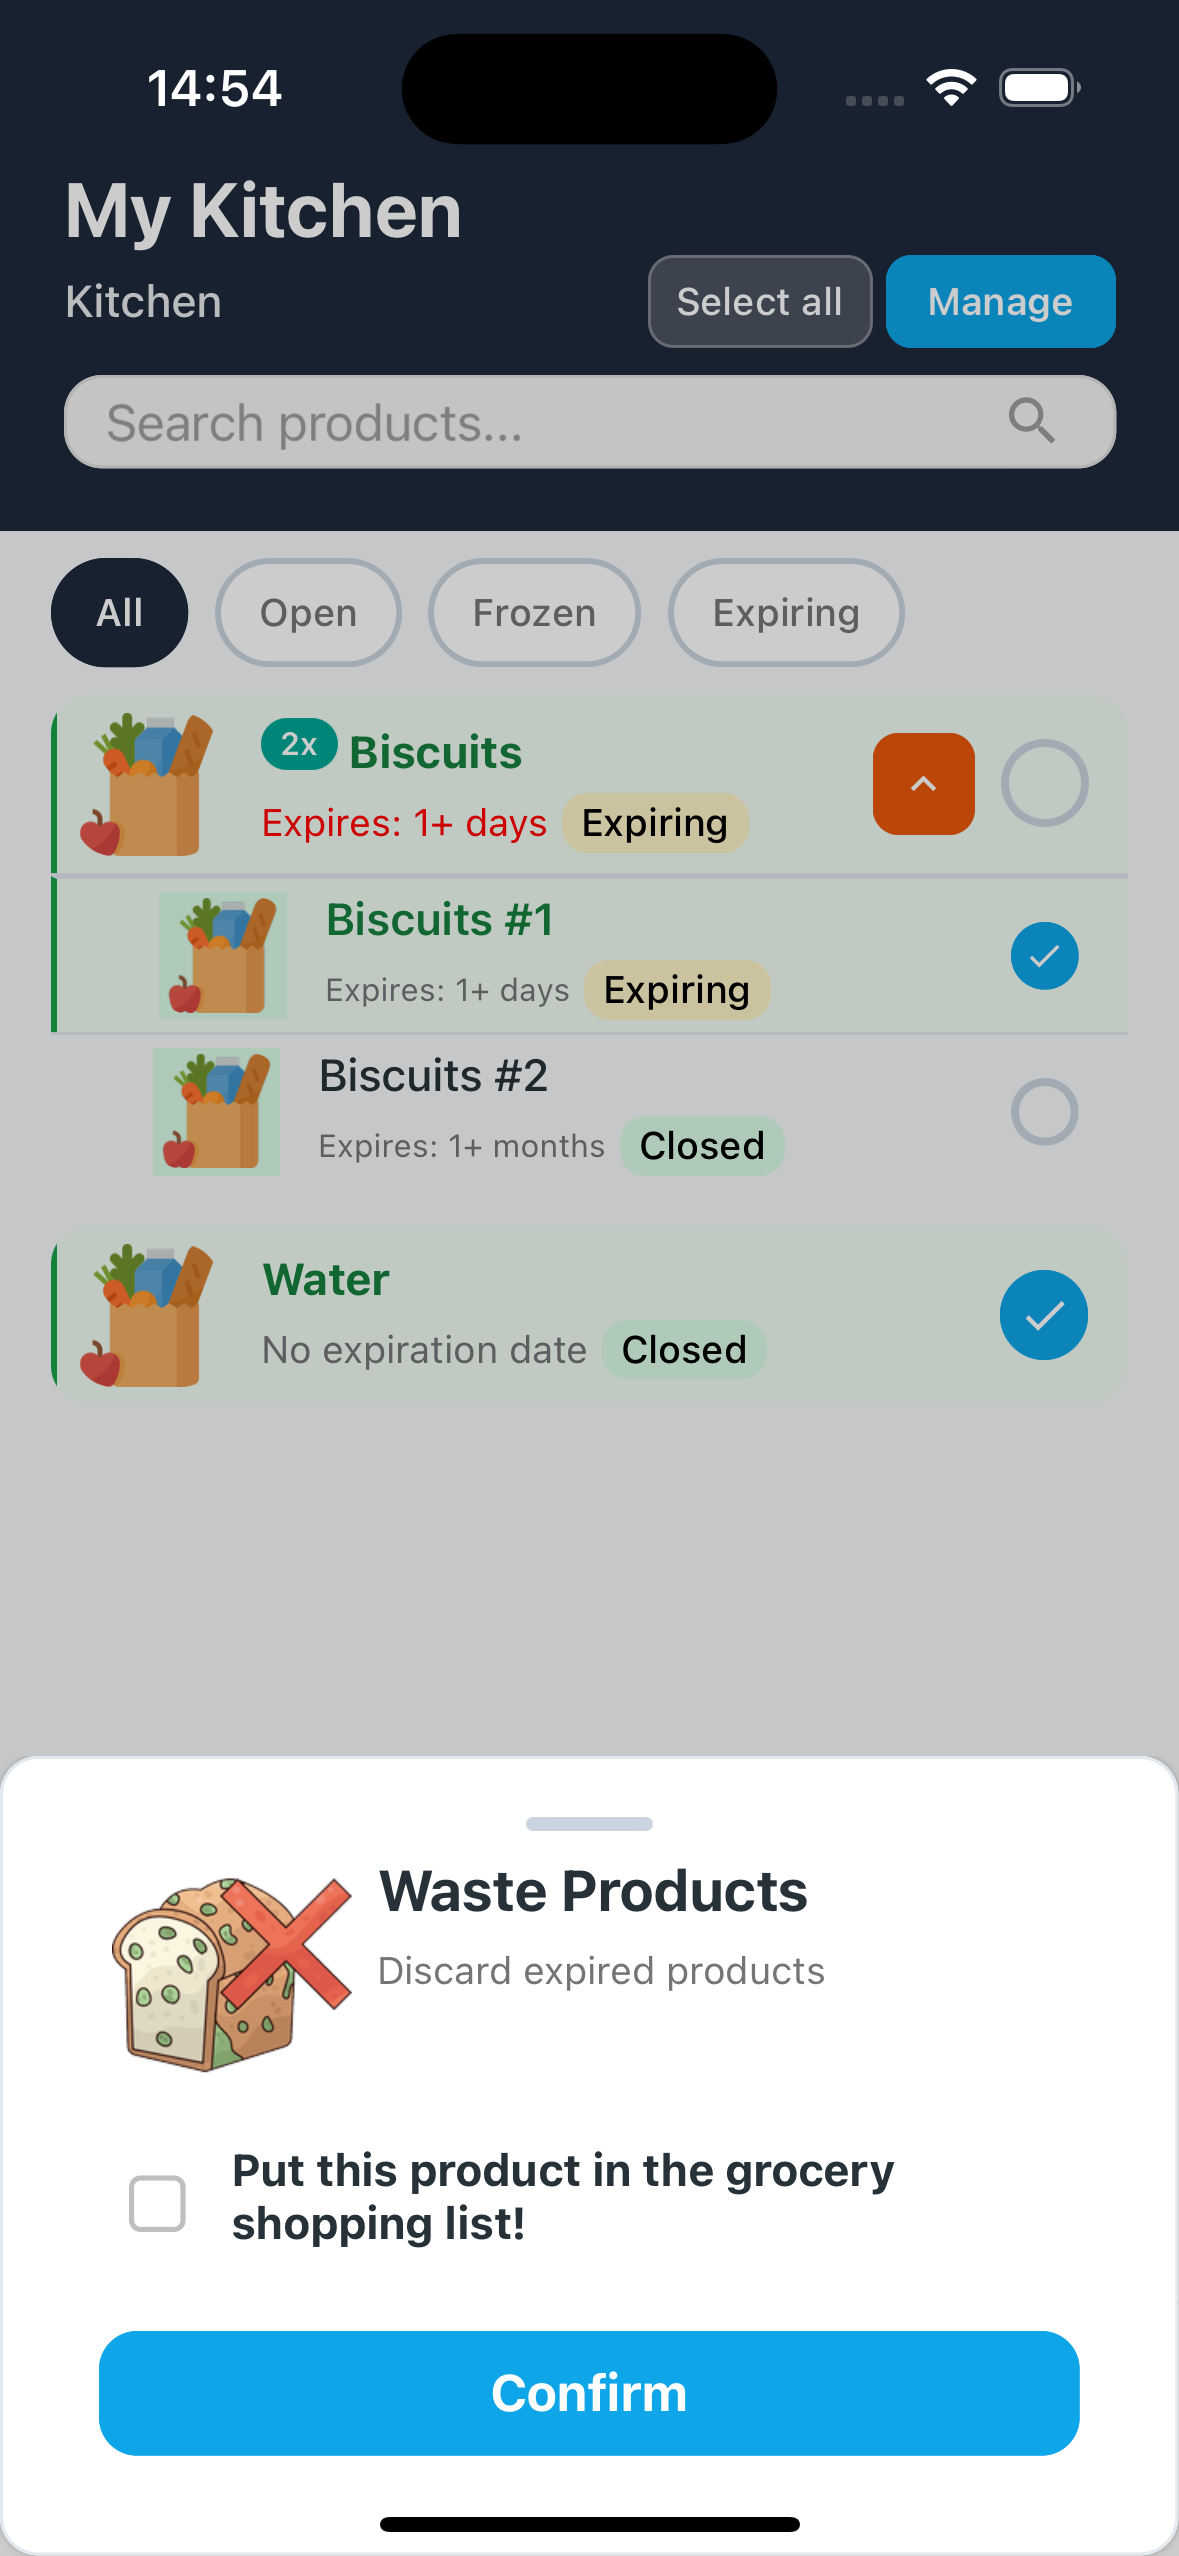
- From the Kitchen screen, select (checkbox) the products to throw away
- Press the "Manage" button at the top
- Select the "Throw away" action from the menu
- A window appears with a checkbox: "Add this product to the shopping list!"
- Check the checkbox if you want to rebuy it
- Press "Confirm"
- The product is removed from the kitchen (and optionally added to the shopping list)
If you select an expired product to open or freeze it, FoodyBank will warn you that it's better to throw it away!
🛒 4. Shopping List
The Shopping List helps you organize purchases! It works like the Kitchen screen but is designed for the supermarket. Add products to buy, move them to cart when you take them from the shelf, then confirm the purchase to automatically transfer them to your kitchen!
🗂️ 4.1 How it works
The Shopping List has two states to follow your purchase process: from list to cart, then to kitchen!
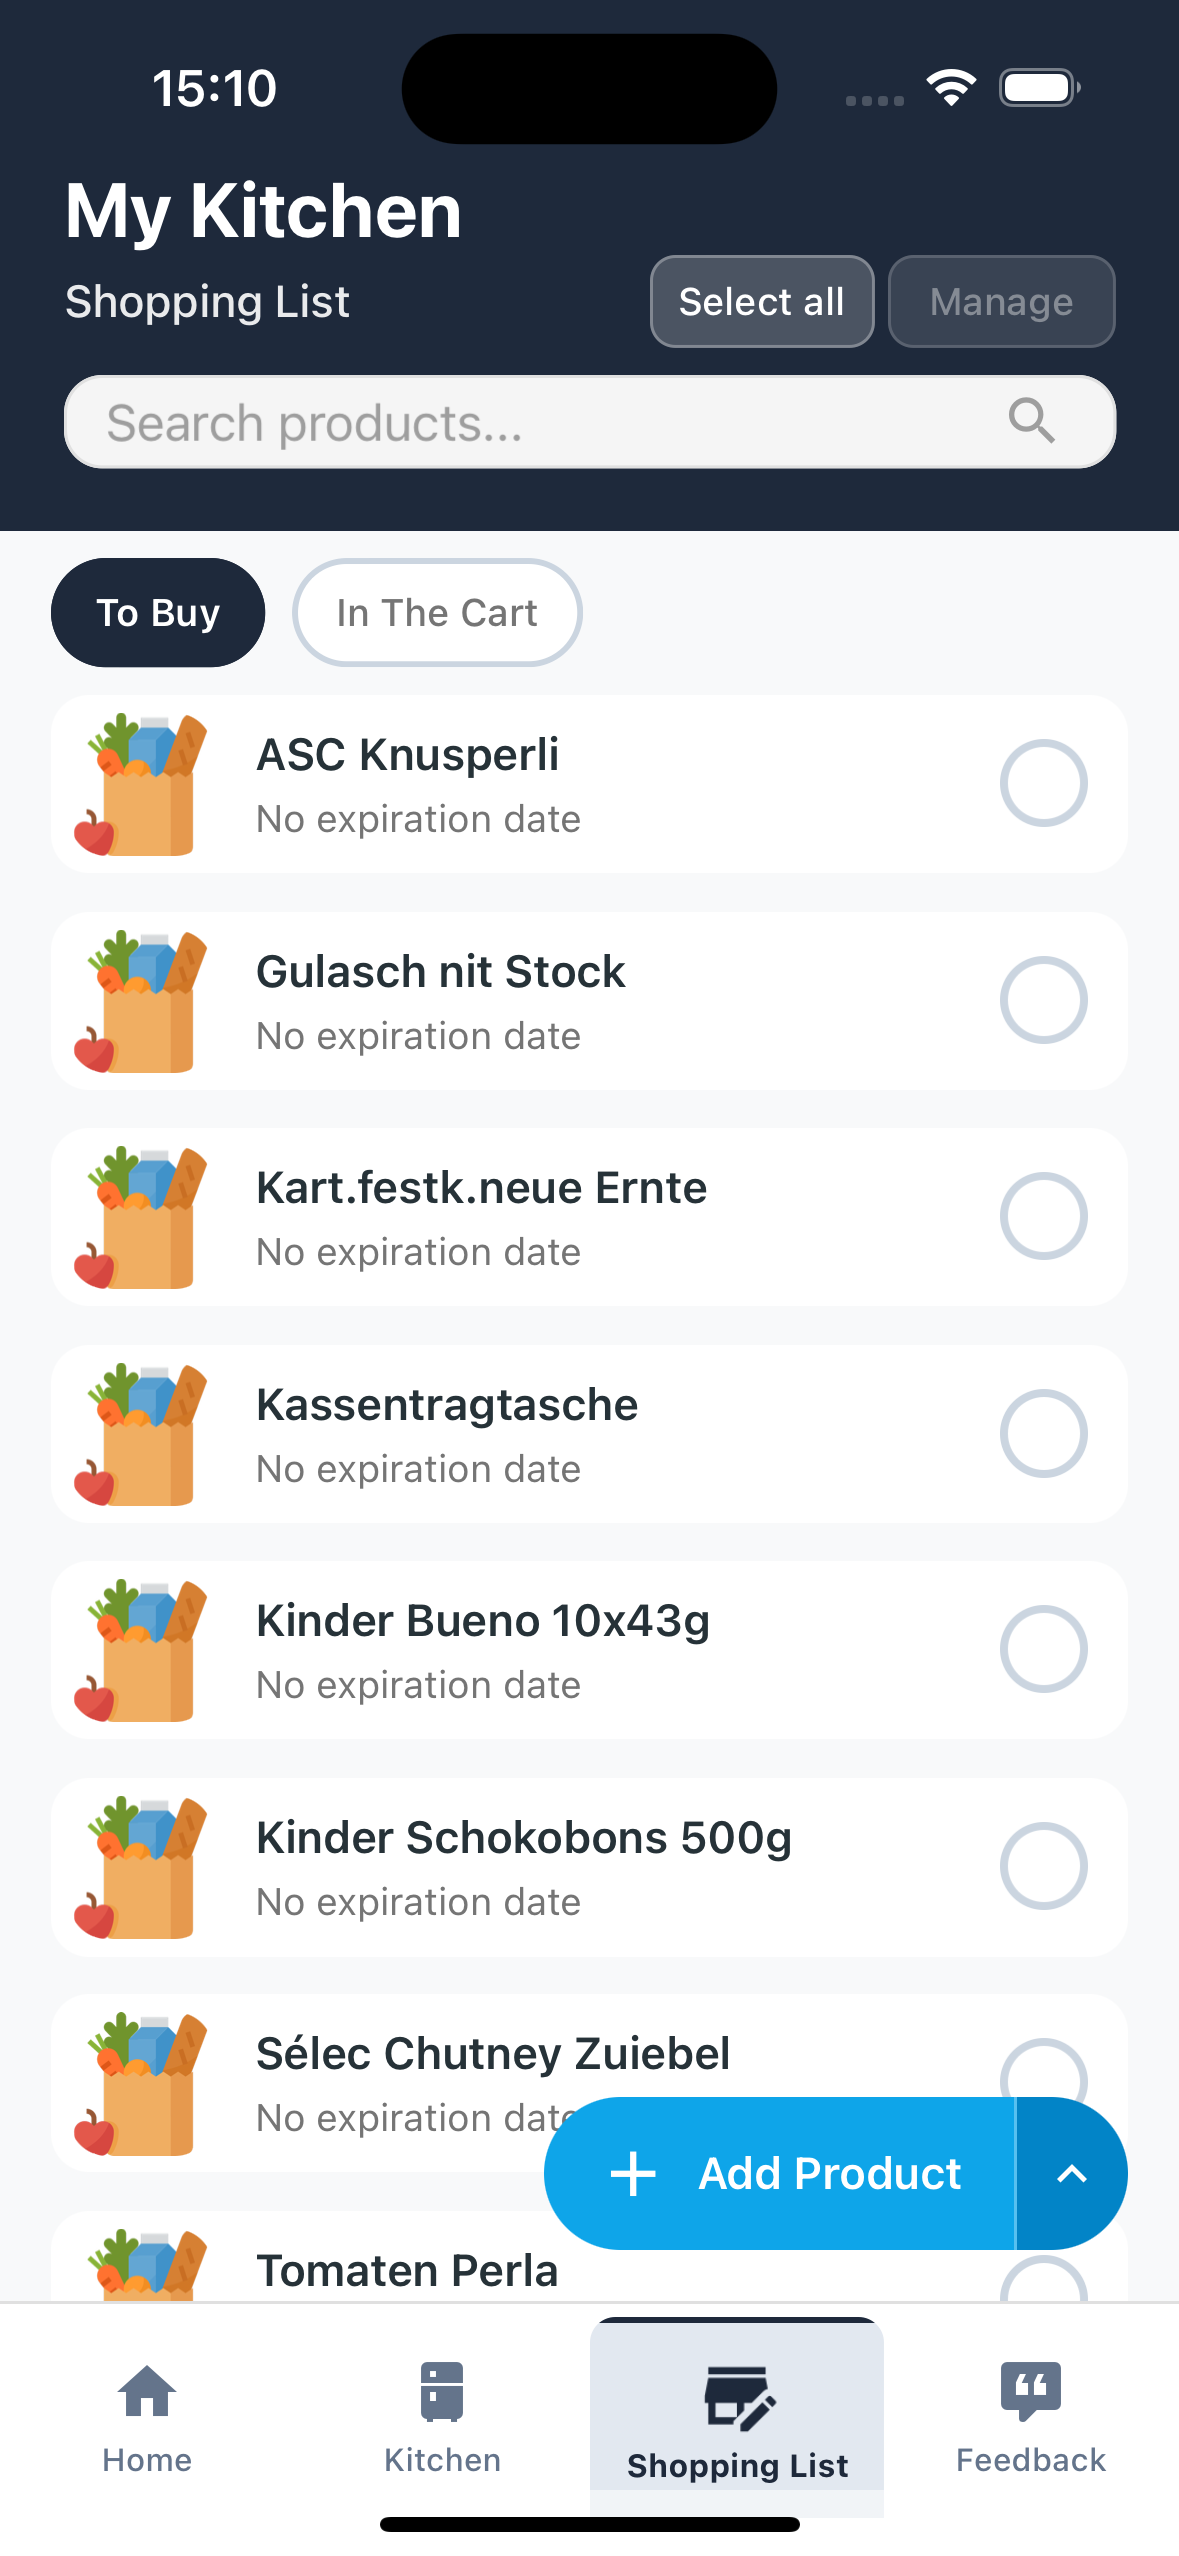
Two available states:
- To Buy - Products you still need to get from the shelf
- In Cart - Products you've already put in your physical cart
How to add products:
- You can add products to the list exactly like in Kitchen (see section 2)
- Use the "Add Product" button at the bottom
- Choose from: Manual, Scan, Voice or Receipt
- Or, when you consume/throw away a product from the kitchen, check the checkbox to automatically add it to the list!
🔍 4.2 Filters: To Buy and In Cart
The two filters let you quickly see what you still need to get and what you already have in your cart.
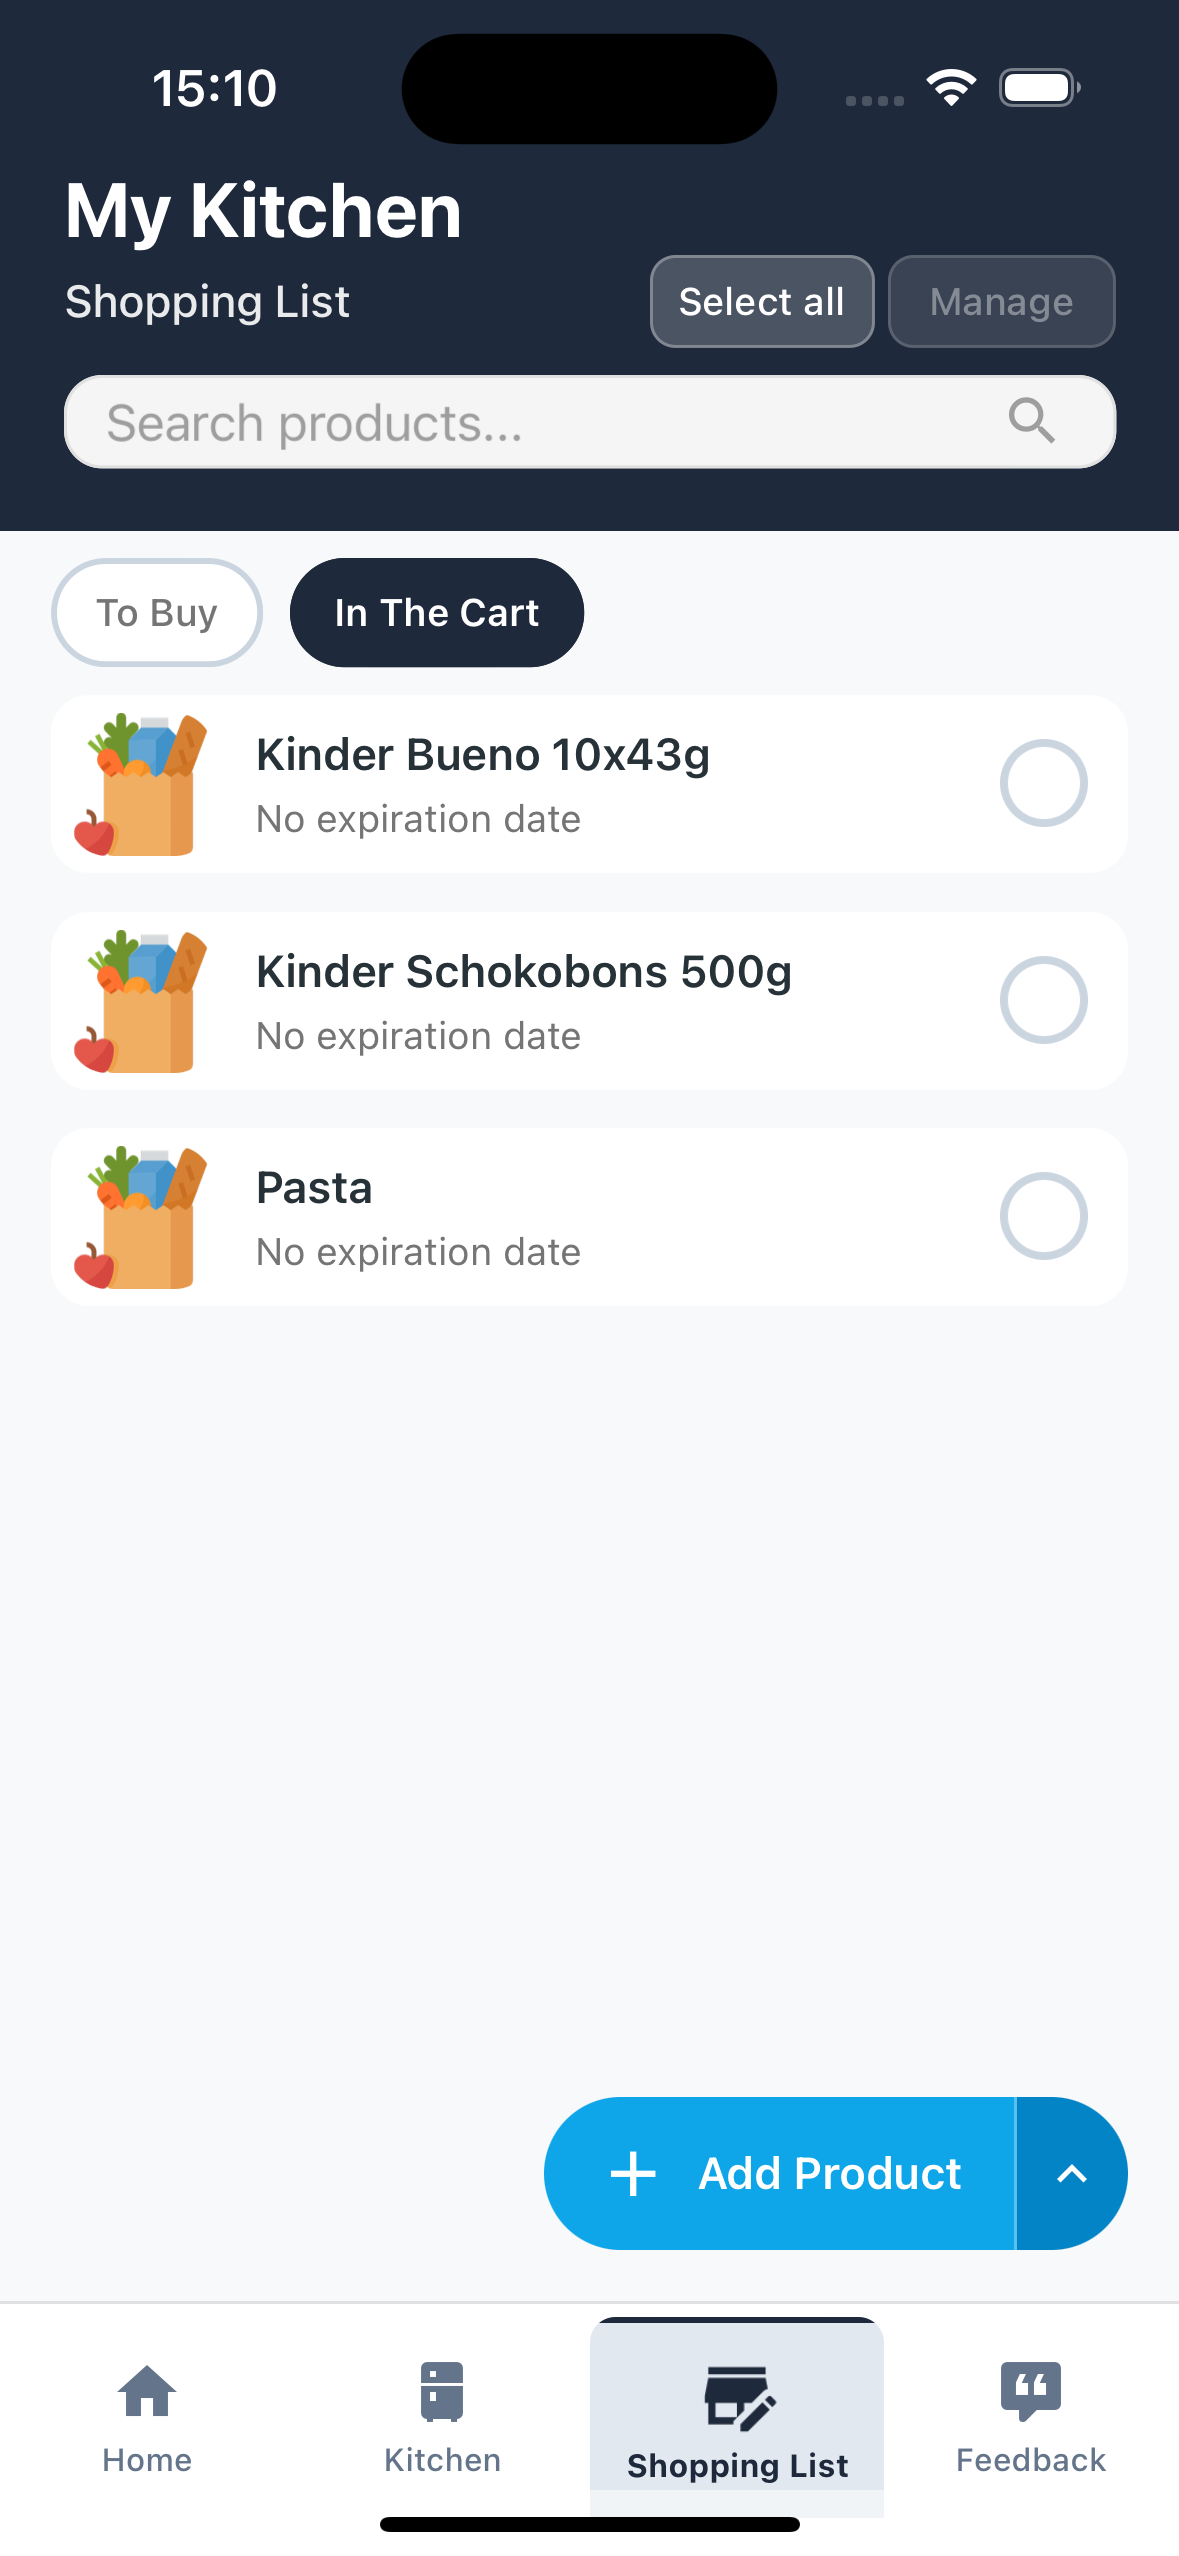
Steps:
- From the Shopping List screen, look at the top below the search bar
- Press on "To Buy" to see products you still need to get
- Press on "In Cart" to see products already added to physical cart
🛒 4.3 Move products to cart (at the supermarket)
When you're at the supermarket and take a product from the shelf, move it to "In Cart" right away so you know what you're still missing!
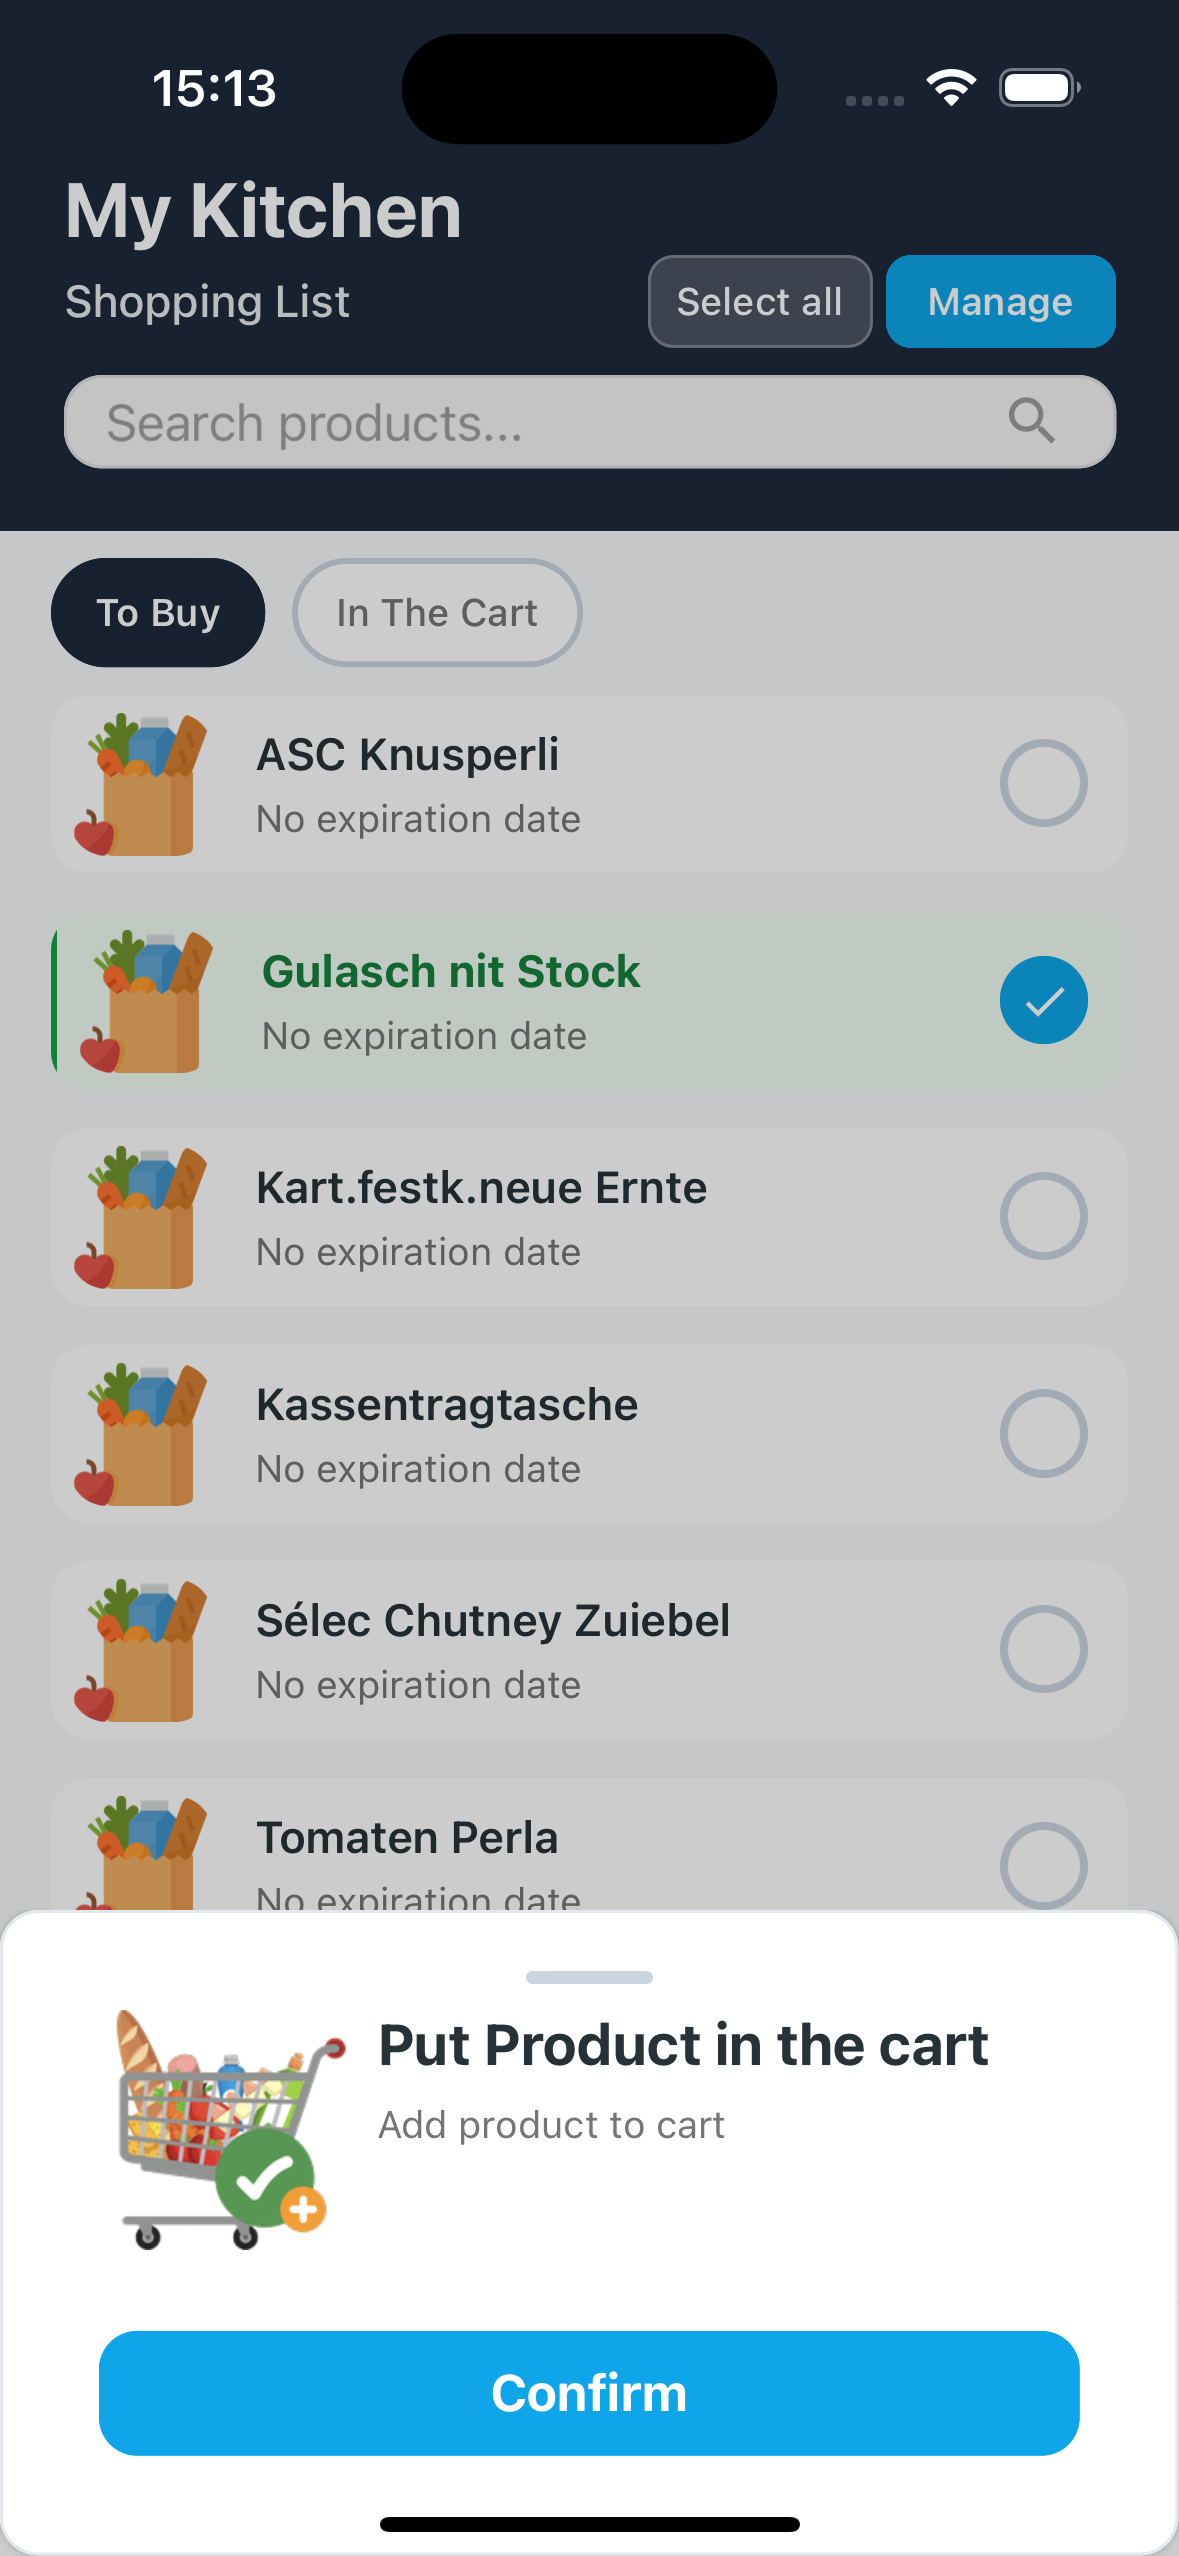
Steps:
- From the Shopping List screen, "To Buy" filter
- Select (checkbox) the products you just took
- Press the "Manage" button at the top
- Select the "Move to Cart" action
- Press "Confirm"
- The products are now in cart!
4.4 Confirm purchase and move to kitchen
Done shopping? Confirm the purchase to move all products from list to your kitchen! You can also enter the total paid to track your expenses.
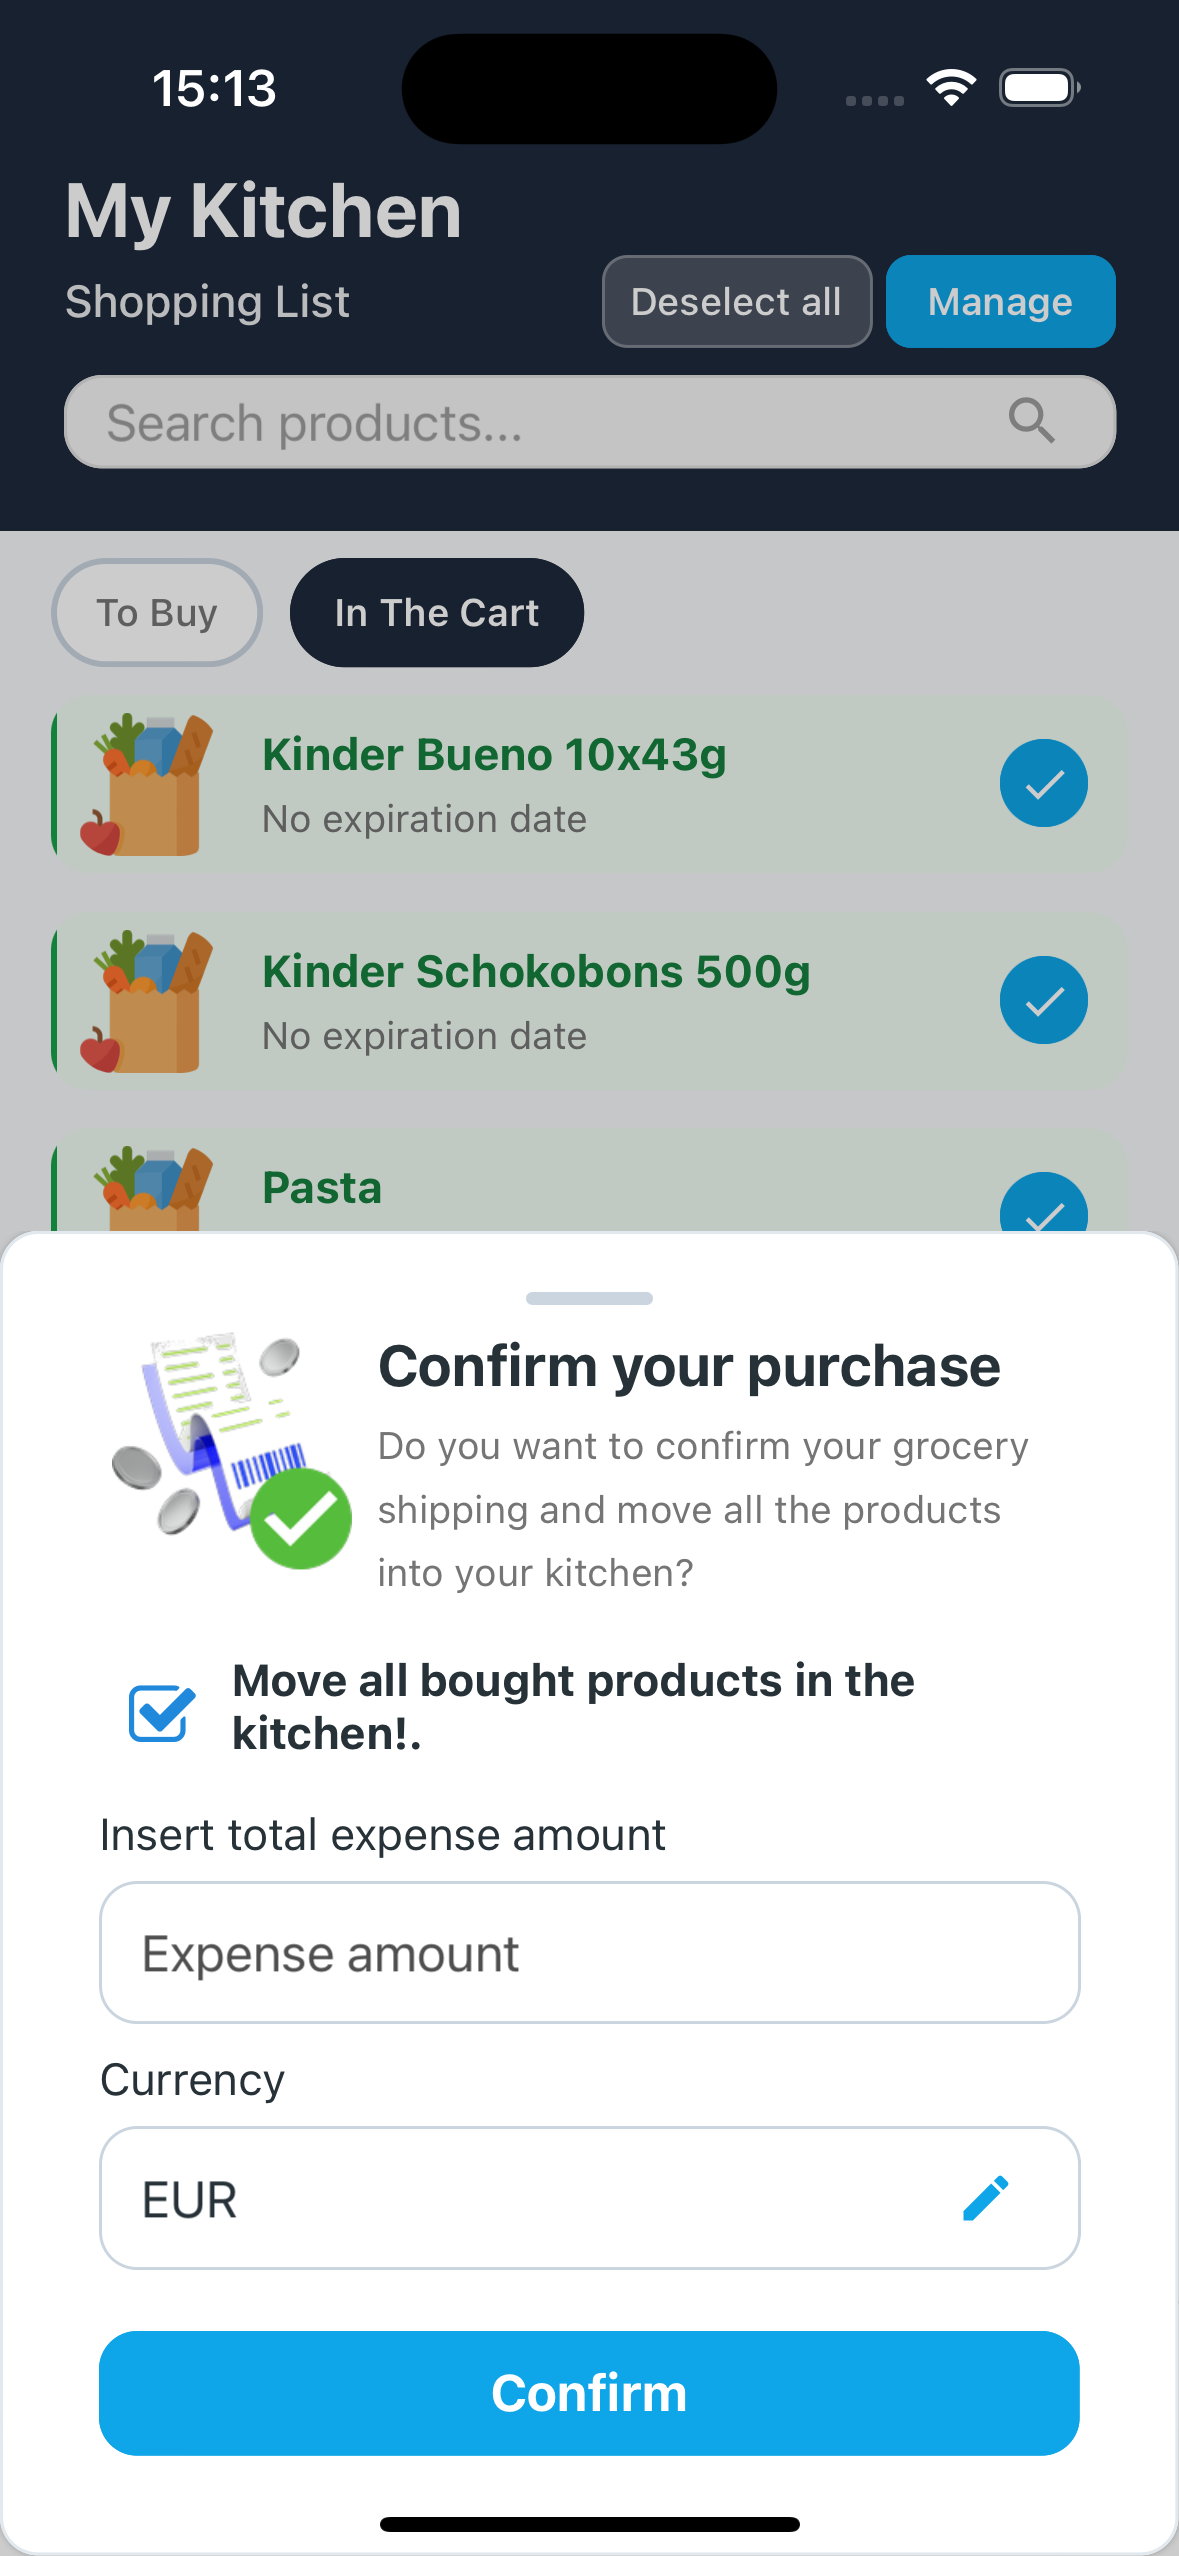
Steps:
- From the Shopping List screen, "In Cart" filter
- Select (checkbox) all products you bought
- Press the "Manage" button at the top
- Select the "Confirm your purchase" action
- A window appears with:
- Checkbox "Move all purchased products to kitchen!" (usually checked)
- "Total paid" field - Enter the receipt total
- Currency - Select currency (EUR, USD, etc.)
- Press "Confirm"
- Products are moved to your Kitchen and removed from shopping list!
You can also not move products to kitchen if you want to just keep them tracked in the list!
💰 5. Foody Points & Rewards
FoodyBank rewards you for using the app! Earn Foody 🌕 points every day and by actively using it. In the future you'll be able to exchange them for grocery discounts, store deals or charity donations!
🎁 5.1 Daily Reward
Every day you can claim a random reward! Open the Points & Rewards Center and discover how many Foody you won today: 10, 20 or even 50 points!
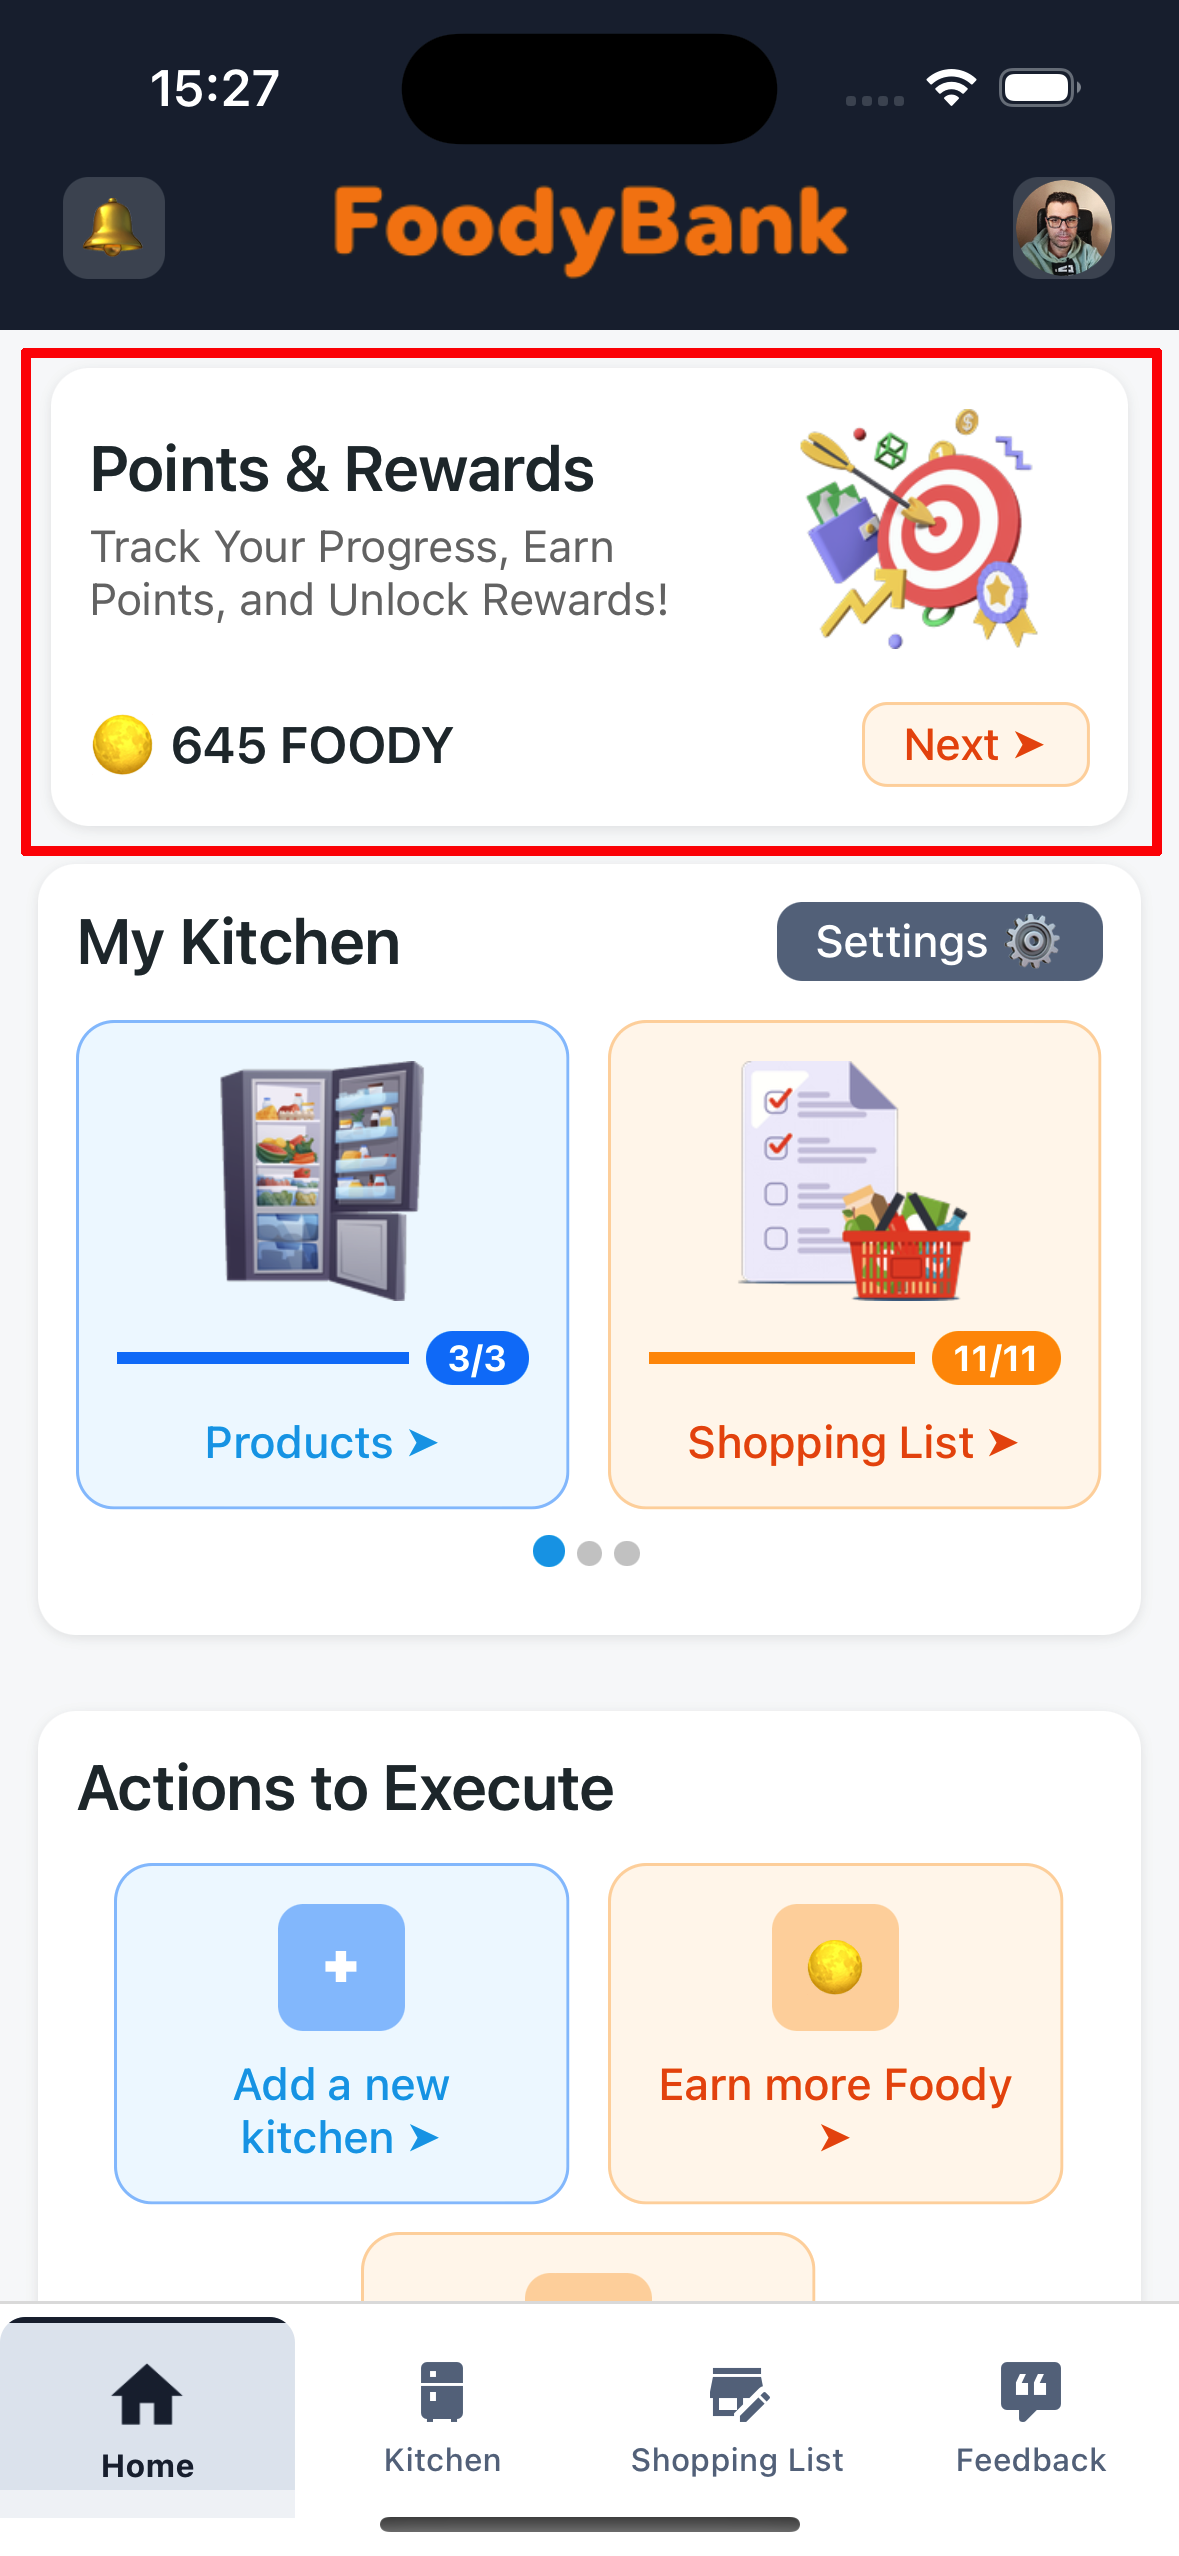
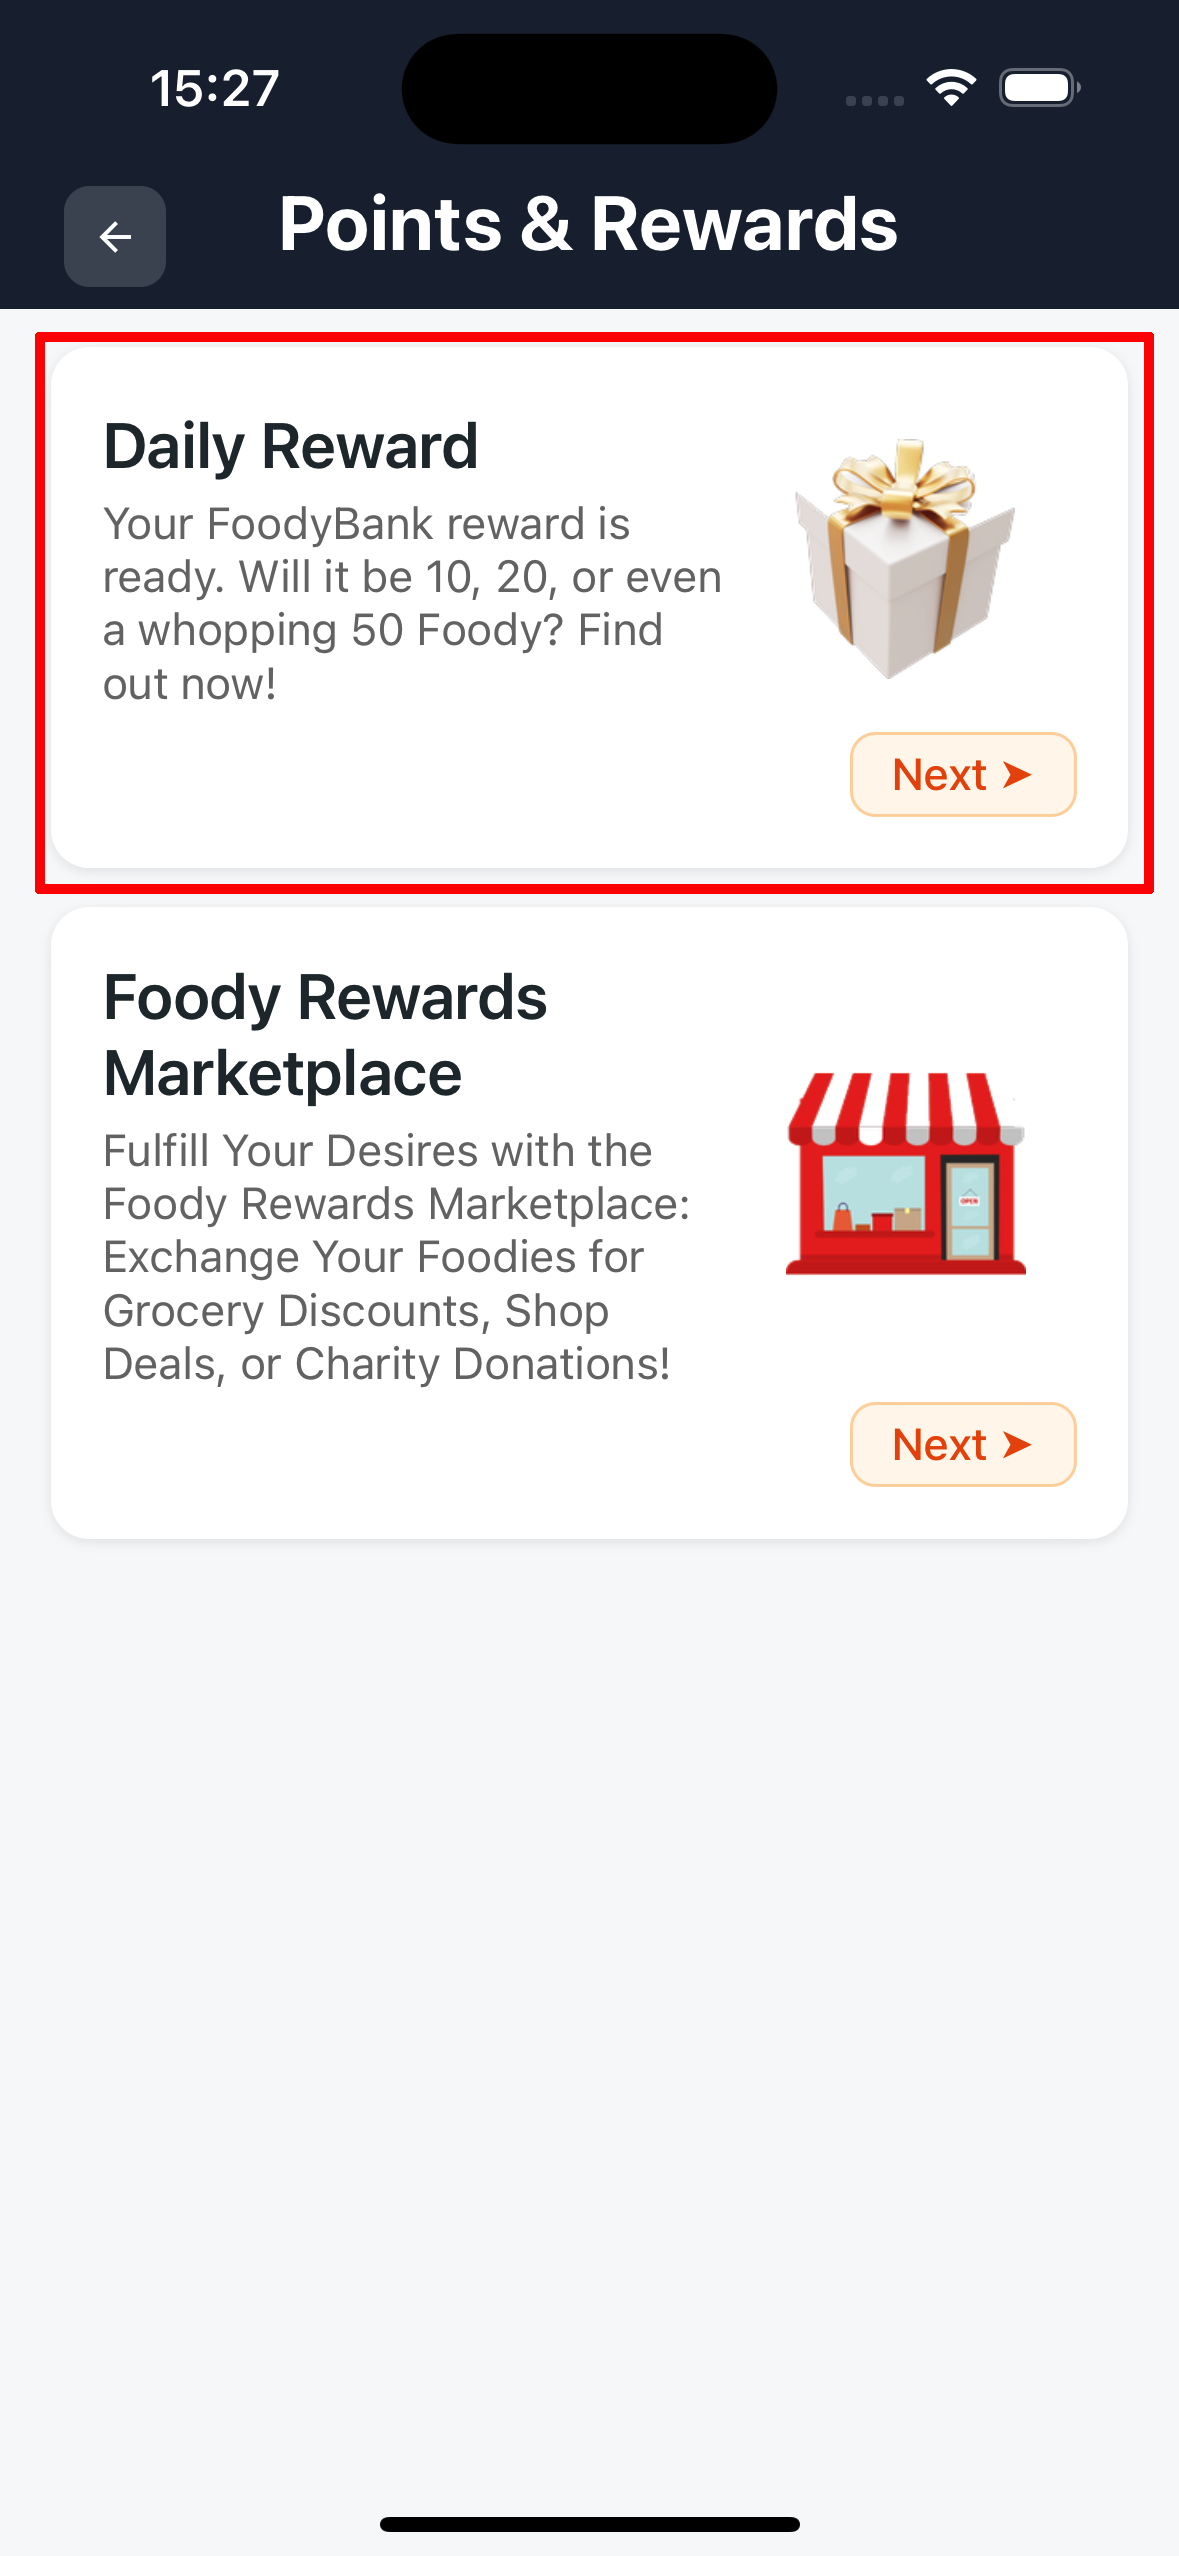
Steps:
- From Home, press on the "Points & Rewards" (or "Achievement Hub") tab at the bottom
- You see a "Daily Reward" card
- Press the "Next ➤" button on the card
- 🎉 An animation opens showing how many Foody 🌕 you won!
- Points are automatically added to your balance
- Come back tomorrow for a new reward!
If you haven't claimed today's reward yet, you might receive a push notification reminding you!
🌟 5.2 How to earn more Foody
Besides the daily reward, you can earn Foody in other ways by actively using the app!
Ways to earn Foody:
📅 Keep your kitchen updated
Add new products to your kitchen and enter expiration dates. The more active you are, the more Foody you earn!
📷 Replace generic with specific products
Transform generic products (e.g. "cookies") into specific products (e.g. "Mulino Bianco Macine") via barcode scanning (see section 2.5 point A). FoodyBank rewards you for making your inventory more accurate!
👥 Invite friends (Ambassador Program)
Invite friends to register using your referral code. You earn 100 Foody 🌕 for each friend who registers. Your friend also receives 100 Foody 🌕! See section 6 for all details.
🏪 5.3 Foody Rewards Marketplace (Coming Soon)
Soon you'll be able to use your Foody points in the Marketplace! You'll be able to exchange them for grocery discounts, store deals or charity donations.
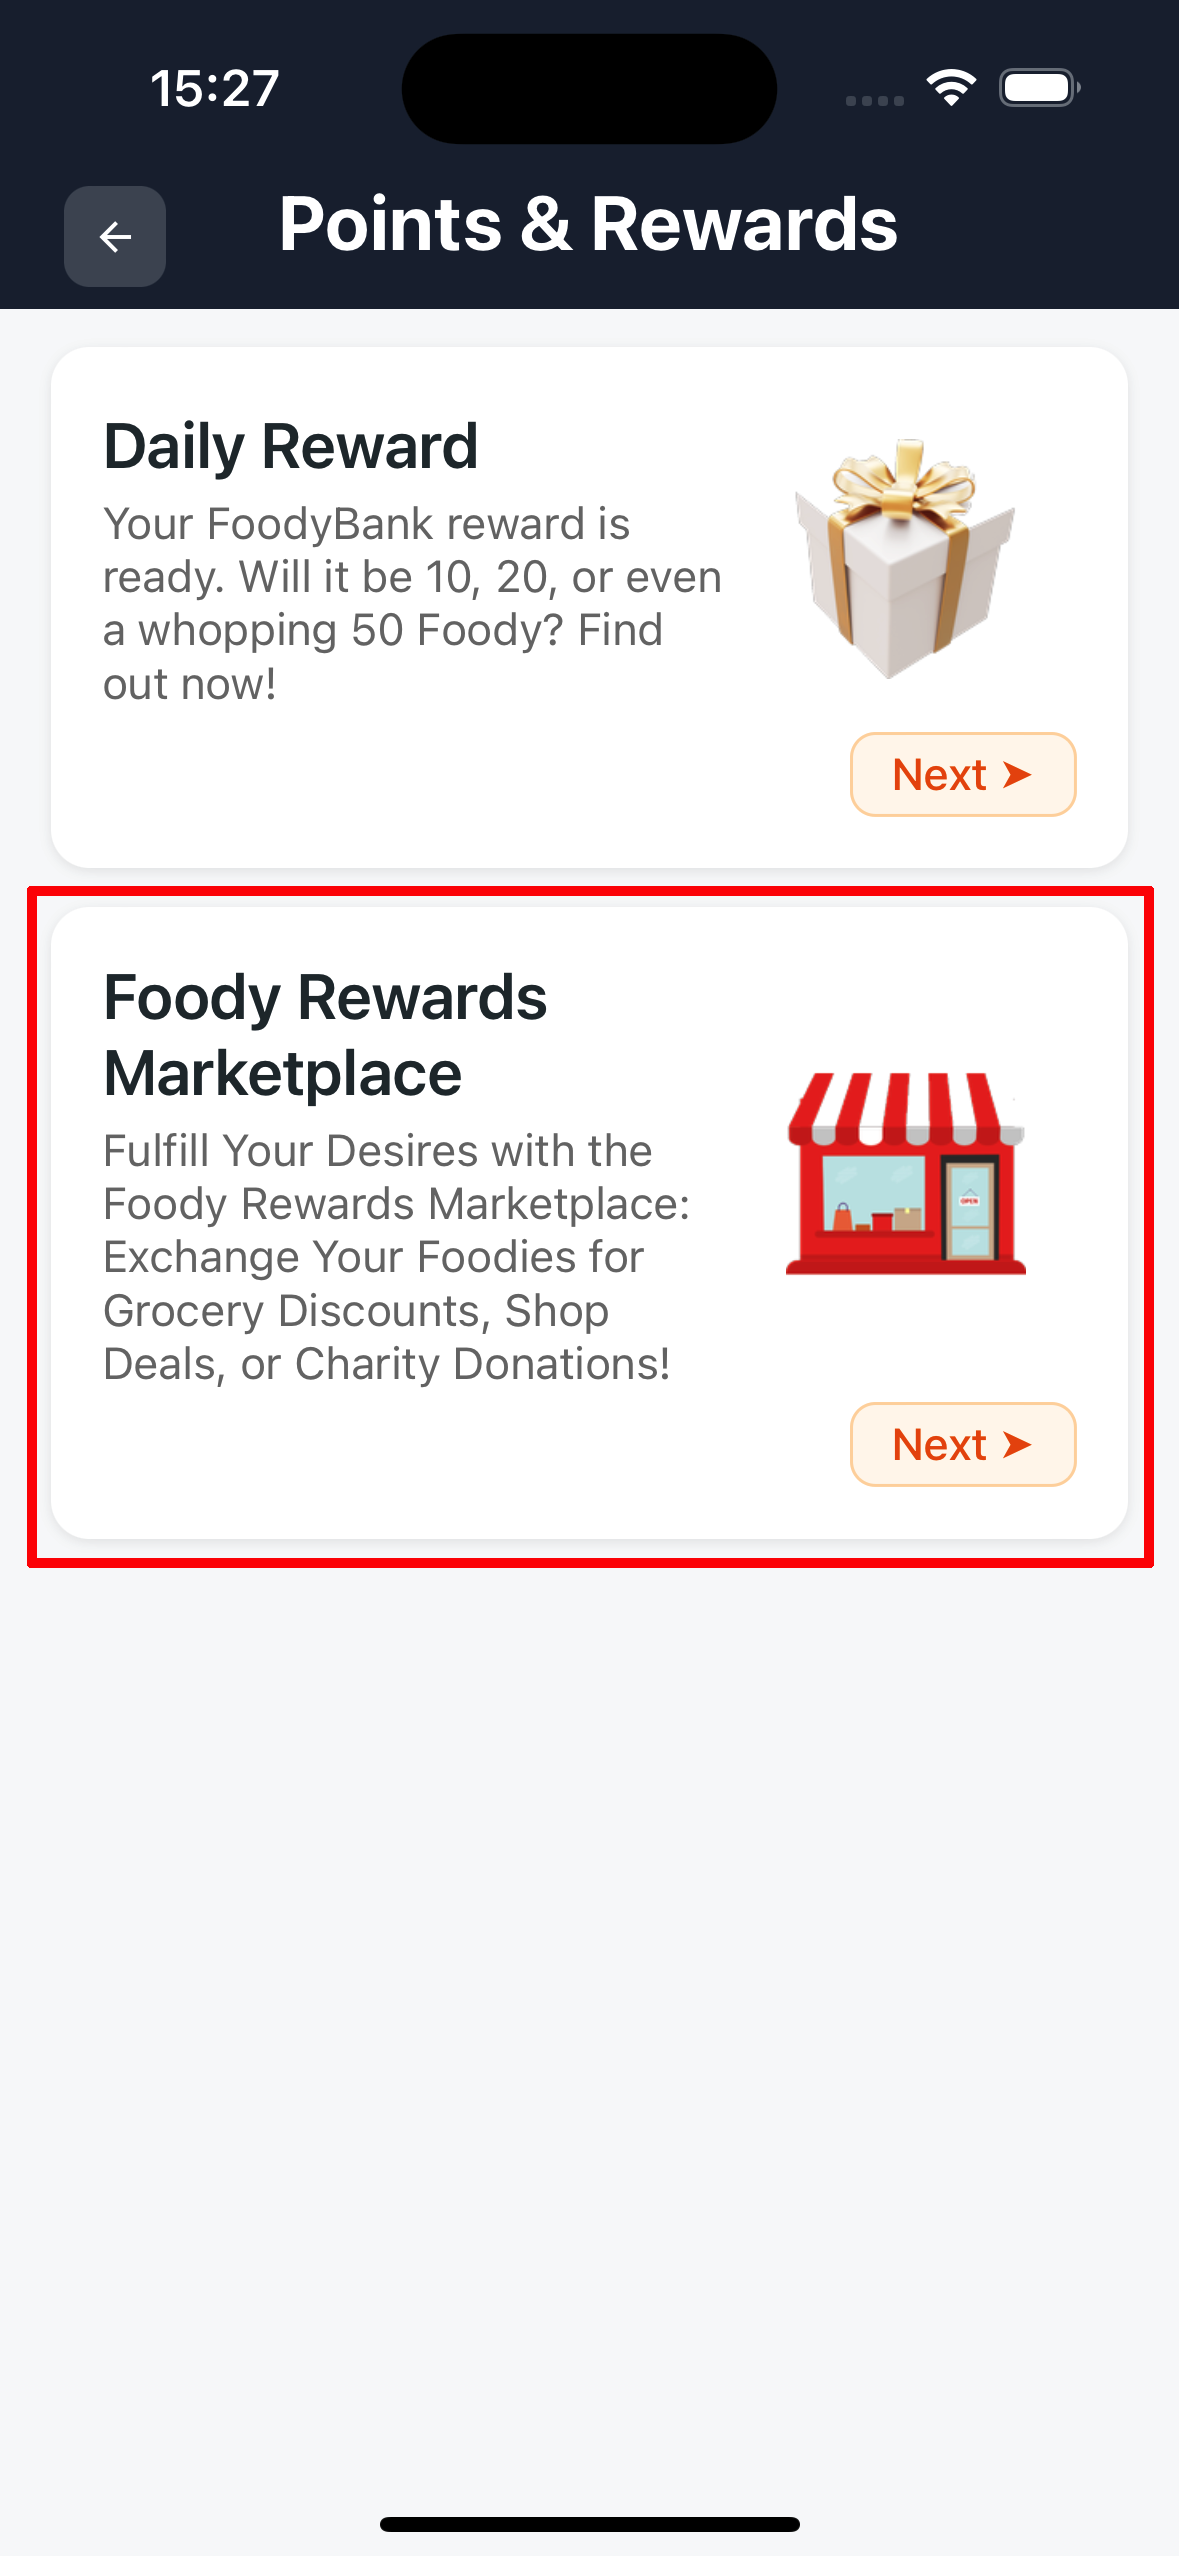
What you'll be able to do:
- 🛒 Grocery discounts - Use your Foody to save on shopping
- 🏬 Store deals - Get exclusive deals
- ❤️ Charity donations - Donate your points to important causes
Keep earning Foody to be ready!
👥 6. Ambassador Program
Become a FoodyBank Ambassador and earn extra Foody by inviting your friends! For each friend who registers you both receive 100 Foody 🌕, and you can earn even more when your friends claim daily rewards!
🎯 6.1 How the Ambassador Program works
The program has two main benefits: signup bonus and ongoing earnings from your friends' activities!
Benefits:
💰 Signup bonus
When a friend registers using your referral code, you both receive 100 Foody 🌕. During special promotions, the bonus can increase to 200 Foody 🌕!
🔄 Ongoing earnings
Every time a friend claims the daily reward, you earn half of their points! Example: your friend claims 20 Foody → you earn 10 extra Foody! Points accumulate until you claim them yourself.
📤 6.2 Invite your friends
Share your personal link with friends and family! The more people you invite, the more Foody you earn!
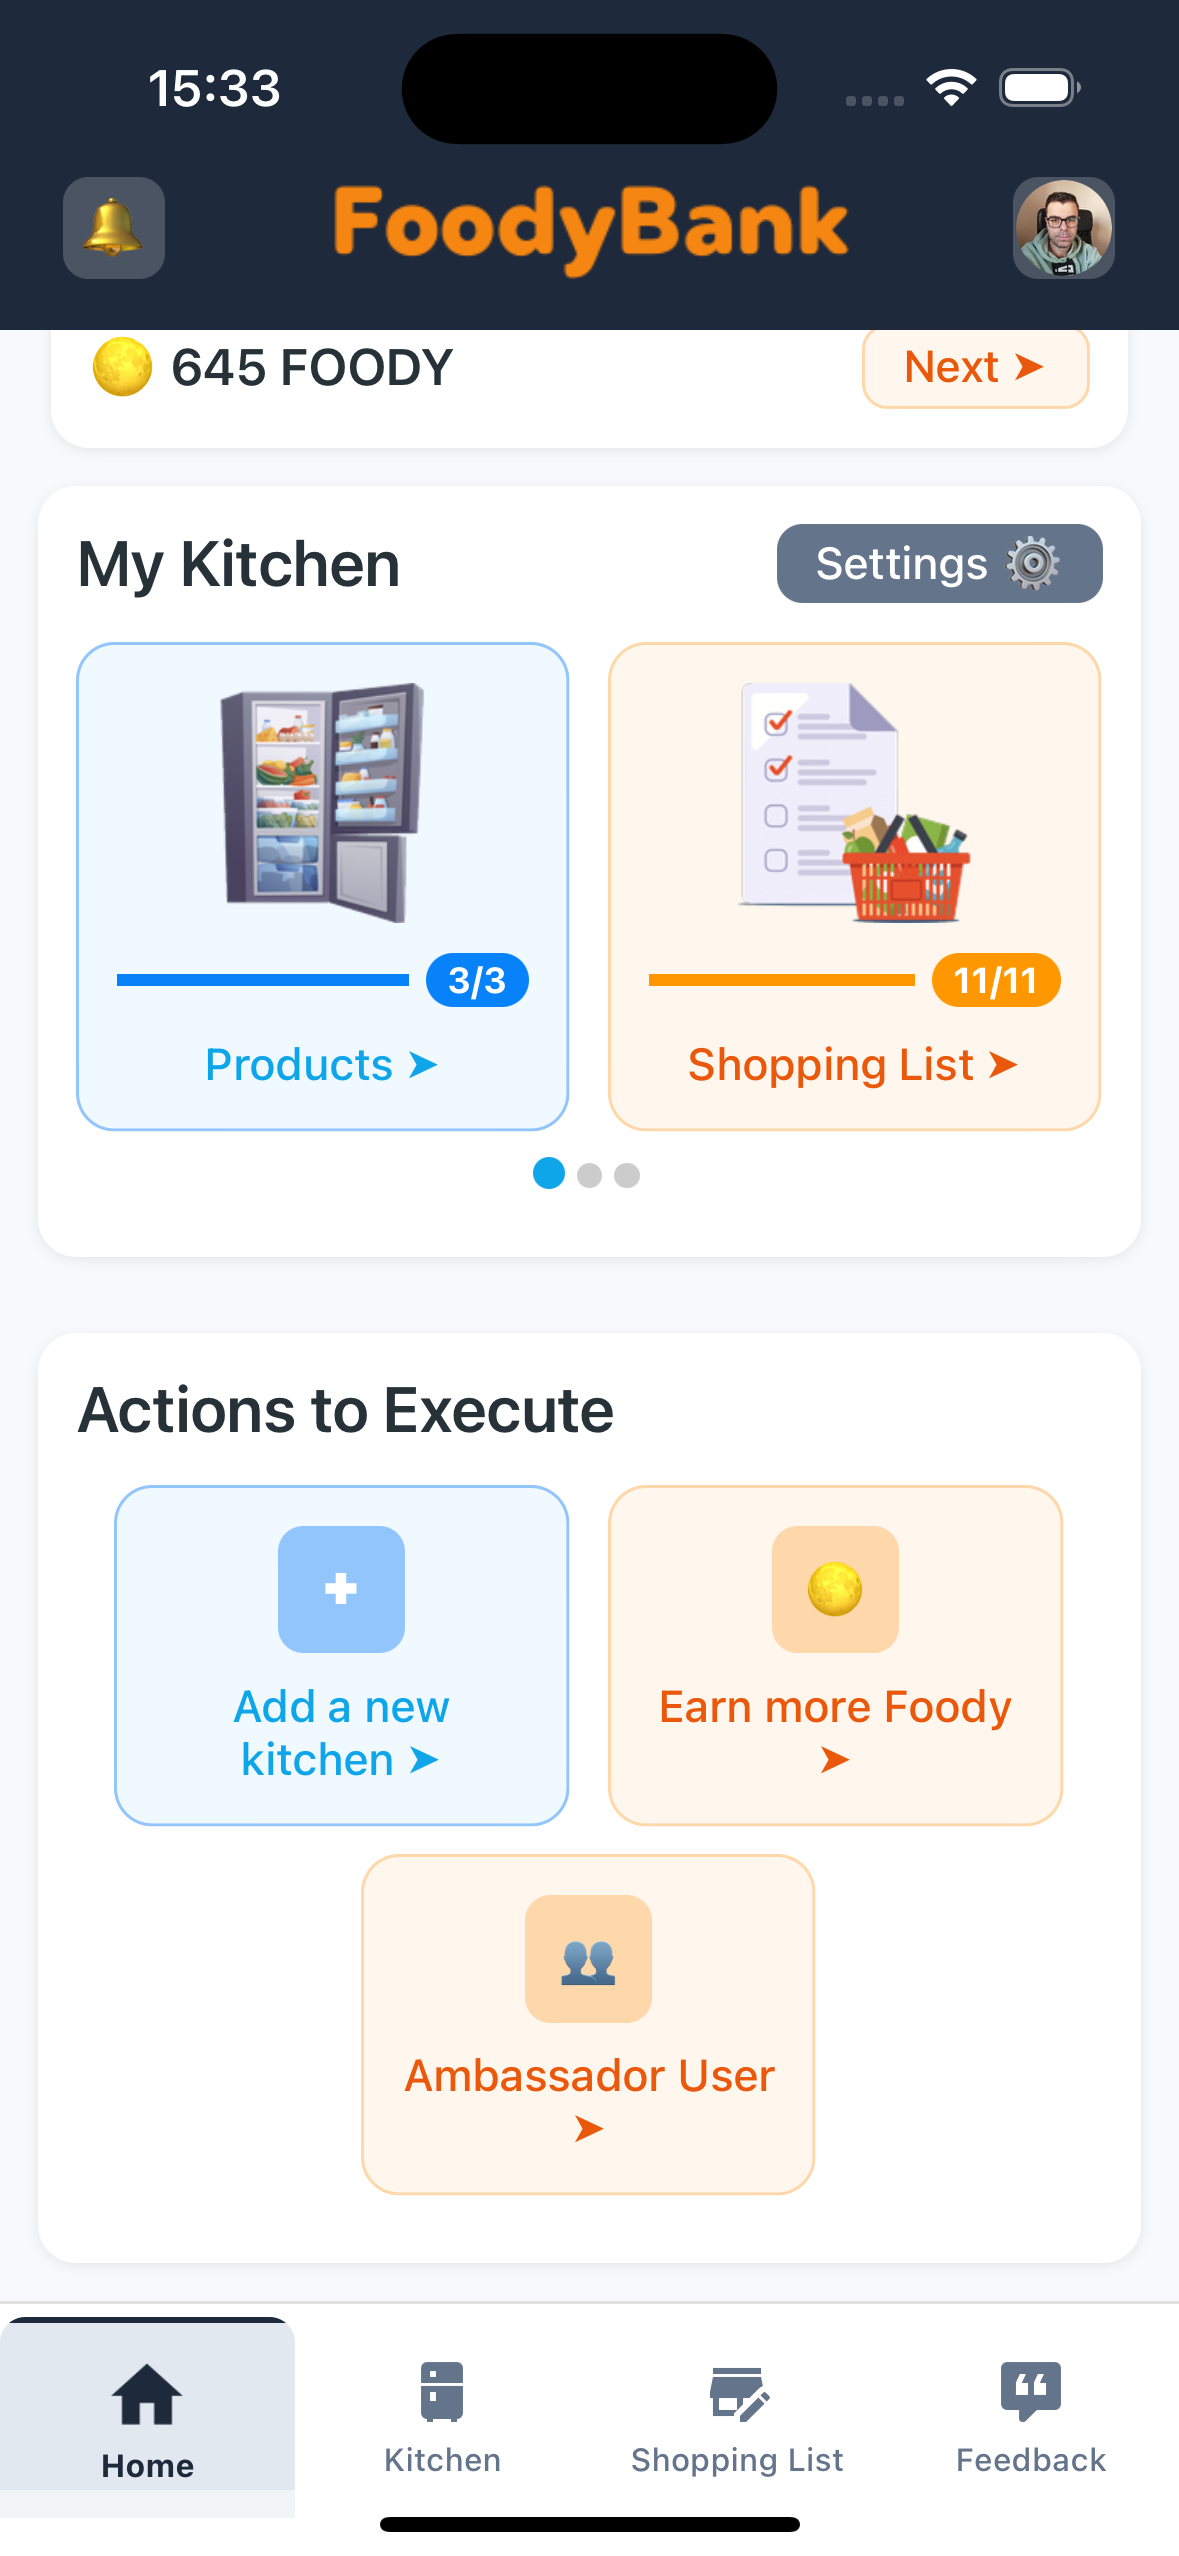
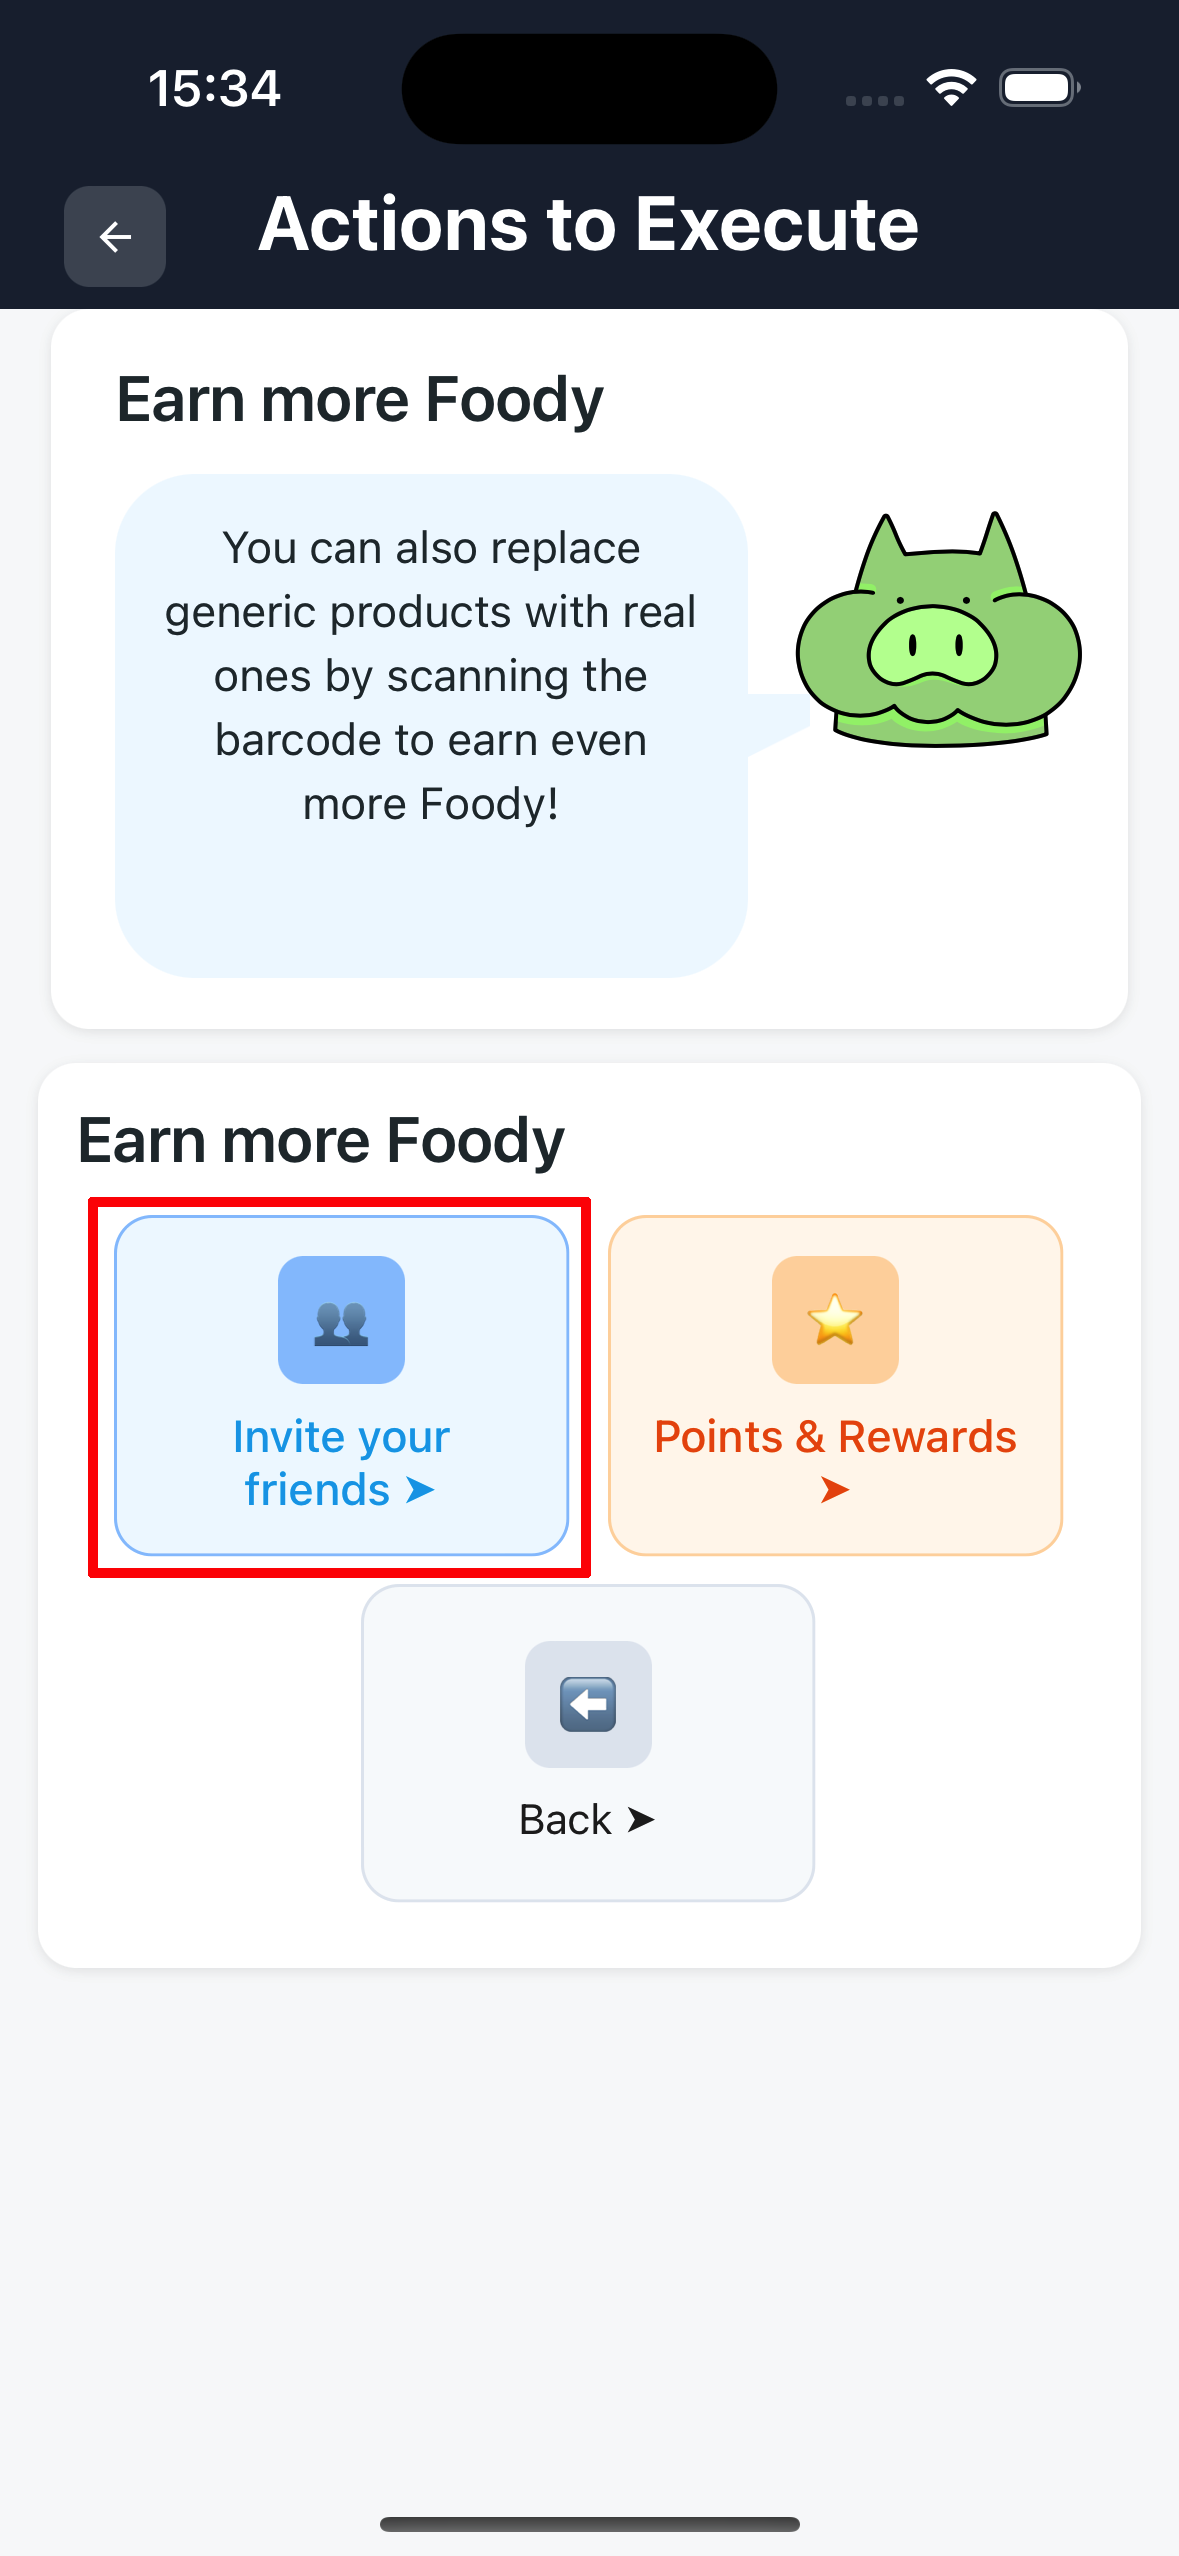
Steps to invite friends:
- From Home, click on "Earn more Foody"
- Then click on "Invite your friends"
- The sharing menu opens with your personal link
- Share via WhatsApp, SMS, email or social
- When a friend registers through your link, you both immediately receive the Foody!
If someone has already registered through your referral link, you'll also see "Ambassador User" on the Home screen, where you can manage your affiliates and view statistics.
👥 6.3 Manage your affiliates
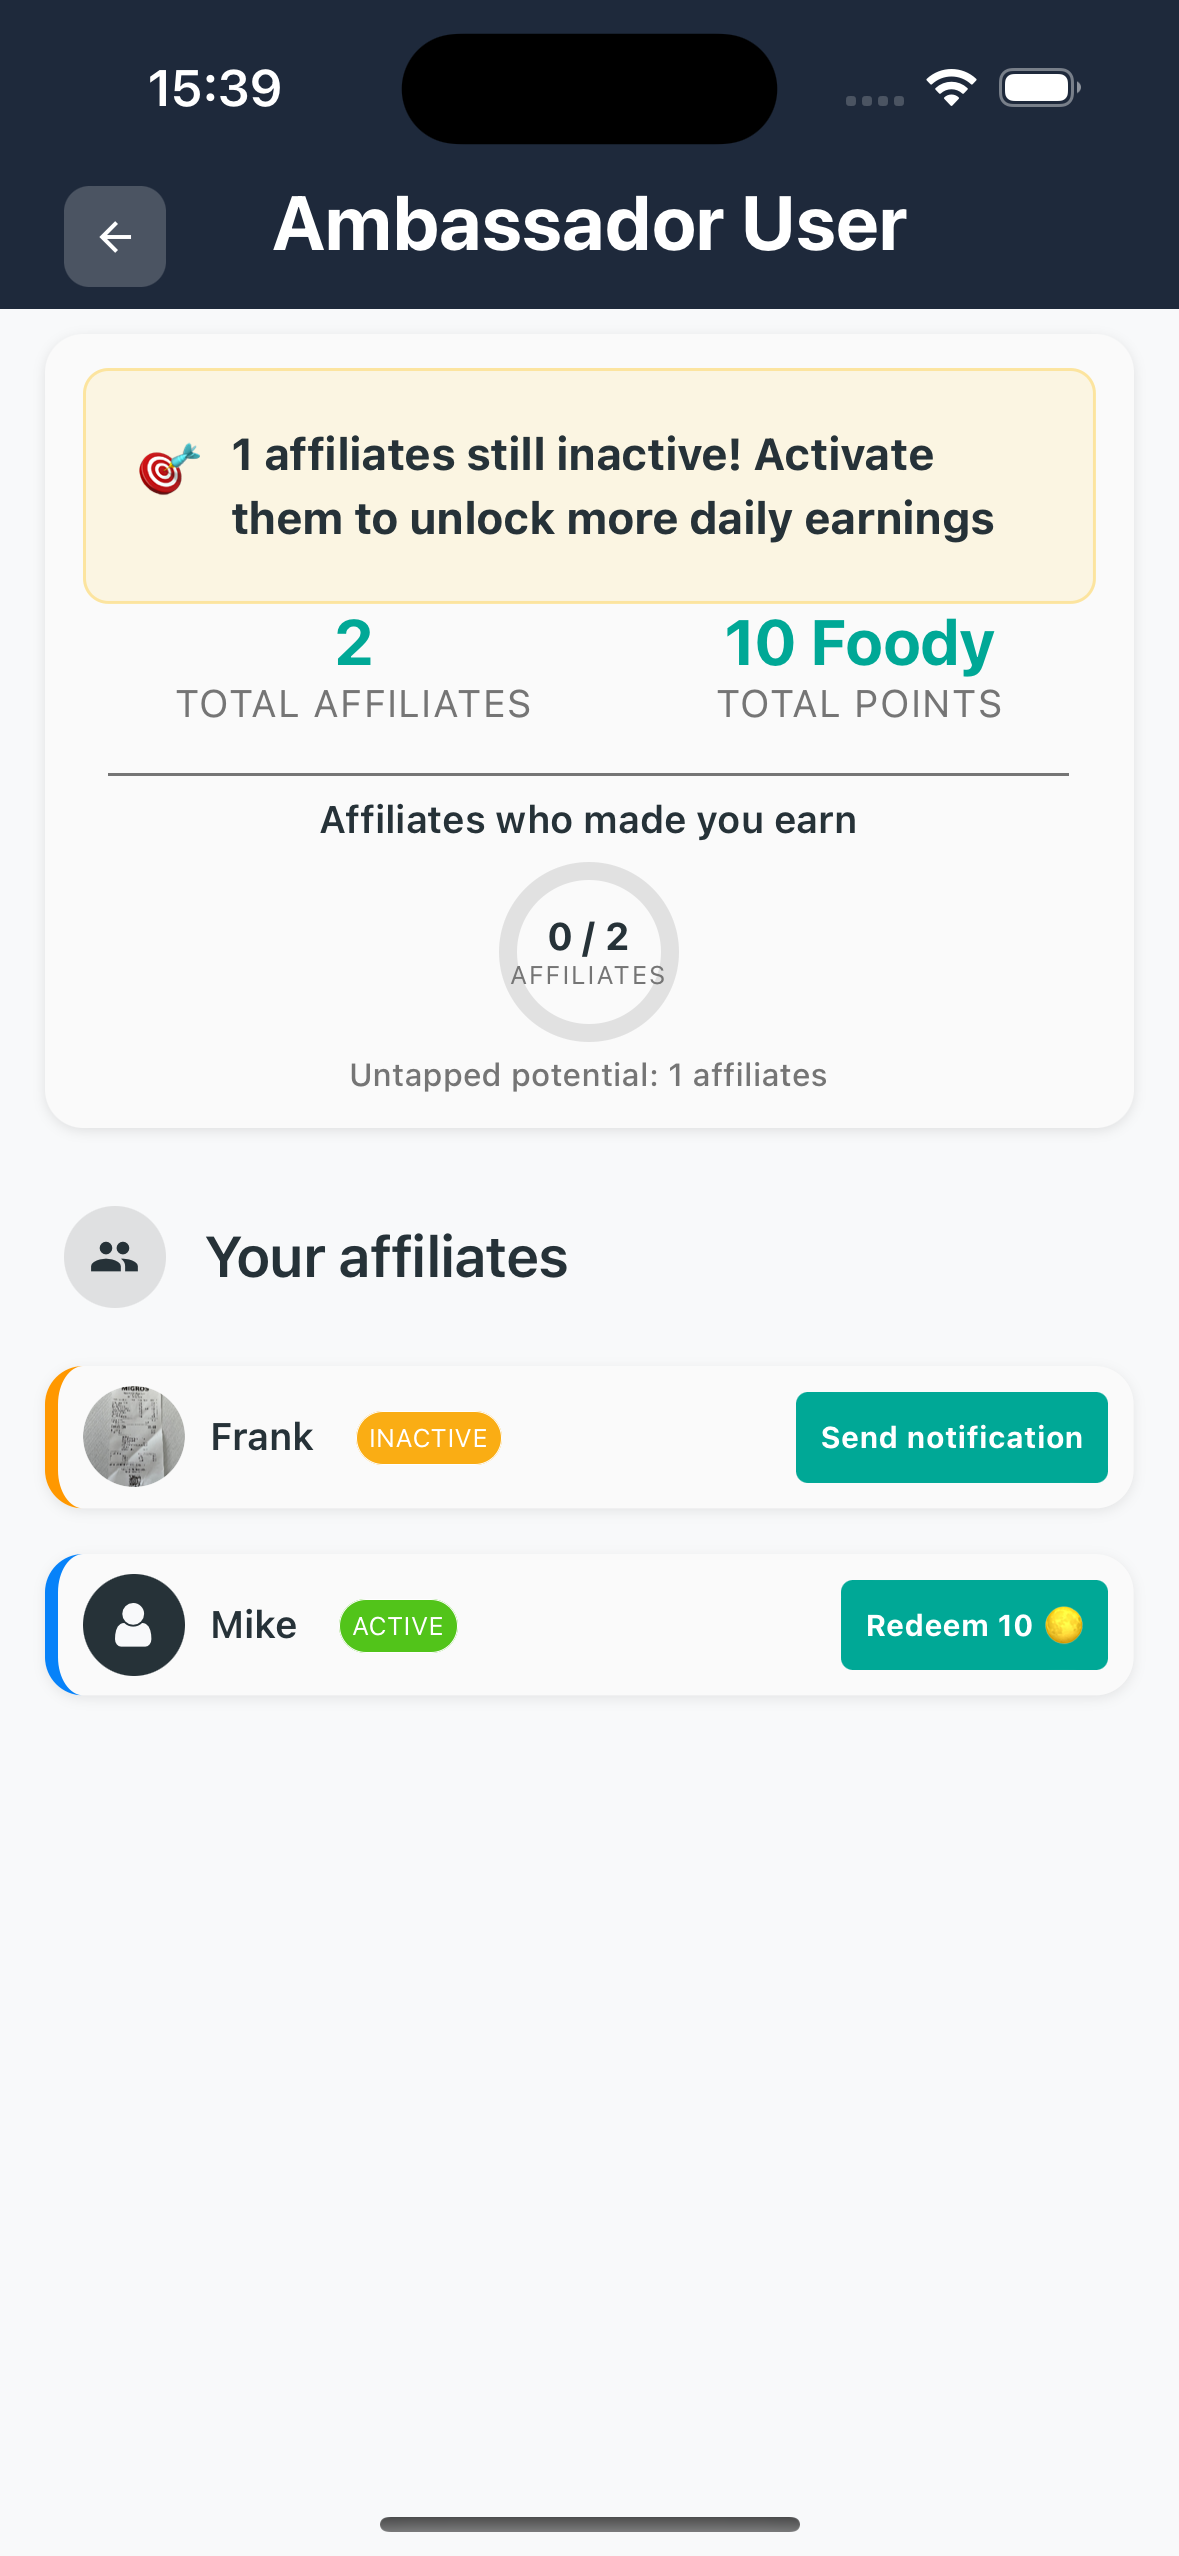
In the Ambassador screen you can see all your invited friends, how many points you've earned and which friends haven't claimed the daily reward yet!
What you'll see:
A) Statistics at the top
- Total affiliates - How many friends registered with your code
- Total points - How many Foody you've earned in total from affiliates
- Active affiliates today - How many friends have already claimed reward today
B) Affiliate list
Each affiliate has a card with:
- Name (or nickname)
- Available points - How many Foody you can claim from this friend
- Status - Have they already claimed today? Are they inactive?
C) Available actions
- 🔔 Notify - Send a push notification to friend to remind them to claim reward
- 💰 Claim - Take the points you earned from this friend (appears only when available)
💸 6.4 Claim your points
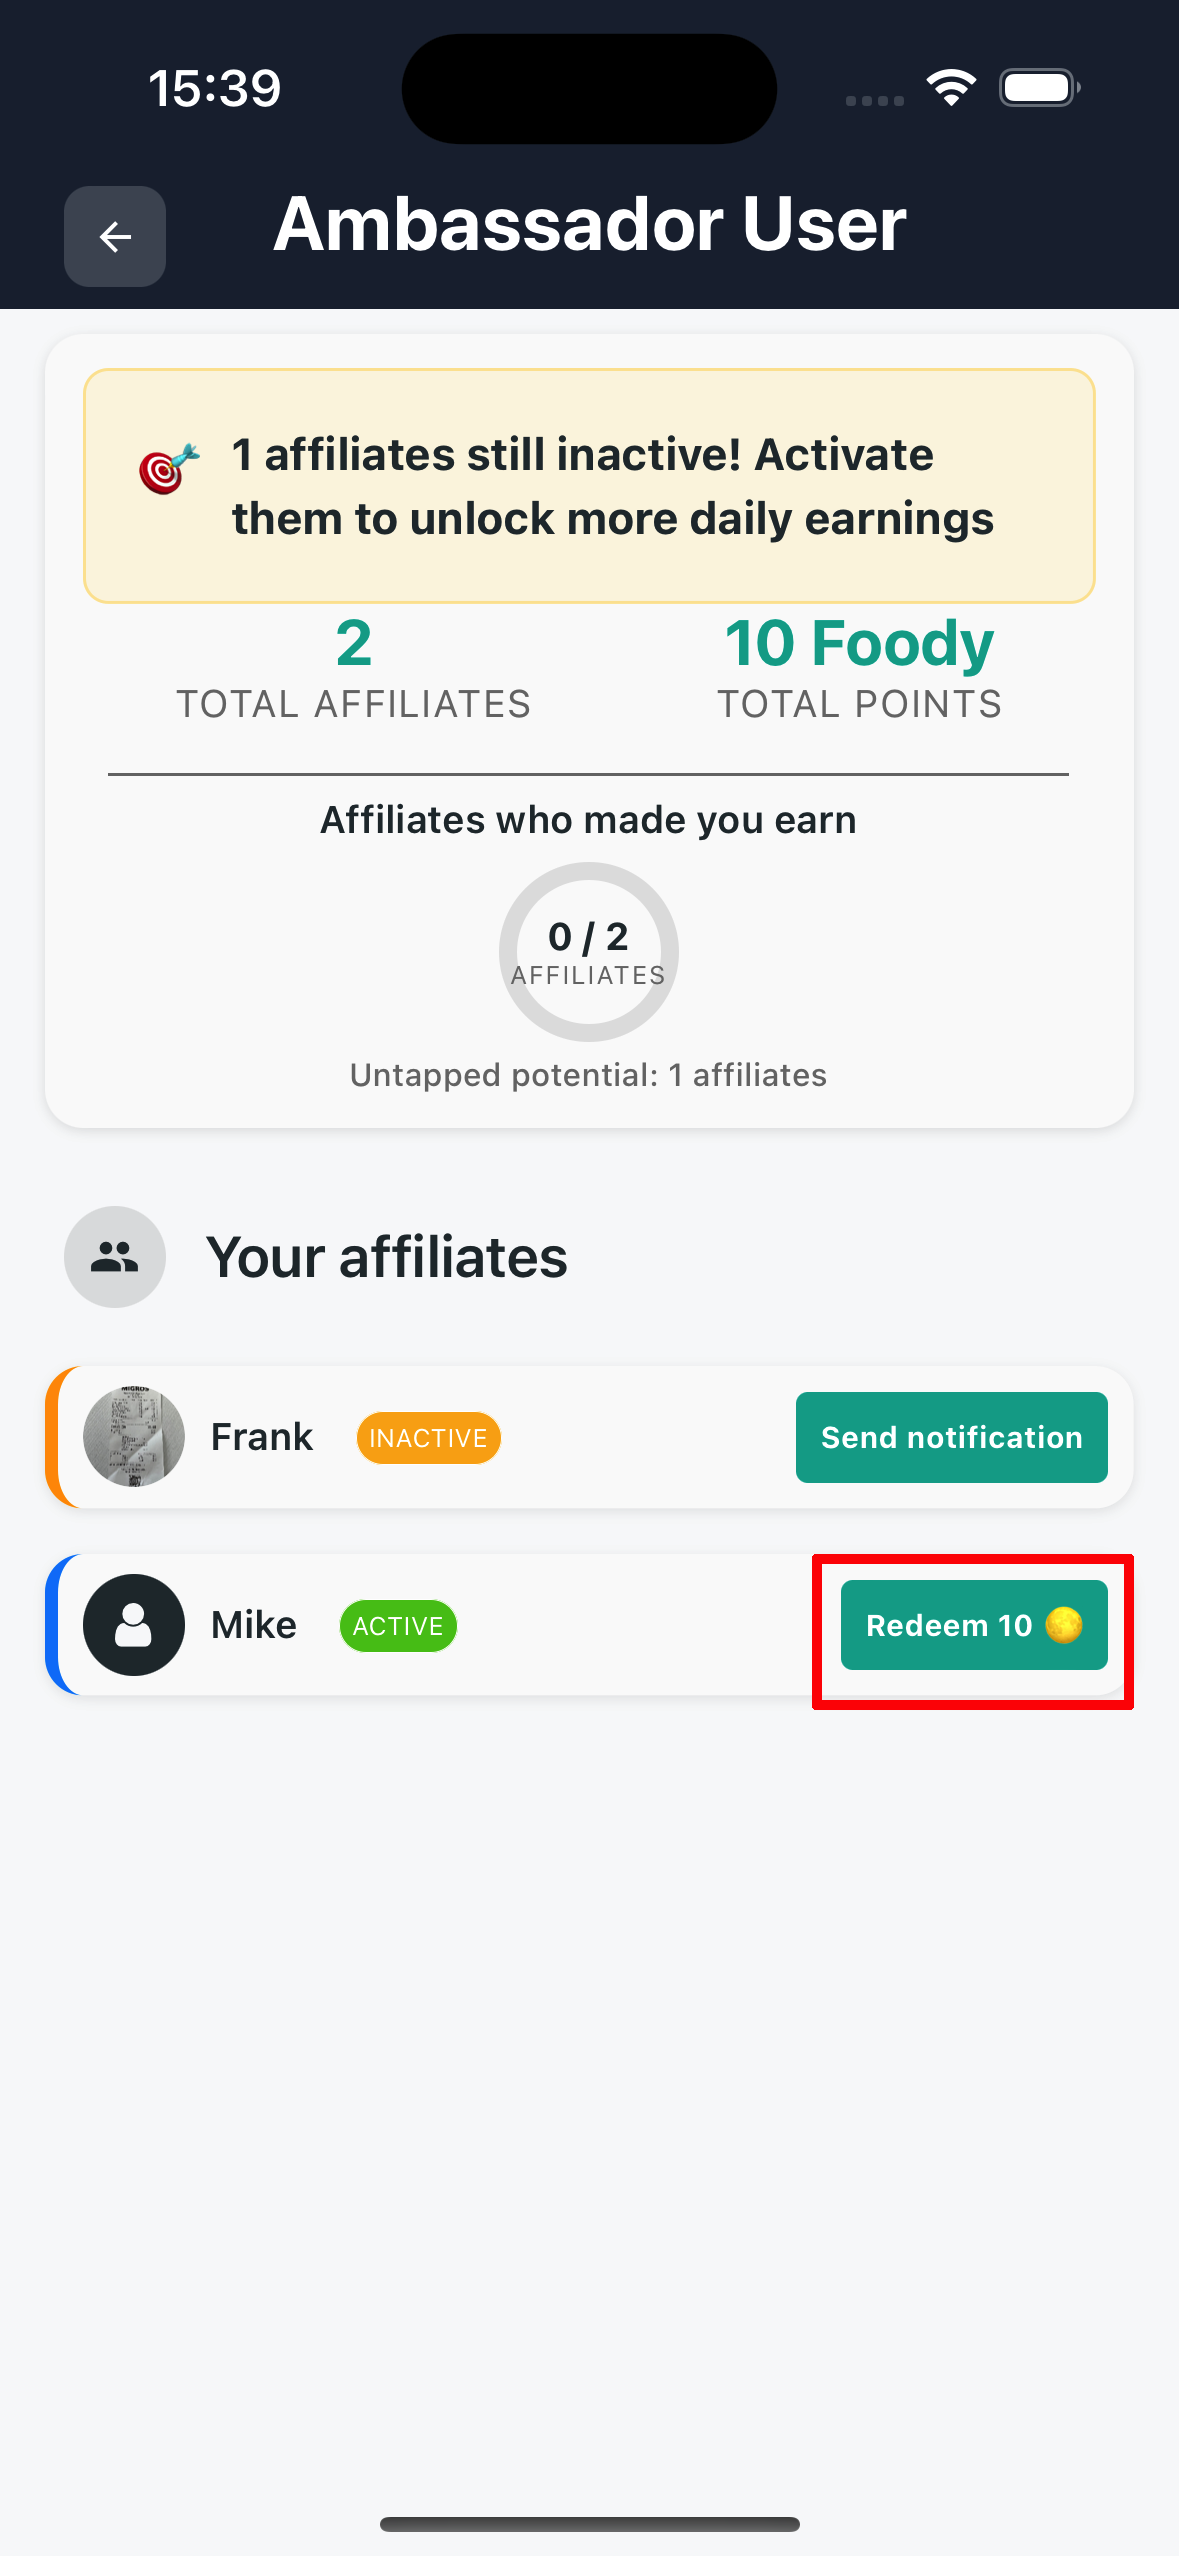
When an affiliate claims the daily reward, you earn half of their points. But you must actively claim them by pressing the button!
Steps:
- Go to the Ambassador screen
- See your affiliate list
- If a friend has claimed reward today, the "Claim X Foody" button appears on their card
- Press the button
- 🎉 An animation opens showing the Foody you earned!
- Points are added to your balance
If some friends are inactive, use the 🔔 Notify button to remind them to claim the daily reward!